Has anyone of you ever had a computer stalling or freezing due to 99% CPU usage? It could be because a specific application consumes a large portion of the processing power in the background.
Following recent updates, many users blame the System Idle Process as the root cause of this issue. When no other tasks are running, the System Idle Process runs on your CPU thread.
It usually has a lower priority and should use far less of your system’s CPU power. However, it is operating improperly due to several issues. Try these fixes on your PC, and the case should be resolved in no time.
However, before proceeding to the main remedies, we recommend you try these workarounds first to test out some smaller solutions to your problem. System Idle Process High CPU: Is It a Problem? Many people have this question, too, so we will also answer this question and will tell you all the fixes. Let us begin.
If you’ve ever looked in Task Manager—Windows 10 users must go under the “Details” tab, you’ll notice that the System Idle Process consumes most of your CPU, if not all.
On the other hand, the System Idle Process is simply an idle process created by the operating system. Your system may freeze if this process is not constantly occupying your processor with something to do.
In other words, the CPU resources used by the System Idle Process are just idle CPU resources. If programs consume 5% of your CPU, the System Idle Process consumes 95% of your CPU.
Consider it to be a basic placeholder. As a result, the Task Manager refers to this as the “percentage of time the processor is idle.” It has a process identifier (PID) of 0.
To keep things simple, Windows hides the System Idle Process information from the standard Processes page in Windows 10’s Task Manager, but it is still visible on the Details tab.

Why Does the System Idle Process Use So Much CPU Power?
A system process in the background is called a system idle process. Don’t panic if you notice that the System Idle Process uses a lot of CPU power because it only uses the CPU power that is not being utilized.
Otherwise, the System Idle Process will consume 94% of the CPU if other programs on your computer use 6% of the CPU.
The term “System Idle Process CPU usage” refers to the percentage of available CPU. When Windows is running, this procedure keeps the computer CPU busy with something in the background, which keeps your computer from freezing.
Thus, you are not recommended to turn or terminate the System Idle Process. Your PC is not sluggish because of the System Idle Process.
Other issues like running out of RAM or other programs using up all of your computer’s resources could be the culprit. A Windows PC can be sped up by attempting several solutions.
What are the possible causes of computer slowness caused by the System’s Idle Process
- System infected with a virus or malware
- The hard drive is full and unoptimized (no defragmentation).
- Unwanted programs or toolbars placed on the system. Too many background startup programs running
- There is more than one anti-virus program installed.
- Driver for a device that is corrupted or malfunctioning
How to Look at Windows 10 and 11’s System Idle Process
Step 1: To launch the Task Manager, hit CTRL-SHIFT-ESC.
Step 2: Go to the Details tab.
Step 3: When your PC isn’t working exceptionally well, then sort it by CPU
Step 4: The first display should be the System Idle Process.
How to look at Windows 7 and Windows 8’s System Idle processes
Step 1: To launch the task manager, hit CTRL-SHIFT-ESC.
Step 2: Check the box labelled “Show processes from all users.”
Step 3: To order the list, select the CPU header.
Step 4: The System Idle Process should appear at the top when your system is not overly busy.
What if your computer is running slowly?
If you are experiencing this issue for the first time, then you can try these essential solutions –
Fix 1: If this is the first time this problem has occurred on your computer, a simple reboot may resolve the issue.
Fix 2: Determine whether or not your Windows is up to date. If this problem is caused by a bug or corrupted system files, Windows Update will provide a bug repair for your machine. Check to see if the issue has been resolved after updating Windows.
If none of these workarounds worked for you, try these fixes and still, your computer is running slowly; there could be an issue. You can resolve it using the solutions below.
Solution 1: Restart your computer
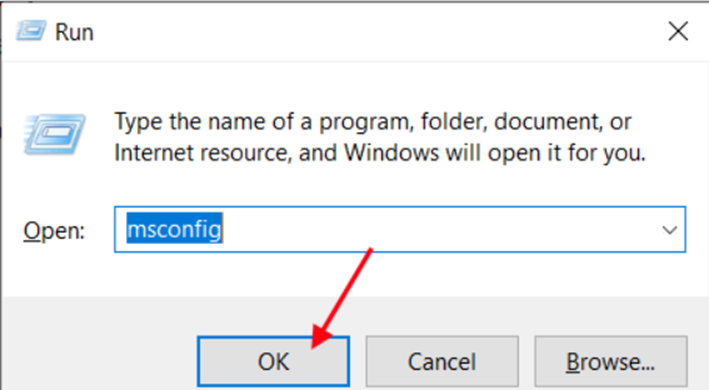
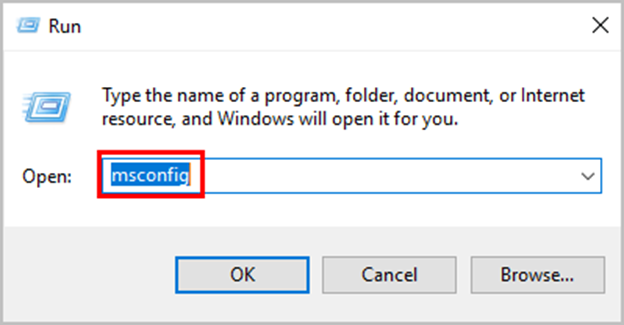
Step 1: Launch Run by pressing Windows Key+R. Now, type “msconfig” and press the “OK” button. The System Configuration window will appear.
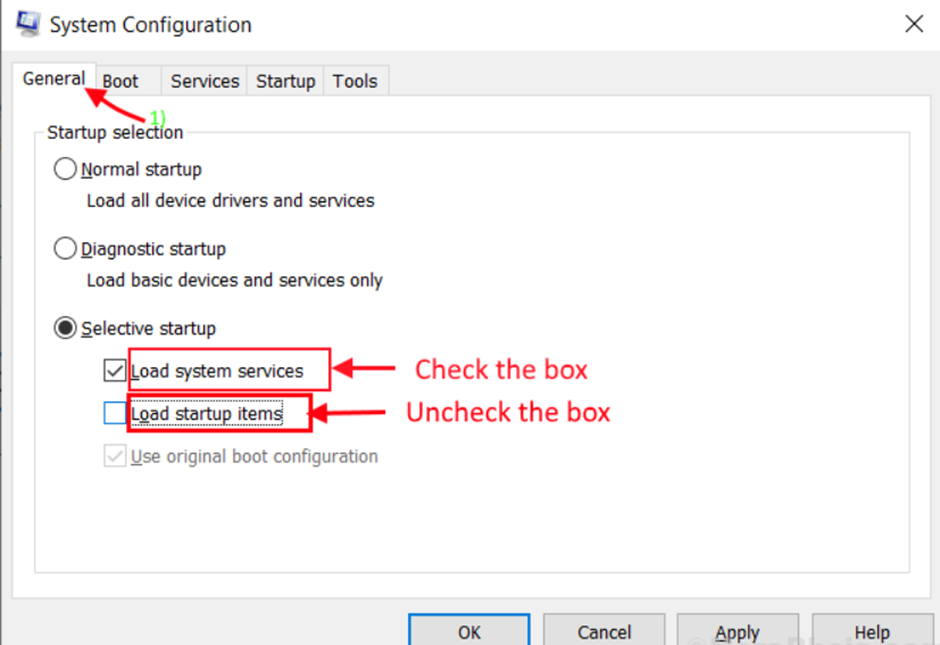
Step 2: In the System Configuration window, go to the “General” tab and uncheck the box next to “Load startup items.” Then, ensure that the “Load system services” option is selected.
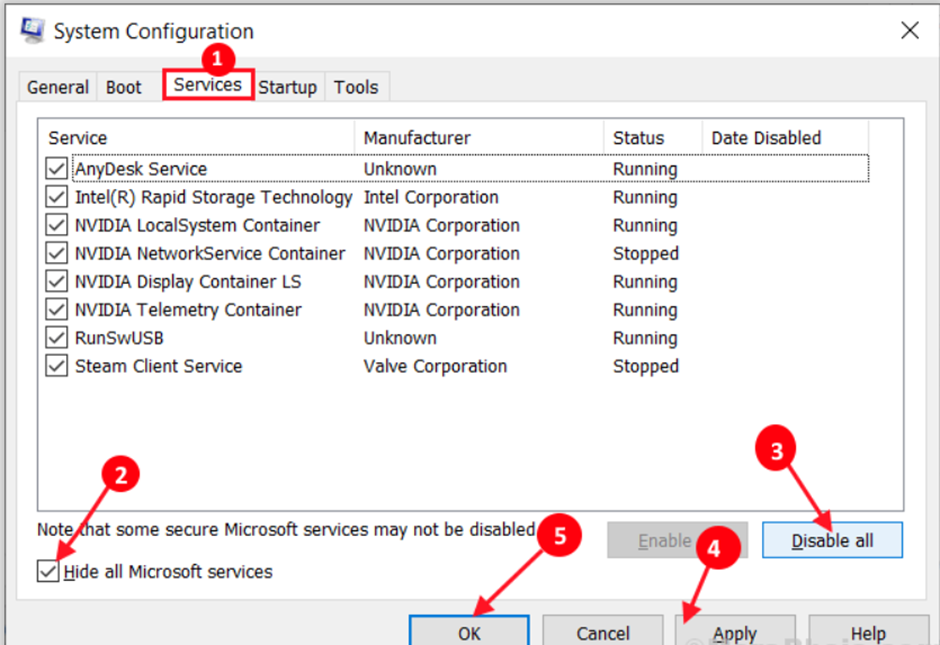
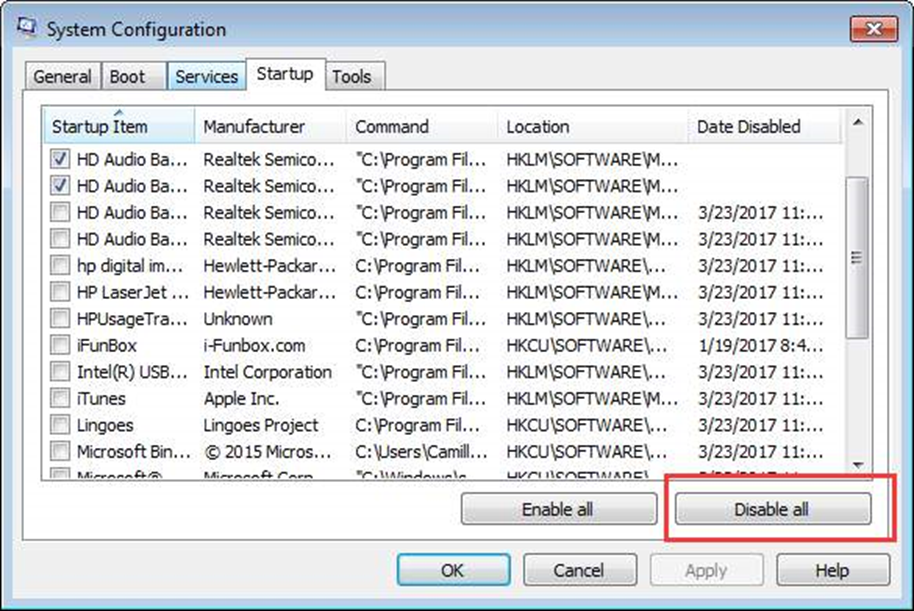
Step 3: Now, select the “Services” tab. After that, tick the “Hide all Microsoft services” box and click the “Disable all” button on the System Configuration window. Now, press the “Apply” and “OK” buttons to save the modifications to your computer.
Step 4: Restart your computer.
After a clean boot, your computer will boot with only the drivers required for your device. So, after rebooting, see if the System Idle Process still has a high CPU utilization.
Solution 2: Run the.bat file
Step 1: Start Notepad
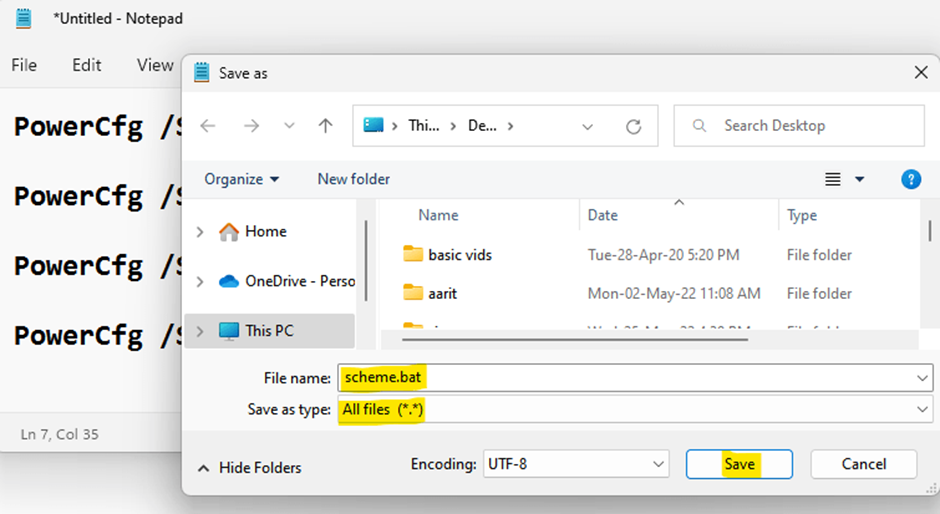
Step 2: In Notepad, copy and paste the code below.
PowerCfg /SETACVALUEINDEX SCHEME_CURRENT SUB_PROCESSOR IDLEDISABLE 000
PowerCfg /SETACTIVE SCHEME_CURRENT
PowerCfg /SETDCVALUEINDEX SCHEME_CURRENT SUB_PROCESSOR IDLEDISABLE 000
PowerCfg /SETACTIVE SCHEME_CURRENT
Step 3: Save this file as scheme now.bat
Step 4: Select All files in Save as type
Step 5: Click the Save button.
Step 6: Right-click on the scheme and select Properties. Run the bat file as administrator.
Solution 3: At startup, disable some processes.
If your computer is running Windows 10, you can disable the processes during startup by following the steps below:
Step 1: To open the run box, click Win+R (the Windows logo and R keys simultaneously) on your keyboard.
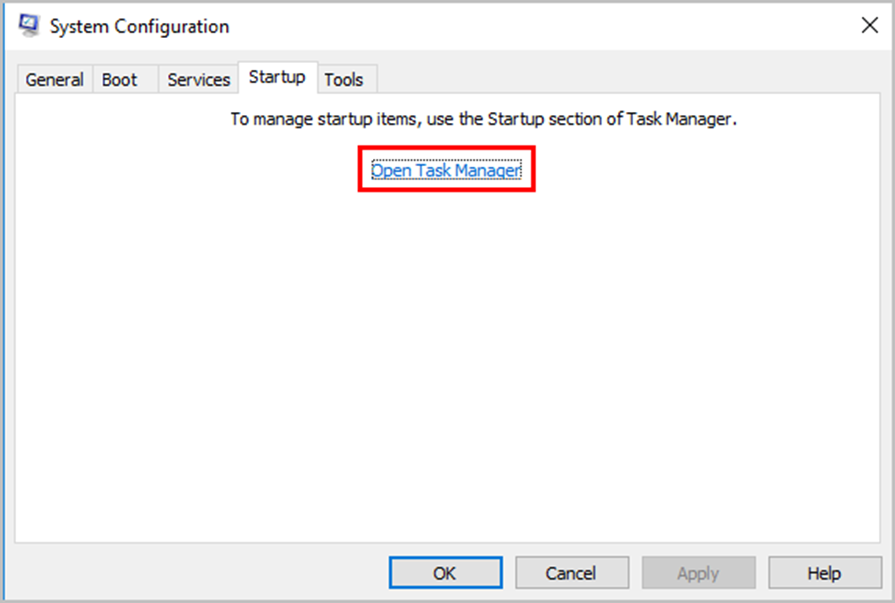
Step 2: In the run box, type msconfig and press the OK button.
Step 3: Click on the Open Task Manager.
Step 4: Click the Disable button next to an item you don’t need to launch upon startup.
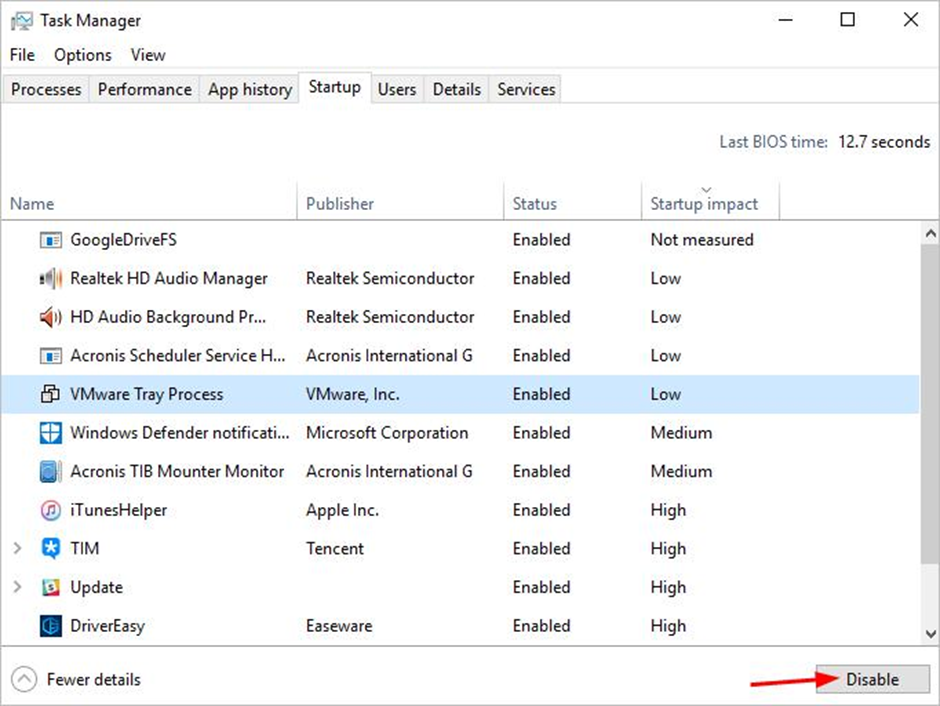
Step 5: To disable any item you don’t need to open upon startup, repeat Step 4.
Step 6: Verify whether your PC is still operating slowly.
If you have Windows 7, you can disable the processes at startup by following the procedures below:
Step 1: To open the Run box, press Win+R (the Windows logo and R keys simultaneously) on your keyboard.
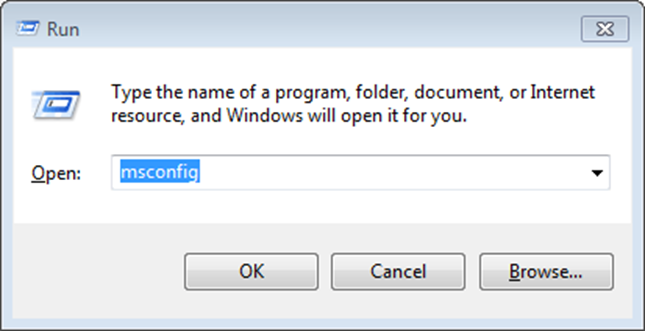
Step 2: In the run box, type msconfig and press the OK button.
Step 3: Click the Startup tab, choose the items you don’t want to open at startup, and then click the Disable All button.
Step 4: Click on the OK button.
Step 5: Restart your computer for the modifications to take effect.
Solution 4: Cleaning the disk with Disk Cleanup
Disk Cleanup will remove temporary and corrupted data from your system. This could be the solution to your problem-
Step 1: Launch Run by pressing Windows+R. Now, type “cleanmgr /lowdisk” into the Run box and press Enter. The Disk Cleanup window will appear.

Step 2: In the Disk Cleanup: disk Selection window, select the disk where you installed Windows from the “Drives:” drop-down menu.

Step 3: Check all options in the “Files to delete:” section. Then, click “OK” to begin the PC cleanup process.
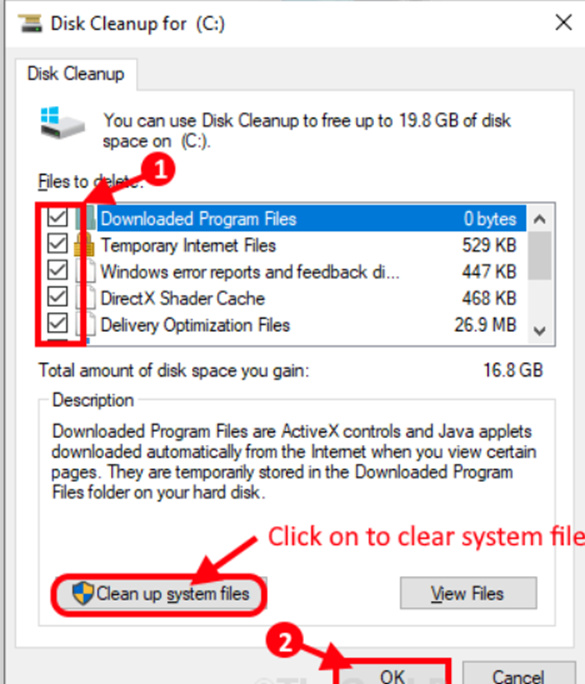
The Disk Cleanup operation will take a few minutes to remove the useless files from your system.
Restart your computer after the cleanup process is finished. Check to see if the System Idle Process still takes significant processing power after rebooting.
Solution 5: Disk Fragmentation
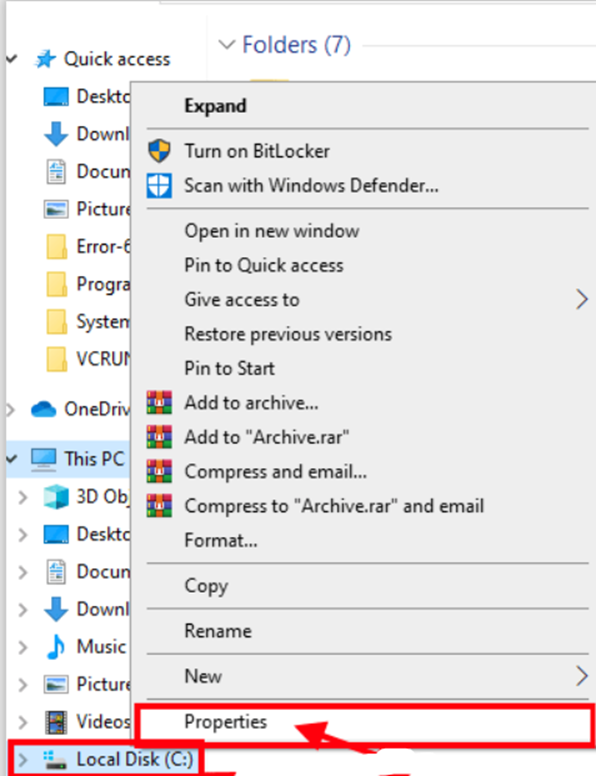
Step 1: Open the File Explorer window by pressing Windows key+E. You should now see a list of drives on your computer in the left pane. Click “Properties” after right-clicking on the drive where Windows 10 is installed.
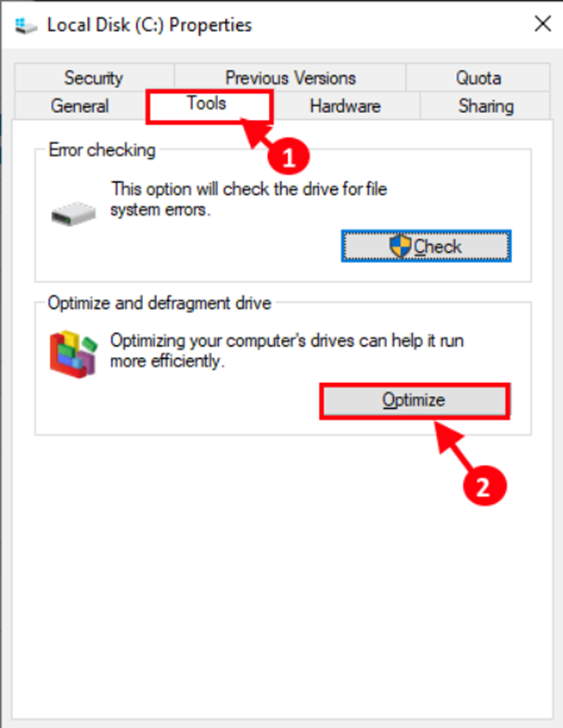
Step 2: In the Local disk C: Properties box, go to the “Tools” tab and click on “Optimise” in the ‘Optimise and defragment drive’ option to optimize the drive.
Step 3: Select the drive where Windows is installed in the Optimize Drive window, then click “Analyse” to analyse the drive. Click “Optimize” on your computer’s HDD.
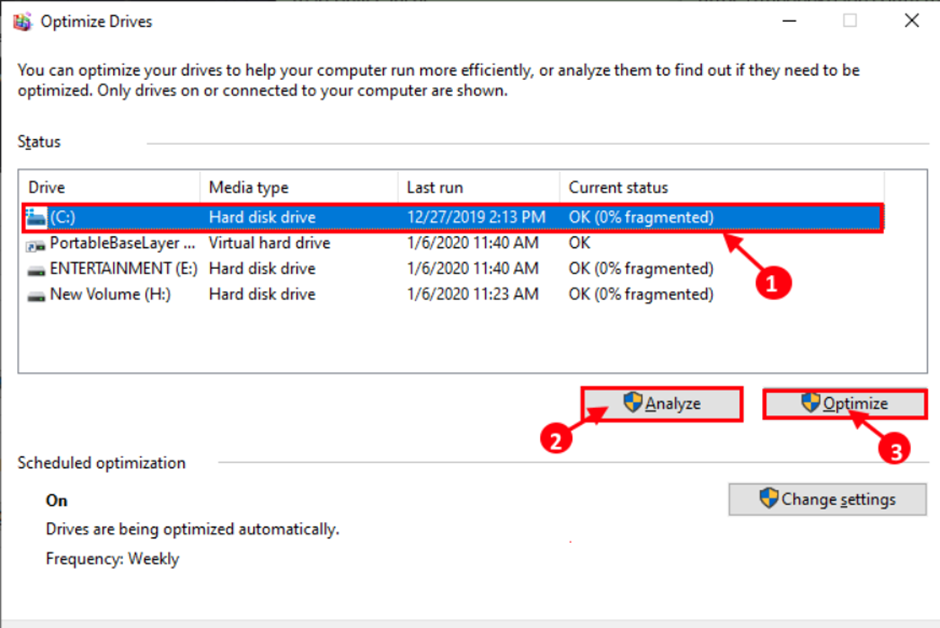
Step 4: Close the Optimize Drives window on your computer after defragmenting the drive.
Note: Defragmentation may take some time, depending on the size of the disk.
To save the changes, restart your computer. After restarting your computer, check if the System Idle Process still uses much CPU power.
Solution 6: Find out the driver that may be causing the issue.
A specific driver or a hardware malfunction could be to blame for the issue. So you can determine the driver or hardware.
RATT can generate a log file to identify the problematic driver. Microsoft’s RATT is an event tracing tool designed for developers. If you need help utilising it, look it up on the internet.
After determining which driver is at blame, disable it. To disable the driver, follow the procedures below.
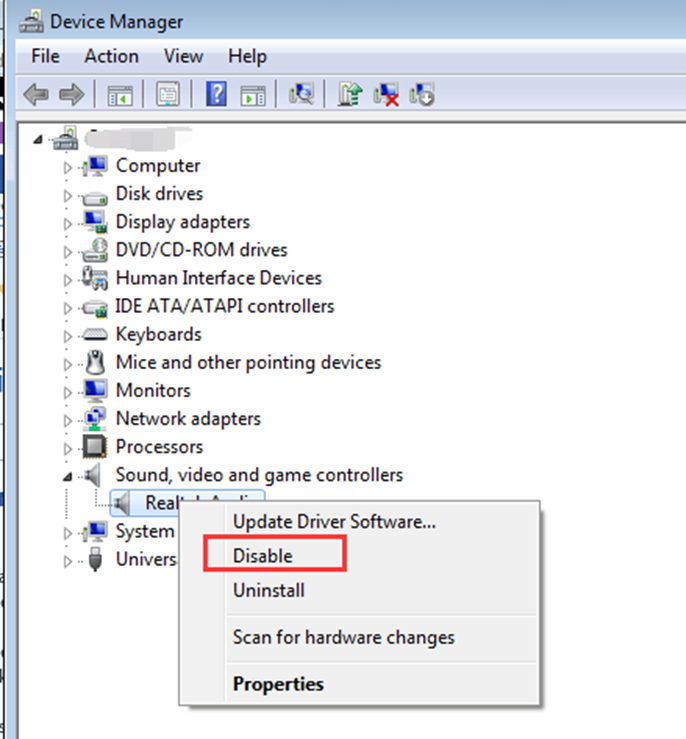
Step 1: Launch Device Manager.
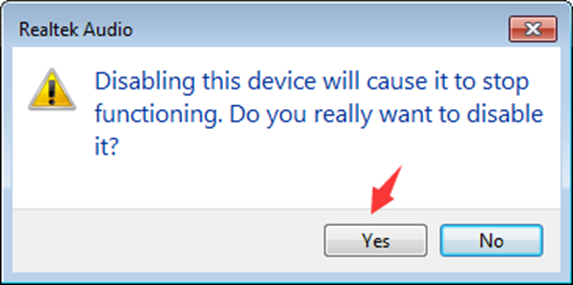
Step 2: Expand the category and look for the problematic driver (you may find it by looking at the device name). Disable it by right-clicking it. It should be noted that it will no longer function after disabling the gadget.
Step 3: Select “Yes” to proceed.
Step 4: Confirm whether the issue has been fixed.
Solution 7: Update your computer’s USB drivers
Updating your computer’s USB drivers may resolve your issue. To update the driver on your PC, follow these steps:
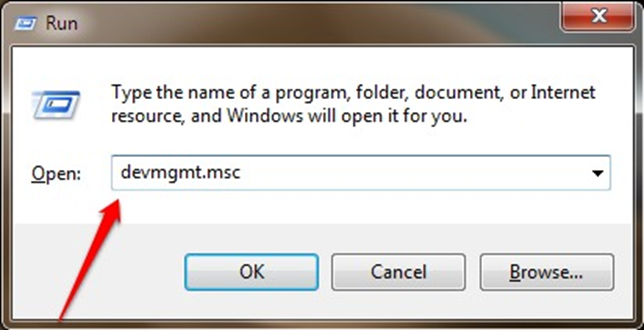
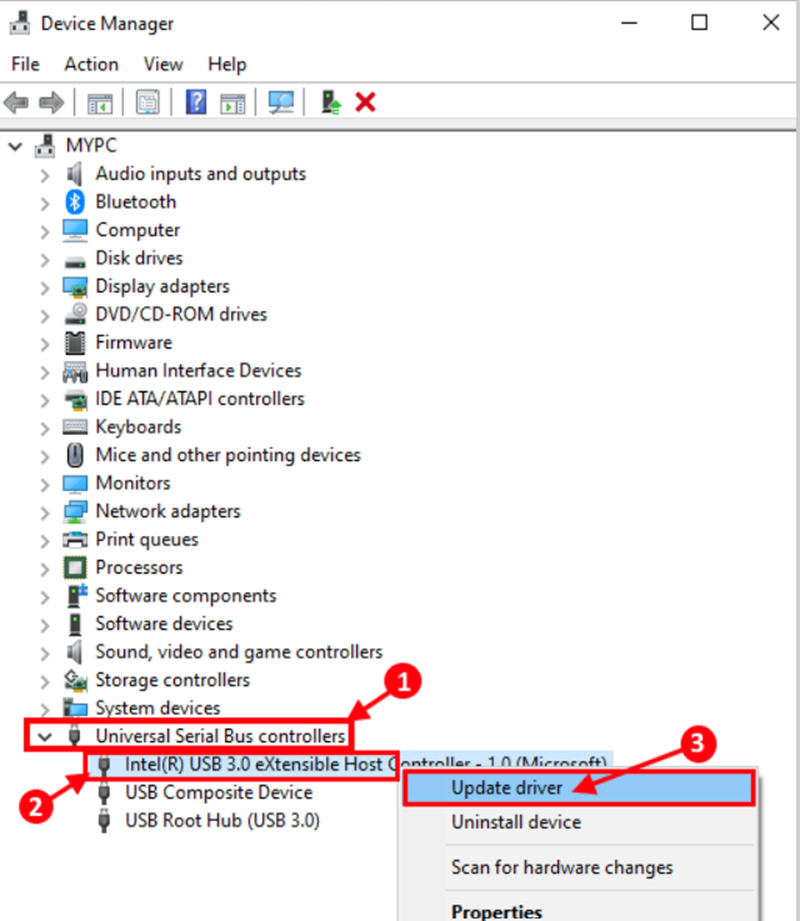
Step 1: To launch Run, press the Windows key plus R. Enter “devmgmt.msc” now. A window for the Device Manager will open.
Step 2: Expand “Universal Serial Bus controllers” in the Device Manager window, right-click on the first USB driver and select “Update driver”.
Step 3: Click “Search automatically for updated driver software” now.
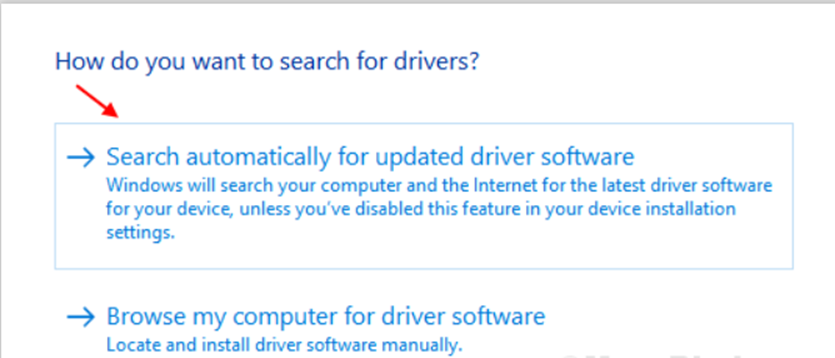
Wait a few moments as Windows searches and installs the most updated driver for your computer.
Step 4: If a prompt says, “The best driver for your device is already installed,” select “Search for updated drivers on Windows Update.”
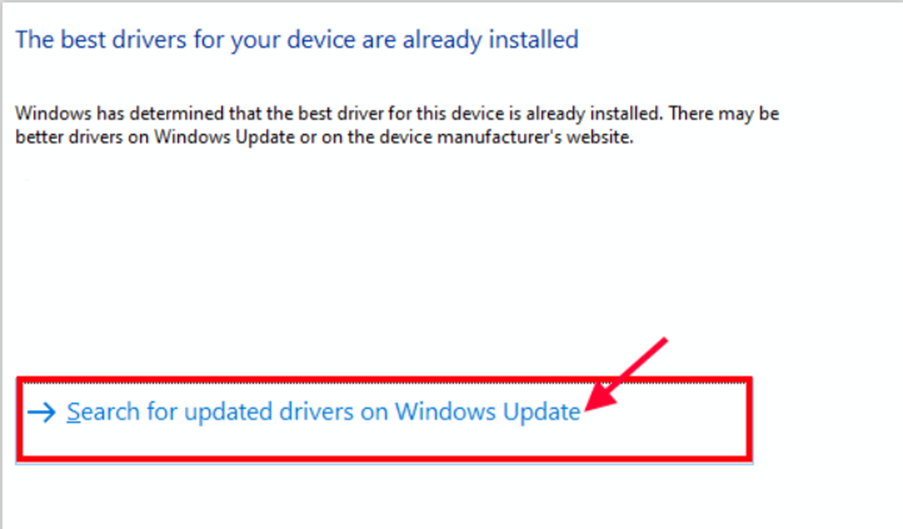
The most recent device driver will be installed alongside Windows Update.
Step 5: Repeat steps 2–4 for the remaining “Universal Serial Bus controllers” drivers.
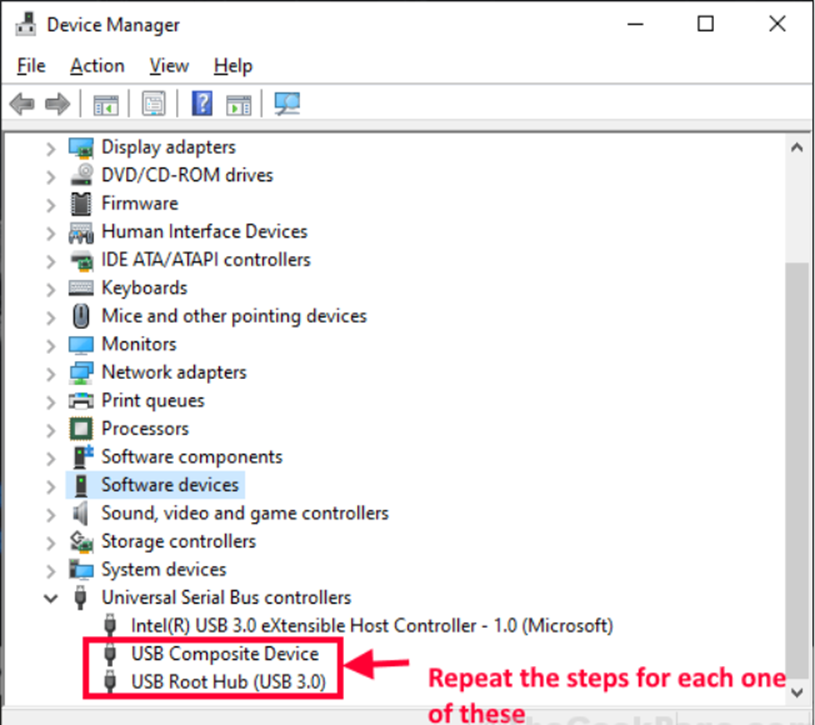
Restart your computer after the software update is complete. You will notice the System Idle Process is still taking a significant amount of processing power after rebooting.
Solution 8: Run Driver Verifier on your computer
If this problem is caused by a driver, the Driver Verifier can identify and repair the driver on your computer.
Before proceeding, you must activate the minidump (DMP) files. To create minidump files, follow the procedures below.
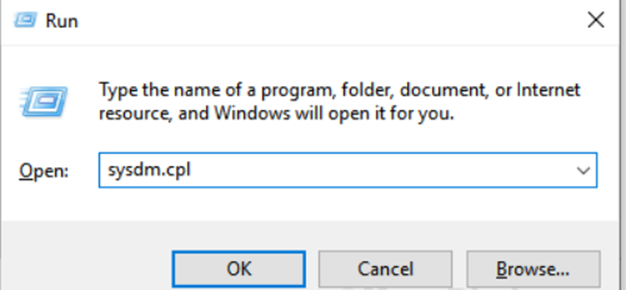
Step 1: Press Windows+R to open Run, then type “sysdm. cpl” and press Enter. The System Properties window will be displayed.
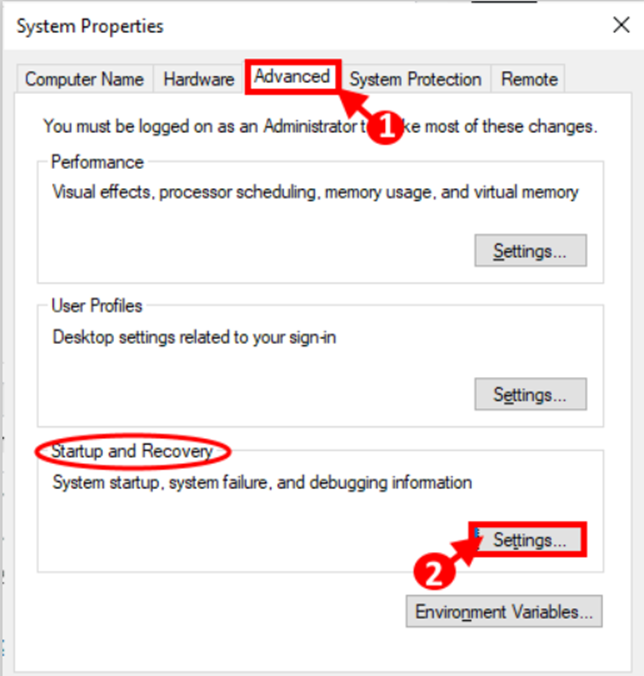
Step 2: Navigate to the “Advanced” tab in the System Properties box. Now select “Settings” from the Startup and Recovery menu.
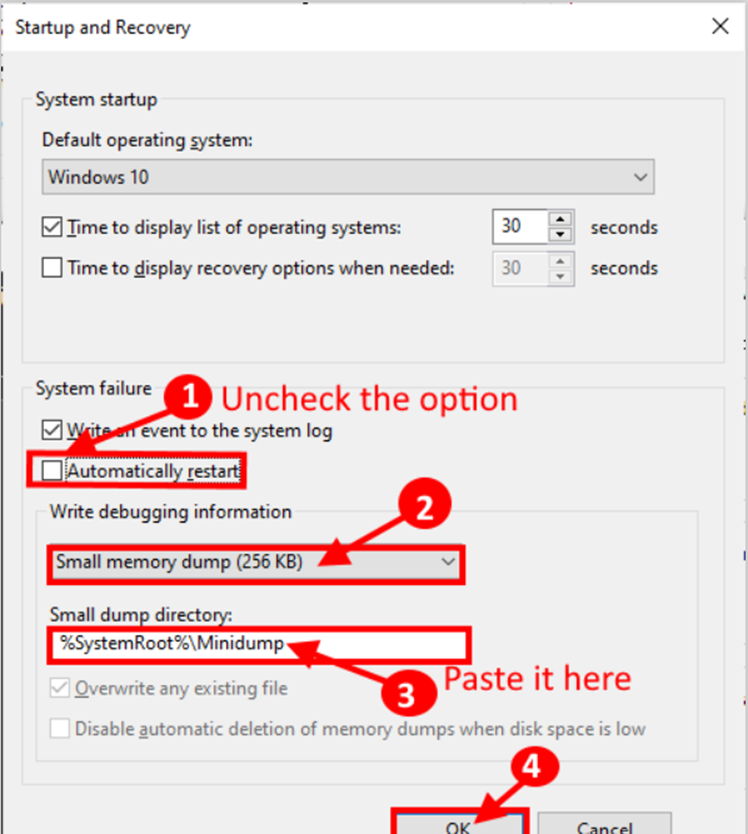
Step 3: Uncheck the “Automatically restart” option in the Startup and Recovery window, and then click the drop-down “Small memory dump (256 KB)” option under the ‘Write debugging information’ location.
Step 4: Now, in the ‘Small dump directory:’ area, copy and paste “%SystemRoot%Minidump.” Click “OK” to save your changes.
Step 5: Now, the last step is to Reboot your computer
Solution: 9 Scan your computer for viruses.
Your computer may become slow if infected with malware or a virus. You can completely eradicate the detected malware/virus by running a malware/virus scan using Windows Defender or another third-party anti-virus software. To thoroughly eliminate the detected malware/virus, run Windows 10 in Safe Mode.
Note: When your computer is idle—when no other demanding task is running on it—the System Idle Process primarily runs.
When the system idle process uses 80–90% of the available processing power, the system is typically idle, and 80–90% is free.
However, the System Idle Process generally hangs when you try to execute a program, causing the application to need significant processing resources.
This is a standard procedure. However, try these fixes if you notice that your computer is stalling and that the System Idle Process is using up unneeded processing power.
Conclusion
Windows Task Manager is a fantastic method to view what’s happening with your computer, but it may also be frightening to see what’s using your system resources. You may observe that a System Idle Process job runs rapidly, consuming up to 99% of your CPU’s time.
System Idle Process High CPU: Is It a Problem? The answer is no; it is not at all a serious problem. You should not be worried about the System Idle Process high CPU consumption issue because it refers to unused CPU resources in your computer. If your computer is slow, you can attempt specific techniques to improve its performance.