Windows users are familiar with the safe mode. However, many people still need to learn what exactly is safe mode in Windows 11 or have questions about it. So, to clear all your doubts, we are here again with another fantastic and informative article.
So, Windows 11 Safe Mode is a valuable tool for determining the root cause of performance difficulties, crashes, and various other issues. Windows 11 Safe Mode allows users to assess what is causing a specific problem on their system by simplifying the operating system and leaving only the needed components for functioning.
Windows 11 Safe Mode is a reliable, simple Windows operating system version. Any issues consumers may have with the computer can be traced to a recently installed or malfunctioning driver if they can boot into Safe Mode. The system likely has a hardware problem if the issue persists in Safe Mode.
However, we suggest you use the default Windows 11 Safe Mode setting, which will handle almost all the challenges users face regularly.
Minor changes to the setup may be required for specific situations, such as using ‘Safe Mode with Networking’ for occasions when the internet connection is required or a configuration that requires people to grasp the command line interface. In today’s article, we will understand how to boot into Windows 11 Safe Mode in simple steps. Let us begin.
Windows 11 Safe Mode allows users to restart their PCs when an error occurs. These issues could include a failure to start or troubles immediately after the computer is turned on.
Driver errors are among the most common issues that Windows 11 Safe Mode may assist with. Users trying to download drivers from an external source will be struck with the iconic blue screen of death.
Fortunately, we have Safe Mode for situations like this. It safely prevents applications from functioning in the background, allowing the juicer to identify the source of the problem.
It is important to note that spending more time in Safe Mode than necessary is not recommended because it is a system that limits the computer’s functions.
Some users use Safe Mode only to speed up the device’s boot time. However, this puts the computer in danger because it disables security capabilities such as anti-malware or antivirus protection software.
How do I boot Windows 11 into Safe Mode?
To start Windows 11 in Safe Mode, you must first enter Recovery Mode. As a result, we will first enter Recovery Mode on Windows 11 before proceeding to Safe Mode.
It is the quickest way to boot into Safe Mode on Windows 11. Following the steps below, you can reboot your PC into Safe Mode using the Start menu on your desktop.
Step 1: On the taskbar, click the Start menu button.
Step 2: Press and hold the Power button. Now, hold down the Shift key.
Step 3: While holding down the Shift key, click Restart.

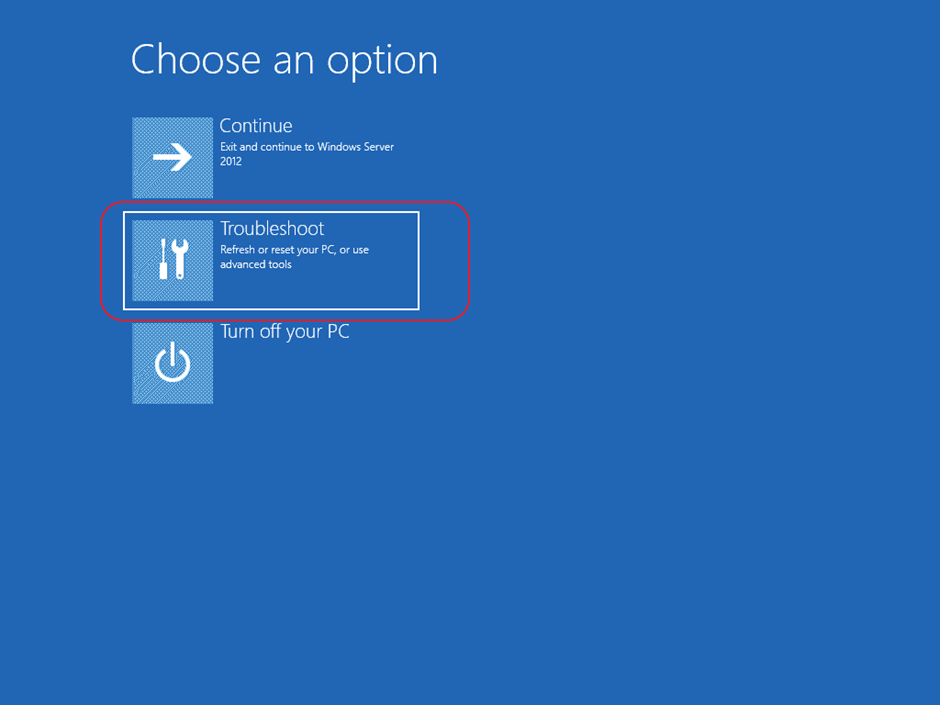
Step 4: When the computer restarts, on the Choose an option page and select Troubleshoot.
Step 5: Click on Advanced Options, which is available under the Startup Settings
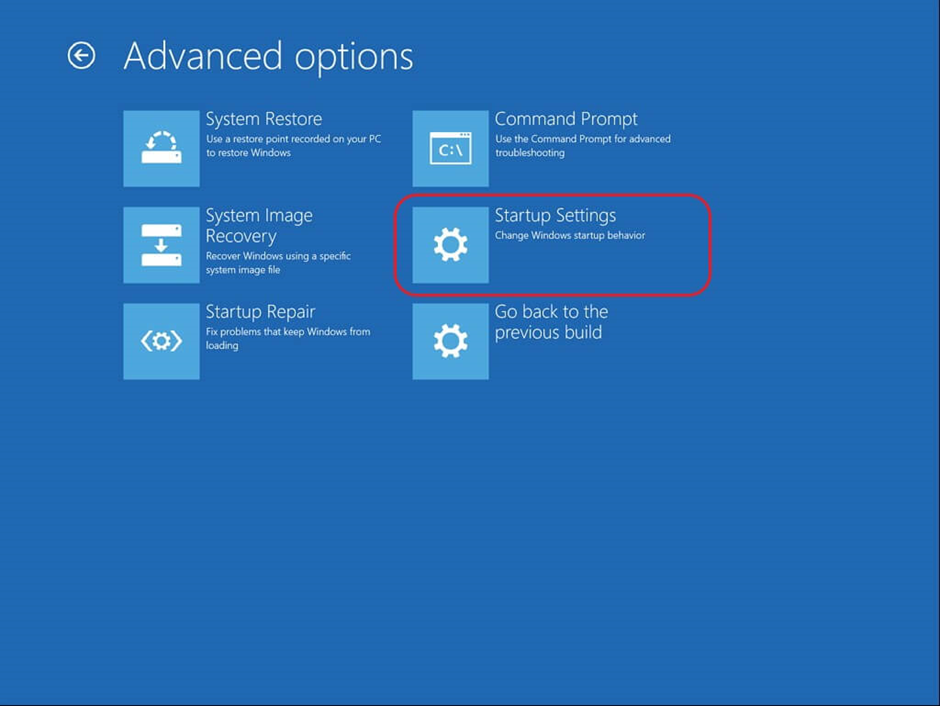
Note: If you can’t find the Startup Settings option in the Advanced Options box, go to the bottom of the Advanced Options window and click See more recovery options.
Step 6: Hit the Restart button.

Step 7: After rebooting the computer, select the Safe Mode type you wish to use.

Method 2: Using Advanced Startup to enter Safe Mode in Windows 11.
With the help of Advanced Startup, you can solve issues or adjust settings that aren’t possible with the operating system in use. This functionality also allows you to boot into Windows 11 Safe Mode.
Step 1: Firstly, hit Windows + I. On the other hand, select Settings from the Start menu.

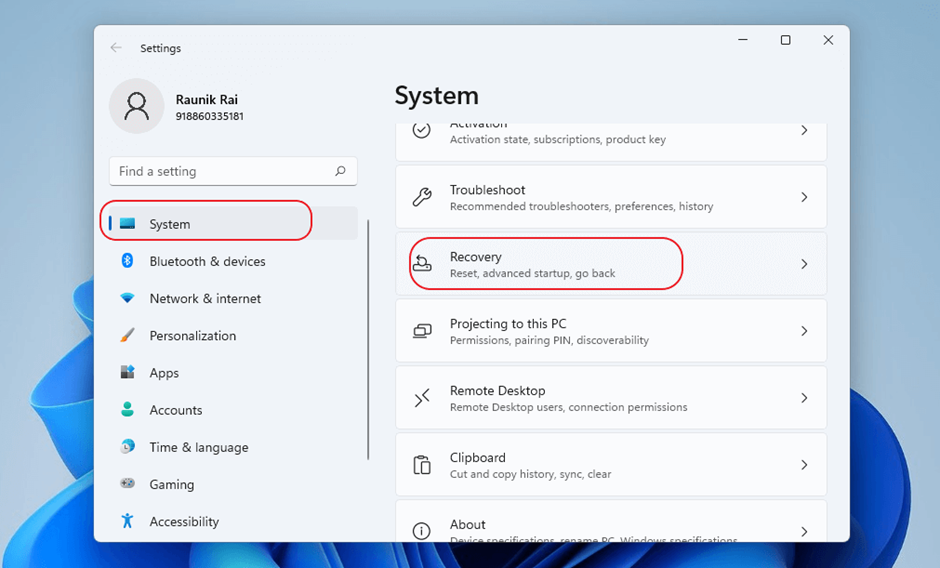
Step 2: From the left pane, click on system. Click to open Recovery, which is in the right pane.
Step 3: Select Advanced Startup from the newly opened window.
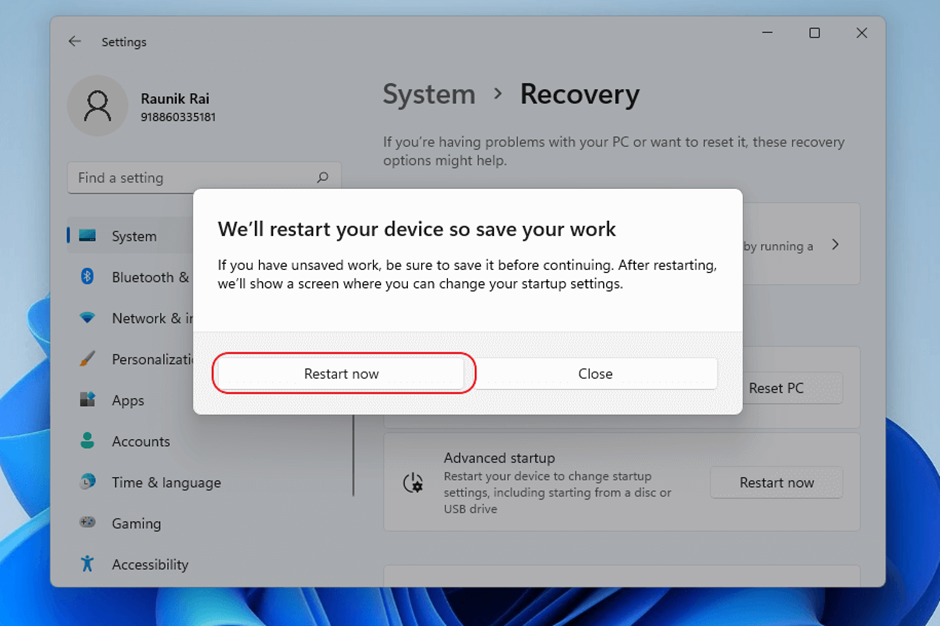
Step 4: A warning will appear. Save your work before we restart your device. And, now, restart.
Step 5: Choose Troubleshoot > Advanced Options > Startup Settings when your computer restarts.
Step 6: Press the Restart button and see if the Restart happens.
Step 7: Choose how you want to utilize Safe Mode on your computer from the selection.
Method 3: Enter Safe Mode by stopping Windows 11 from booting normally.
Windows 11 uses a failsafe mechanism to counter any potential damage to the operating system or essential components. It automatically enters repair mode after three unsuccessful attempts of booting up.
Therefore, you must repeatedly interrupt your computer’s usual boot process three times to boot into Windows 11 Safe Mode. This is the way you do things.
Step 1: Press the Power button for four to five seconds to turn off your computer in its initial boot-up.
Step 2: Your OS will enter its automated repair mode when you complete the procedure twice more.

Step 3: Allow your operating system to assess your computer.

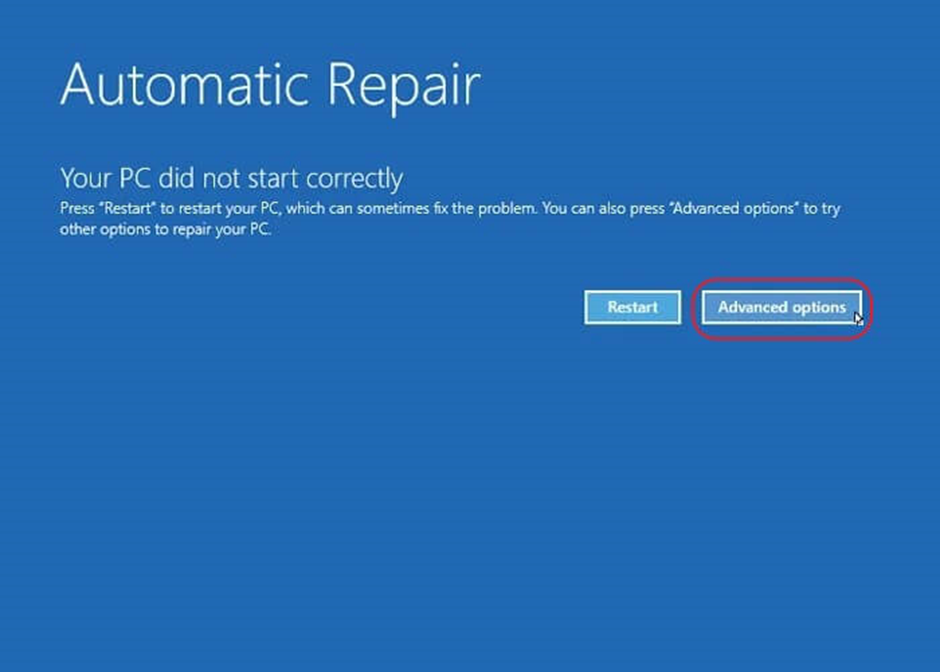
Step 4: The screen for automatic repair will appear. Press the button for Advanced Options.
Step 5: Select Startup Settings under Troubleshoot > Advanced Options.
Step 6: In the Startup Settings window, select Restart.
Step 7: After the computer restarts, you should see a list of options called Enable Safe Mode, Enable Safe Mode with Networking, and Enable Safe Mode with Command Prompt. These are the options for Safe Mode.
Select the appropriate option to turn on your preferred Safe Mode.
Method 4: Entering Safe Mode with Command Prompt.
On a Windows PC, there is always an option to use Command Prompt, even if all other alternatives have been explored. The steps below will guide you in using CMD to boot your Windows 11 PC into Safe Mode.
Step 1: Open the Command Prompt by typing cmd into the search box.
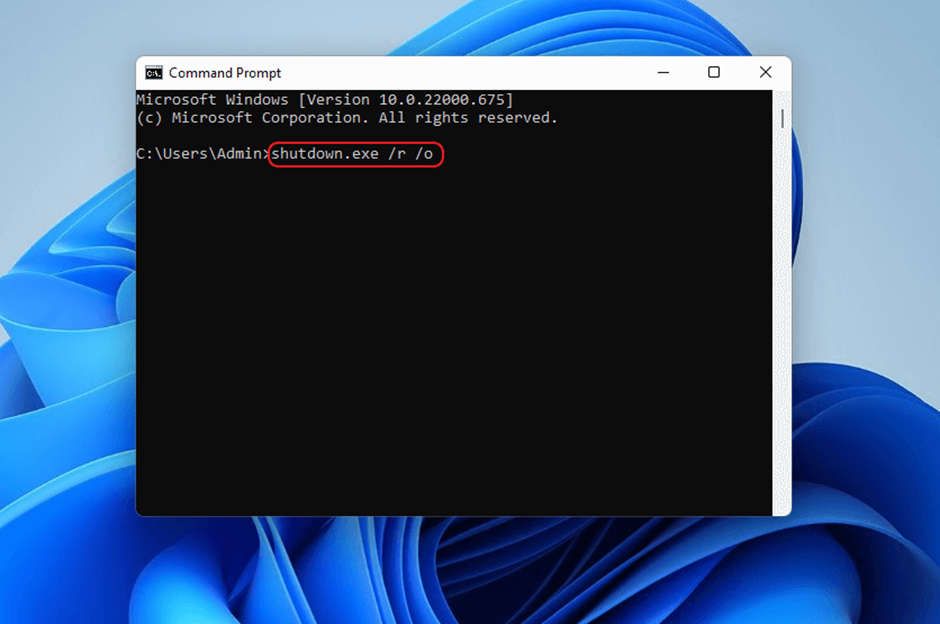
Step 2: In step two, type shutdown.exe /r /o into the command line and hit the Enter button.
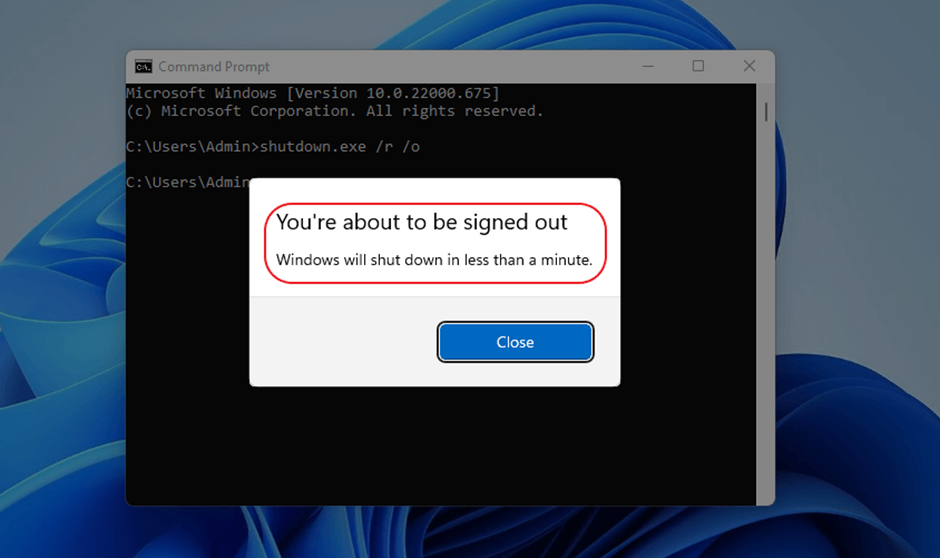
Step 3: The alert on the screen that says “You’re about to be signed out” pops up. Now, close it and allow Windows to enter Recovery Mode for a reboot.
Step 4: The same option will appear on the screen. Choose an option screen from it.
Step 5: Continue using the same step outlined in the above steps.
Safe mode will boot up on your Windows 11 computer.
Method 5: Use a recovery drive to Boot Windows 11 into safe mode.
You can either make a bootable USB recovery device on a different Windows 11 PC or utilize a previously made USB recovery drive to boot your computer into Safe Mode. To start your computer into Safe Mode, connect the USB device and follow the instructions below.
Step 1: Allow your computer to boot from the bootable USB drive.
Step 2: Select an option from the Choose your keyboard layout window.

Step 3: In the Choose an option window, select Troubleshoot.
Now, as explained in the previous steps, choose Advanced Options > Startup Settings > Restart and select the Safe Mode type.
How Can You Exit from Safe Mode?
You don’t need to do anything special to get your PC out of Safe Mode. When you restart your Windows 11 PC, it will boot into normal mode.
While in Safe Mode, you may discover the option to restart your system. The restart choice stays the same in both Safe Mode and Normal Mode. Select Restart from the Start menu > Power.
What happens when you launch Windows 11 in Safe Mode
When you launch Windows 11 in Safe Mode, your computer or device loads the operating system with a simple user interface. It only uses necessary drivers and services, so most things that can cause crashes or problems are avoided. This makes troubleshooting Windows 11 easier.
Conclusion
These methods can be used to launch Windows 11 in Safe Mode. There are numerous options, so you may select whichever you want or can utilize based on the state of your PC.
Windows 11 is an innovative, intelligent operating system that can fix minor issues. However, the operating system can only handle some problems.
A user can enable Safe Mode to assist the operating system in resolving critical issues. We hope you found this article helpful and understood how to boot into Windows 11 Safe Mode. Stay connected with us for such informative and technical posts for your daily needs.