Hello users, there is no doubt that Mac is famous for its reliability and durability. But, with modern technology, we all constantly keep updating ourselves. As a result, we buy a new Mac, and many of us resell our used old Macbook to someone who requires it.
And, as we all know, the thumb rule while reselling or transferring your old electronic device is that it is compulsory to erase the data. This rule applies to Mac devices, too; before giving out your old Mac, you should erase all your data.
Apple lets users clean their Macbook settings and content with its built-in tools. And the Mac erase tool comes into the picture. This tool will allow you to delete your Mac’s data by following simple steps. But sometimes you might face the “Erase Assistant is not supported on this Mac” error on the screen.
But the question is, what should we do in this situation? So, in today’s article, we will look at how to fix the “Erase Assistant is not supported on this Mac” error. Let us begin.
What exactly is Erase Assistant on Mac?
Before looking at the solution to fix the “Erase Assistant is not supported on this Mac” error, let us first look at what an erase assistant in Mac is and why Apple has included it.
If you are an Apple user and ever deleted all the content and settings on your iPhone, you must have seen Erase Assistant. Erase assistant performs the same task on iPhone, but here it does it on Mac. It will delete all your settings, content, and MacMac before it is taken away or sold.
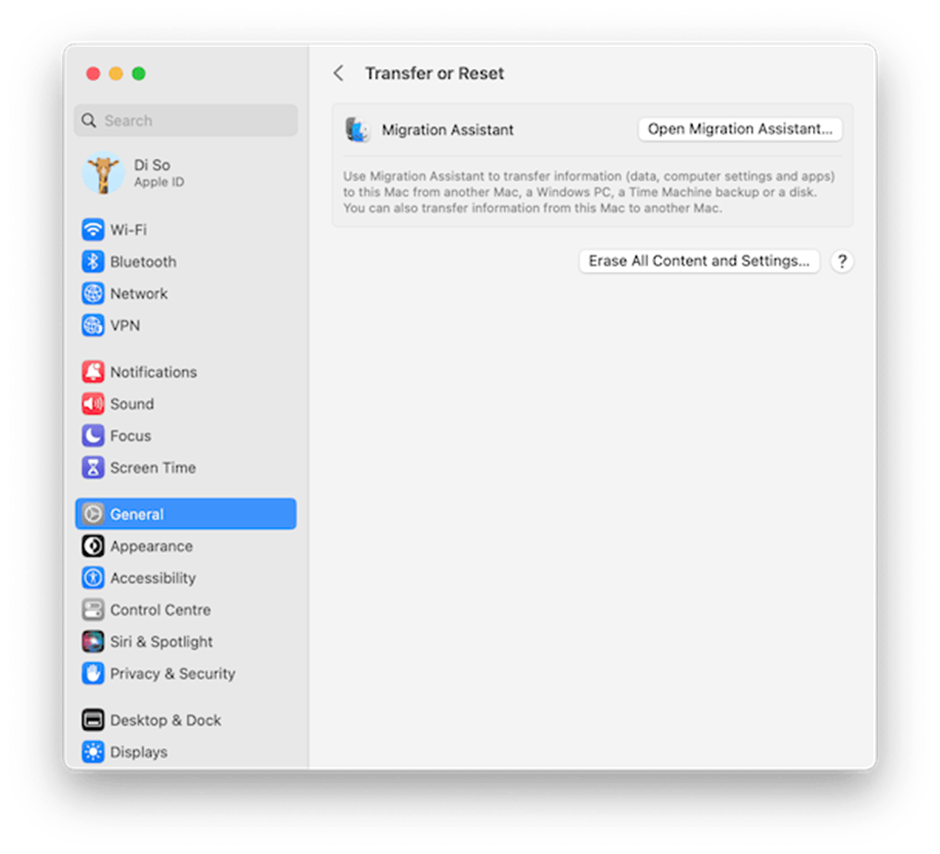
But before using the erase assistant tool, you must back up all the data using Time Machine or any other third-party backup tool. If you plan to update your Mac, then Time Machine will help you restore all your data using Migration Assistant.
What does the “Erase Assistant is not supported on this Mac” error mean on Mac?
If you notice the “Erase Assistant is not supported on this Mac” error on your Mac screen, your Mac is older and does not have Apple silicon or T2 security chips.
This error is mainly experienced by users who own MacBook Pro 2017 models operating with macOS Ventura. In simple terms, the older Mac devices will face this issue.
There may be some rare cases where this error appears on the screen. This might be due to a bug; to resolve it, connect with the Apple support care team.
List of Mac users who can use the Erase Assistant
Erase assistant is among the best features available on Macs running with Apple silicon (M-series chips) or with Apple T2 Security Chip. Simultaneously, it would help if you are working with at least macOS Monterey, macOS Ventura, or something else.
Below is the list of Macs that support the erase assistant. They are as follows:
- iMac (Retina 5K, 2020)
- iMac Pro Mac Pro (2019)
- Mac Pro (Rack, 2019)
- Mac Mini (2018)
- MacBook Air (Retina, 13-inch, 2018, 2019, 2020)
- MacBook Pro (13-inch, 2018, 2019, 2020)
- MacBook Pro (15-inch, 2018, 2019)
- MacBook Pro (16-inch, 2019)
How to access Erase Assistant on Mac
Before understanding the steps to use Erase Assistant, knowing how to access it on your Mac is crucial.
The steps will vary depending on your macOS version, and below, we have mentioned the steps for macOS running with Ventura and Monterey.
On macOS Ventura
Step 1: First, go to System Settings of your Mac
Step 2: Go to General
Step 3: Click on the Transfer or Reset option
Step 4: In the last step, select Erase all Content and Settings option.
On macOS Monterey
Step 1: In the first step, open System Preferences
Step 2: Now, click on Erase All Content and Settings.
Steps to use Erase Assistant on your Mac
Step 1: Back up your Mac: First, you cannot back up your data once you clean your Mac using an erase assistant. So, it is highly recommended to back up your data and settings with the help of Time Machine or any third-party backup tool.
Step 2: In the second step, click on the Apple menu
Step 3: Click on the system settings
Step 4: Go general located in the sidebar
Step 5: Click on transfer or reset option
Step 6: Now, click on erase all content and settings.
Step 7: Enter your password and click on the unlock button.
Step 8: Click on the continue button and move forward
Step 9: If you are asked to log out of your Apple ID, then click on the Continue option
Step 10: In the last step, click on Erase All Contents and Settings
Your Mac will restart now. And now you can turn it off and hand it over. It will boot like brand new for its next owner.
You can also transfer your data with the help of Migration Assistant, which will share everything from your old Mac to your new Mac.
Once you are done backing up all your data, open Migration Assistant in step 6 mentioned above.
Why is Erase Assistant not supported on Mac?
The erase assistant tool works only on Macbook devices with Apple Silicon or Intel Macs and a T2 security chip. If your Mac does not fulfill all these categories, you will face this error message on the screen. Unfortunately, you are facing this error on the net. In that case, you can only clean your Mac manually by booting it in recovery mode and using Disk Utility to clean the disk and reinstall macOS.
If your Mac has Apple Silicon or is running with a T2 security chip, then follow the steps above to use the erase assistant.
How do we fix the “Erase Assistant is not supported on this Mac” error?
Firstly, there is no fix for this erase assistant error. This tool only supports the latest models running macOS Monterey or further.
You can only use the erase assistant tool if your Mac fulfills the requirements. But don’t worry. Still, you can use the manual method for cleaning your Mac.
What do you do if Erase Assistant is not supported on your Mac?
If your Mac is not an Intel Mac or has no T2 security chip, you will receive “Erase Assistant is not supported on this Mac” on your screen. Don’t worry; you can still manually clean your Mac. The steps are as follows:
Step 1: First, start your Mac in recovery mode. The process of rebooting in recovery mode is different for every Mac.
Step 2: Whenever the macOS utility screen appears, click the Disk Utility option.
Step 3: Select the boot disk you wish to clean
Step 4: Now, click the erase button in the toolbar.
Step 5: Enter a name for the disk.
Step 6: Choose the APFS format
Step 7: Click on the Erase Volume Group option
Step 8: Once the erase is wholly done, quit Disk Utility.
Step 9: In the last step, click on reinstall macOS in the recovery app and follow the instructions on the screen.
And, done. Whenever macOS is reinstalled, shut down your Mac. And the next time someone boots, it will start as a brand-new Mac.
Note: Keep in mind to always back up your Mac’s data. It is highly recommended to perform backups and store them in different locations for safety.
Conclusion
If your Mac fulfills all the system requirements, then you can easily erase all content and settings to reset without any manual process for cleaning your Mac.
But if your Mac does not have Apple silicon or T2 security chips, then you will not be able to use this feature, and you need to follow the traditional process for resetting the Mac.
Thus, Erase Assistant is a top-rated and valuable tool for your Mac. It will clean all the data and settings from your Mac. So, whenever you give away or sell your Macbook, the new owner will set it up as a brand-new Mac, and your data will be secure with yourself.
But it works only on the latest Mac device. And, if this service doesn’t run on your Mac, then you will see “Erase Assistant is not supported on this Mac” on the screen, and sadly, there is no fix for it.
But don’t worry, we are here for you. You can follow the above-mentioned manual steps to help you erase your data and settings. But always make sure you take a backup before cleaning your Mac.