Nvidia is a Graphics processing unit (GPU) and Nvidia graphics driver is system software that can control a computer’s video adapter (sometimes a video card/GPU). The computer generally does not have an original video adapter, the graphics driver controls that part by controlling the computer’s motherboard.
Driver updates are already released for fixing glitches. It can increase the performance of its graphics cards. Moreover, it causes a blue screen death, and other issues after installation force the user to do so. The dedicated recovery software hub has information about driver recovery tools.
With the help of NVIDIA graphics drivers, the users are getting benefited as it helps to improve the system graphics and performances after updating it. Due to the errors, most of the users do not want to get NVIDIA drivers in Windows 10. It slows down the performance and also lets the user experience with sudden shut down issues. Due to new bugs and glitches and frequent crashes, users went to rollback NVIDIA drivers in Windows 10.
The NVIDIA driver can be rolled back in two ways including Display Driver Utility and Windows Device Manager. In this article, we will be discussing these two listed processes that can roll back NVIDIA drivers in Windows 10 for fixing performance issues created by the new version. To learn more about DPC Watchdog Violation Error Windows 10, drop down to our ISO River page for the detailed insights.
How to Roll Back NVIDIA Drivers in Windows 10
We have come up with the procedure of rollback NVIDIA in Windows 10 by using the methods of Windows Device Manager and Display Driver Utility. Let’s find out what methods suit the best to solve the issue.
Rollback with Windows Device Manager
- Windows key +R has to click for the opening and the run.
- For opening device manager, users have to type devmgmt.msc and then press the OK button.
- Then, the display adapter category of the device manager has to expand.
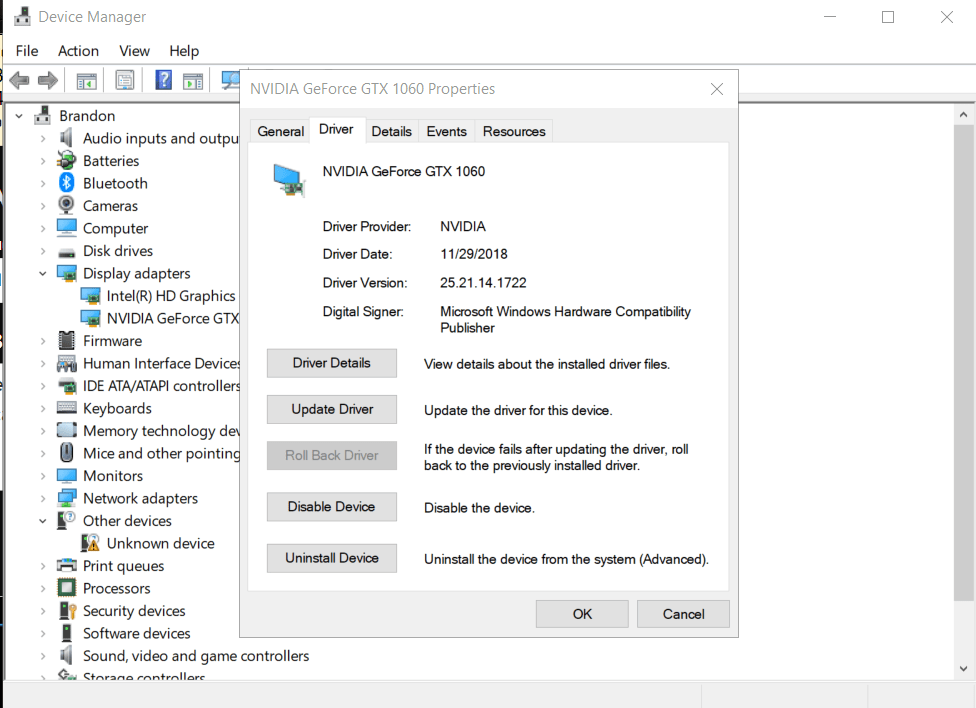
- Then, click (right) on NVIDIA graphic device and click on properties.
- Users have to open the driver tab which is in the properties window.
- At this time the driver version and date must be noted down by them.
- Then click on the button named rollback driver.
- Users have to select any reason in the driver package rollback window and then press YES.
- At this time windows will rollback to the driver to the earlier version.
- If it is done properly, then they have to open the driver tab again and the date and the driver version have to be checked once again to make sure that the rollback process is successfully done.
If the Roll Back Driver button is greyed out then what will they do?
- First users have to download the last working version of the NVIDIA driver. they can find it on the official websites.
- Windows key +R has to press.
- Again type devmgmt.msc and press the “OK” button.
- Then users have to expand Display Adaptors, which is in the Device Manager.
- They have to click again on the NVIDIA graphic (right-click) device for selecting Update Driver.
- For driver software options users have to select my computer Browser.
- Then press a click on the browse button and then select the previously downloaded NVIDIA driver and then press the “open” button.
- Then the user must click on the Next button and wait for some time unless and until it will install the driver.
- If installed properly, for confirmation, they have to open the Driver tab and have to check again if the driver version and date are changed or not.
Rollback with Display Driver Utility
- First, one thing must be sure by the users, that they downloaded the last working version of the NVIDIA driver to their computer.
- Next, they have to download the Display Driver uninstaller utility and then only they can able to extract the file.
- Next, they have to click on the DDU.exe file. If the tool prompts, then update the utility otherwise not required.
- Then pressed the launch button.
- Under the selected graphic driver section, they must select NVIDIA at this time which is in Drop-Down Menu now.
- After that, they have to clean and reinstall it.
- For that, they must have to close all other programs and must save their data (any data they do not want to destroy) before starting the cleaning process.
- At this time computers will restart and DDU will uninstall all the NVIDIA graphic drivers.
- After that, they can install the driver. They can install it from the NVIDIA website. For that, they have to double click on the .exe file.
- Custom initialization must be selected and after that must be performed the clean installation process.
- If installed properly and successfully, their computer will restart and then check the previous issues which were caused by the previous NVIDIA driver being resolved or not.
- This process of NVIDIA driver rollback is easy and it can be done easily by using the above mentioned (two) processes.
Roll Back NVIDIA Drivers in Windows 10 – A complete guide in 2020
We hope that you are satisfied with the information we have delivered to you. If you are a Windows user and you still do not have Windows, then you should know how to roll back NVIDIA drivers in Windows 10 as it helps you run your operating system faster and more smoothly. Also, it is extremely handy and easy to function. Download Windows 10 ISO and keep your operating system up-to-date. If you have any queries regarding how to roll back NVIDIA drivers in Windows 10 you can drop down your concern in the comment section and we will get back with the solution in minimum time.


