As more people rely on the internet for work and enjoyment, the use of proxy servers has grown in popularity. But, in other circumstances, the proxy server continues to activate Windows 10.
This can be inconvenient and dangerous because it allows unauthorized access to a user’s internet behavior.
This article will investigate why the proxy server in Windows 10 keeps turning on and provide step-by-step steps for removing it to provide a safer and smoother internet experience.
Recommended Post:- How to get to Advanced System Settings in Windows 10
What is the Proxy Server?
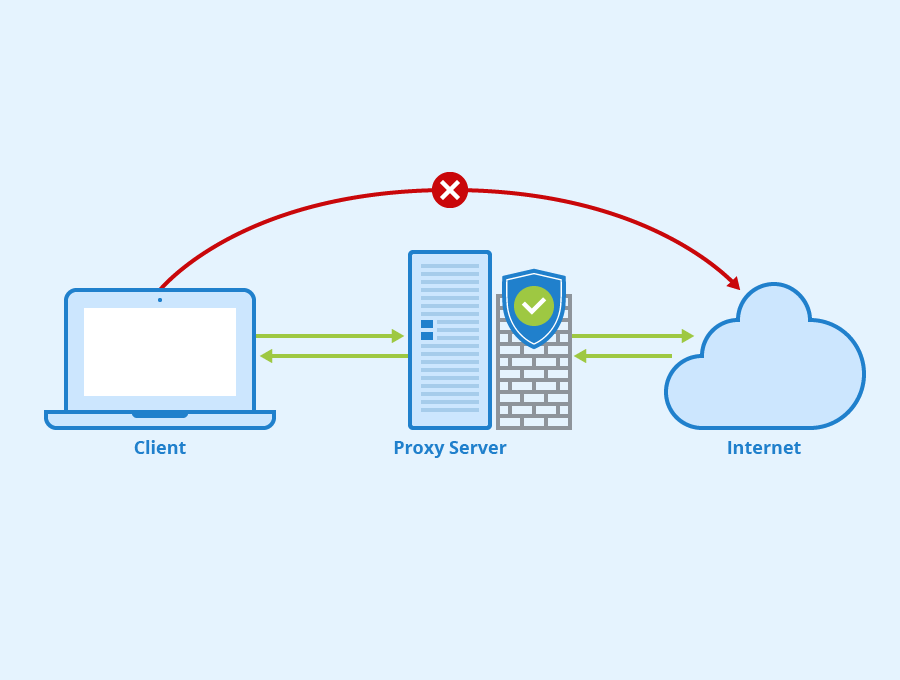
A proxy server is a device or router that acts as a connection point between users and the internet. As a result, it aids in preventing cyber intruders from infiltrating a private network. It is a server that acts as an “intermediary” between end-users and the web pages they browse online.
An IP address is used when a computer connects to the internet. This is comparable to your home’s street address in that it directs incoming data and provides a return address for other devices to authenticate. A proxy server is essentially a machine on the internet with its IP address.
Proxies add an extra layer of protection to your computer. They can be configured to act as web filters or firewalls, shielding your computer from internet risks such as viruses.
This added security is also useful when used in conjunction with a secure web gateway or other email security tools. This allows you to filter traffic based on its level of safety or the amount of traffic your network or individual computers can handle.
How should a proxy be used? Some people use proxies for personal reasons, such as concealing their location while watching movies online. Yet, for a business, they can be used to achieve various vital functions such as:
- Boost security
- Protect your employees’ online activity from prying eyes.
- To avoid crashes, balance internet traffic.
- Manage the websites that employees and office personnel have access to.
- Reduce bandwidth consumption by caching files or compressing incoming traffic.
A proxy server functions as a go-between for a computer and the internet because it has its IP address. When you send an internet request, it is routed to the proxy, which then receives the response from the web server and sends the data from the page to your computer’s browser, such as Chrome, Safari, Firefox, or Microsoft Edge.
Proxy servers and virtual private networks (VPNs) may appear interchangeable on the surface since they both route requests and responses through an external server. Both also let you access websites that would otherwise be blocked in the nation in which you are physically located. VPNs, on the other hand, offer superior protection against hackers because they encrypt all traffic.
Why is the computer constantly launching the proxy server?
There could be several reasons why your computer keeps launching the proxy server. The following are some of the most common reasons:
Malware or virus infection – Malware or viruses might update your computer’s proxy settings without your knowledge or consent and activate the proxy server.
Network settings: If your network or internet service provider needs you to utilize a proxy server to access the internet, your computer may be set to automatically activate the proxy server.
Windows updates: Updates to the Windows operating system may change the default settings and enable the proxy server in some instances.
User settings: If you or someone else who uses your computer has enabled the proxy server and saved the settings, your computer may automatically turn on the proxy server depending on those saved settings.
About this issue, several users repeatedly reported proxy difficulties, such as:
The proxy server keeps turning on Windows 10: In this instance, you may be unable to turn your proxy off since it can keep switching back on. Proxy settings keep changing, and won’t save – This is most likely due to registry issues.
It is not possible to update the proxy settings. Windows 10: This frequently occurs if your user profile is corrupted.
When specific services are not functioning, the proxy settings and the server will not turn off.
Proxy won’t turn off, or disable: This can happen for a variety of reasons, however, we have some fast fixes listed below.
You should troubleshoot and analyze each alternative to find the particular cause of the problem. Once you’ve determined the cause, you can disable the proxy server and prevent it from automatically starting.
What to do if the proxy server keeps turning on in Windows 10?
In the next section of the article let us have a look at the list of solutions which will help you to turn off the proxy servers in Windows 10.
Solution 1: Make use of a VPN
Proxy servers are frequently preferred over VPNs since they are usually free. Yet, if you’re lucky, using a VPN could improve your connection’s privacy, security, and even speed.

Private Internet Access, for example, has a fantastic network of over 22,000 servers (and counting) from which to pick.
It will not record any of your internet activity records, so you can rest confident that your privacy is safe.
On the downside, utilizing a VPN will not instantly stop your proxy, therefore you should attempt our recommendations above before installing a VPN.
Solution 2: Do a complete system scan
- Step 1: In the Search field, type Windows Security and click on the applicable search result.
- Step 2: Next, select Virus & threat protection.
- Step 3: Choose Scan choices.
- Step 4: Choose Complete scan and then click the Scan now an option at the bottom.
The inability to turn off the proxy as briefly explained above, can indicate a malware infection. This is the worst-case scenario, so act swiftly if your proxy refuses to turn off.
As a result, a full system scan is required. Even if it doesn’t identify anything, you can rule out this scenario and attempt the other methods indicated.
Solution 3: Make changes to your registry
- Step 1: Hit the Windows Key + R together.
- Step 2: Type regedit and hit Enter or OK.
- Step 3: Follow the path outlined below: Computer\HKEY_LOCAL_MACHINE\SOFTWARE\Policies\Microsoft\Windows\CurrentVersion\Internet Settings
- Step 4: Double-click the ProxySettingsPerUser DWORD value and change it to 1.
- Step 5: If the DWORD is not already there, right-click the right pane, select New, DWORD (32-bit) Value, and name it ProxySettingsPerUser.
- Step 6: Double-click it and change the value to 1.

If the previous suggestions do not work, some users recommend making the following adjustments in the same location:
- Set the value of ProxyEnable to 0.
- Set the value of ProxyHttp1.1 to 0.
- The proxyOverride key should be removed.
- The ProxyServer key should be removed.
Numerous consumers stated that this solution worked for them.
However, it is important to note that altering the registry is risky to practice, especially if you are unfamiliar with the RegEditor.
Solution 4: Verify that your proxy has been correctly disabled
- Step 1: Launch the Settings app (by using the Win Key + I combination).
- Step 2: Go to the Network & Internet section.
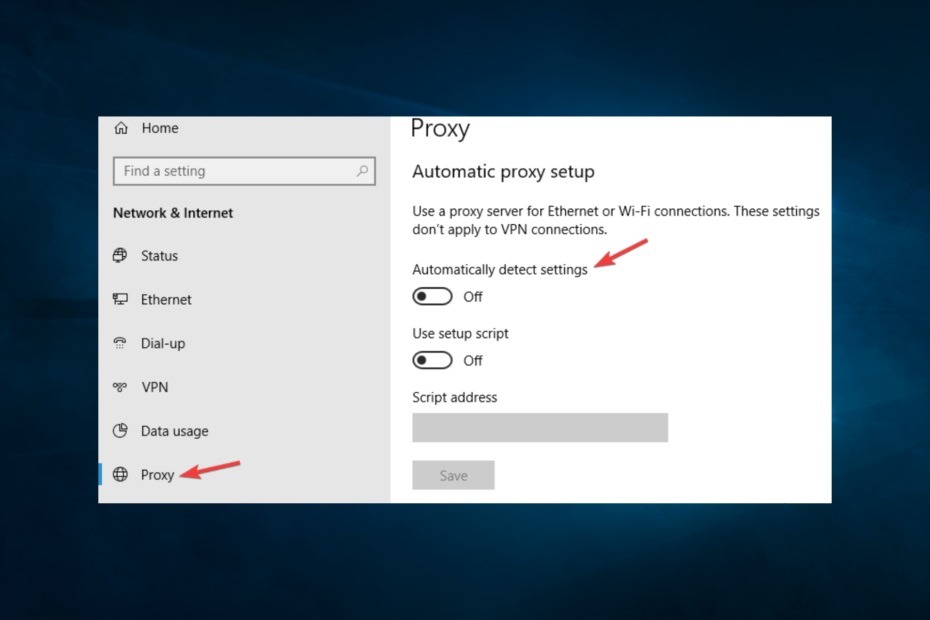
- Step 3: Go to the Proxy category and uncheck all of the Proxy choices.
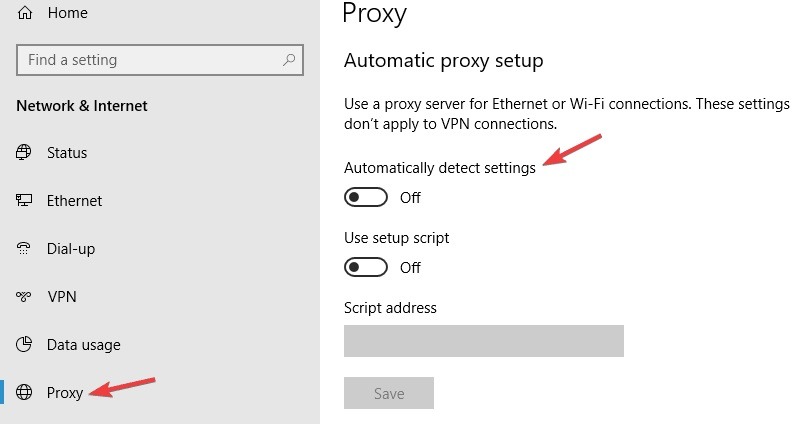
This may appear to be the same as restarting your computer when something goes wrong. You have no idea how frequently users complain about things not working when they are not started.
With that in mind, please double-check that you correctly turned off your proxy before panicking and refusing to disable it.
Solution 5: Determine whether any apps or services use port 8080
5.1 Examine the listening ports
- Step 1: Hit Windows + X, then choose Command Prompt (Admin).
- Step 2: Type and press Enter the following command: netstat -abno | findstr LISTENING | findstr :8080
- Step 3: Determine whether any applications on your system use port 8080.
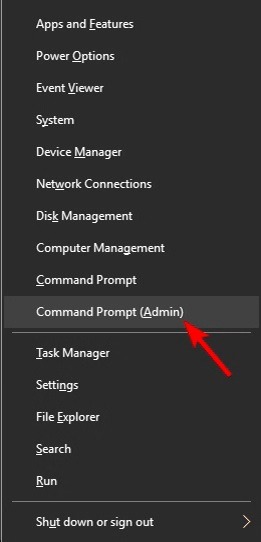
Other apps on your system may utilize port 8080, which can cause proxy difficulties. As a result, you should check to determine if any apps on your system are using port 8080.
ISUSPM.exe is said to commonly use port 8080. To resolve your proxy troubles, you must disable them.
5.2 Put an end to listening processes
- Step 1: Press Ctrl + Shift + Esc to open the Task Manager.
- Step 2: Find the ISUSPM.exe process or any other processes that have been detected using the port.
- Step 3: Right-click it and select End Task from the context menu.
- Step 4: On your PC, navigate to this path:
- Step 5: Next, find ISUSPM.exe and rename it ISUSPM-old.exe: C:\Program Files (x86)\Common Files \Install Shield \ Update
You must now restart your computer, and the proxy issue should be resolved.
Solution 6: Make a new user account
- Step 1: Press Windows + I to launch the Settings app.
- Step 2: Go to the Accounts section.
- Step 3: Choose Family & Other People and then Add someone else to this PC.
- Step 4: Check the box next to I don’t know this person’s sign-in information.
- Step 5: Choose the Add a user who does not have a Microsoft account option.
- Step 6: For the new account, provide a username and password and click Next.
Your user account can become corrupted at times, which can lead to a variety of problems. In this instance, you may be better off creating a new account than attempting to retrieve your old, compromised one.
After that, switch to the new account and see if the problem still exists. If everything is in order, you can begin migrating your files from your previous account and then delete the corrupted account.
Solution 7: Activate the Auto-Discovery Service for WinHTTP Web Proxy
- Step 1: On your keyboard, press the Win Key + R.
- Step 2: Enter or click OK after typing services.msc.
- Step 3: Double-click WinHTTP Web Proxy Auto-Discovery Service.
- Step 4: Press the Start button, then the Apply and OK buttons.
Try to see whether the problem persists after restarting the service. If the service was already running when you arrived, this approach does not apply to you, and you can disregard it.
Some services on your system may be causing your proxy not to turn off the issue. To be more specific, the WinHTTP Web Proxy Auto-Discovery Service, or its lack, may be to blame for this problem. Thus, of course, you need to run this service to correct it.
Solution 8: Disable the proxy settings on your browser
- Step 1: Open your web browser.
- Step 2: In the address bar, type the path shown below and press Enter (this example uses Chrome, which will be different for other browsers). chrome://settings/system
- Step 3: Toggle off the Option and click Access your computer’s proxy settings.
In some cases, merely removing your proxy settings in your browser may be enough to resolve the issue. This method varies by browser; nevertheless, regardless of your browser, it should not be very complicated.
You must enter the Settings tab in your browser, navigate to the Proxy section, and ensure that everything is turned off. To effect the changes, you may need to restart your browser as an administrator.
Check to see if the problem persists after disabling all proxy settings in your browser. If it does, restart your computer and check again.
As it turns out, your PC may refuse to disconnect from the proxy server for a variety of reasons. Yet, we were able to identify the majority (if not all) of them and propose effective solutions to the problem, regardless of its cause.
If you were successful in disabling the proxy on your PC, it might be prudent to invest in a reputable VPN service such as PIA. It provides enhanced privacy and security without the bother of a proxy server.
Conclusion
With the increase in internet fraud and unauthorized access, online privacy has never been more crucial. We prefer to save our card details, keep online wallets, store essential official data, and much more on our systems these days, not realizing that these facts and your online activities are vulnerable to cyber-attacks and hackers.
As a result, some users prefer to browse safely through proxy servers. A proxy server is a server that acts as a middleman between users and the websites they access. It functions more like a filter and firewall, ensuring that only secure data reaches you and so protects you from all the evil things that happen on the internet.


