Errors are pretty common in Windows computers, and there are hundreds of errors that can occur often. Well, many errors will be minor and will not cause detrimental effects or need immediate attention, but some errors like the Blue Screen of Death can be problematic. Today, we will discuss the Panic Stack Switch Error on Windows 10 and 11 and the fix to resolve the issue on Windows 10 and 11 computers.

Well, you might have come across a blue screen of death error on Windows OS often if you have been using Windows OS for long. Well, the blue screen of death error’s occurrence has relatively reduced recently with PS improvements but still, this error can be affecting the functioning of the computer.
Well, the cause of BSOD(blue screen of death) is pretty common when there is an error with drivers on the computer. So, any issue with driver components in the computer will cause issues and the BSOD error. Well, the error will be quite problematic as it will lead you to a blue screen that is not responsive. So, here in this article, we will discuss some of the simple methods to fix the Panic Stack Switch BSOD Error on Windows 10 and 11.
Recommended Post:- Solved: AVG Installation Failed on Windows 10 and 11
So, here we have 9 simple and working fixes that will help you to resolve the error and work on your computer with ease.
Easy Fixes to Resolve Panic Stack Switch BSOD Error
So, the following are the 9 simple methods to resolve the BSOD on your computer. Not all methods will suit you, so try some of these methods and see to it that the error is resolved.
Method 1: Check For Windows Update and Update the Drivers
Updating Windows 10 or Windows 11 OS is a recommended activity. This helps you with keeping your computer up to date with the current tech improvements and resolves existing errors in the OS. So, to update the computer head over to the update and security section in the settings and here click on Windows update and then click on check for updates. Well, if there is update available download and install them on your computer. The system updates will find the latest updates and then install them on your computer, so you don’t necessarily have to install driver software separately.
Well, if you don’t want to update the OS, you can just choose to update the drivers to fix the BSOD error.
- To update the drivers, open the device manager on your computer.
- Here in the device manager, select on the driver you want to update and then select the update drivers option from the menu.
- Follow the instructions on the screen and then install the updates automatically.
You may also use third-party tools to automatically update drivers on your computer. This will be a quick and easy fix for many issues originating due to old driver software.
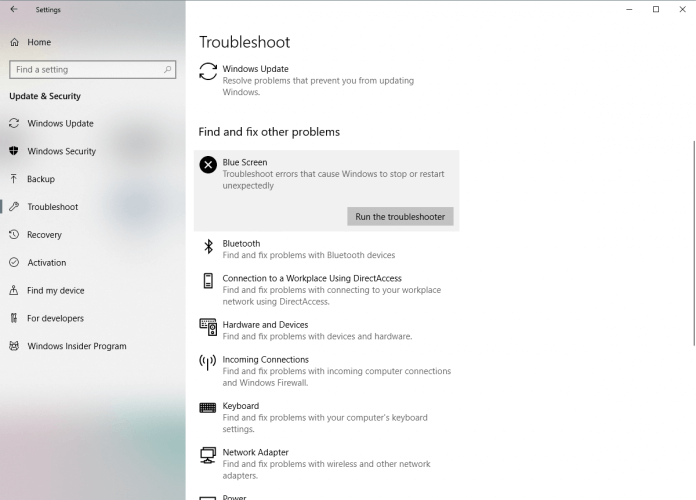
Method 2: Run the BSOD Troubleshooter
Troubleshooters are a great tool to resolve issues on Windows computers. You can run the BSOD troubleshooters and fix the issues on your computer.
- So, with being an issue for Windows users, Microsoft has put up a dedicated troubleshooter to resolve BSOD errors. So to use the BSOD troubleshooter, go to the settings application.
- Here, go to the update and security tab.
- Now, select the troubleshoot option and then select the additional troubleshooter option.
Method 3: Run SFC Scan
SFC scan can be a true saviour if the error is caused due to corrupt system files. The command will scan for corrupt files and then fix them with a good file.
- To run the SFC scan, open the command prompt with admin permission. Now in the command prompt terminal, type SFC/scannow and then hit enter.
- The scan will happen and any corrupt system file will be identified and fixed.
- Once the scan is complete, restart the computer for the changes to be applied.
Method 4: Run the DISM Scan
Just like the SFC scan DISM is a scan command used to fix issues with system files, so you can run the DISM scan to fix errors on your computer but you have to use installation media to use this method.
- To use the DISM scan, run the command prompt as administrator and then type in DISM /Online /Cleanup-Image /RestoreHealth and hit enter to run the command.
- Now, once the scan is complete, restart the computer.
- Now, try updating the drivers on your computer.
Method 5: Check Hard Disk for Errors
- Enter the advanced startup during restart by pressing and holding the shift key.
- Here choose troubleshoot and then advanced options.
- Select the command prompt and then run it as an administrator, here in the command prompt, type in bootrec.exe /rebuildbcd and hot enter
- Now, type in bootrec.exe /fixmbr and hit enter.
- Now, type in bootrec.exe /fixboot and hit enter.
- Now, run the chkdsk /r c: & chkdsk /r d: one after the other.
- Once done, restart your computer and check whether the issue is resolved.
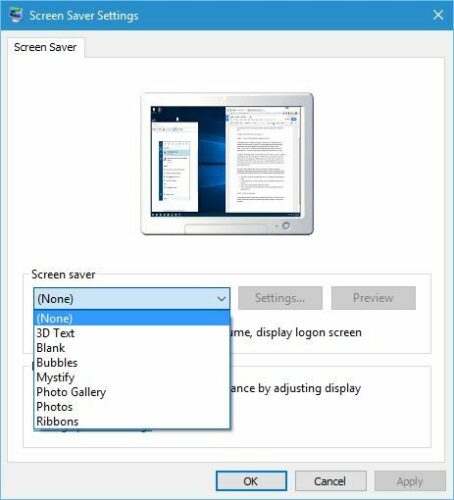
Method 6: Change the Screensaver to None
To change the screensaver, go to the personalization settings and then change the screensaver to none. Now apply the changes by pressing on appl and then on ON and exit the personalization settings.
Method 7: Remove Problematic Applications Like Antivirus
Some applications like antivirus may interfere with system functions and cause BSOD, so removing them will resolve issues on the computer. So, try removing the problematic application from your computer.
Method 8: Check Hardware
Newly installed hardware can cause the BSOD error on your computer, so, you can try replacing the newly installed hardware and check if the error is resolved.
Also, faulty RAM, can cause BSOD so, check the RAM on your computer.
Method 9: Reset the Computer
Resetting the computer is the last resort, you can try other methods and if nothing works, try this.
- Well, to reset the computer, go to the advanced startup by pressing and holding the shift key when restarting the computer.
- Here in the advanced startup, open troubleshoot and then select Reset this PC.
- Select the remove everything option and select only the drive where Windows is installed.
- This will reset your computer totally and you will be left with just the OS.
Hope the information provided above was helpful and informative, with these simple methods, you can fix the Panic Stack Switch Error on Windows 10/11.


