Storage devices on computers have been a part of the computer from the very beginning. With the evolution of the computer technologies storage devices have evolved and modern-day storage devices are very much more efficient than what was initially used. Modern-day storage devices use advanced hardware components and can store large data and provide a better transfer speed. So, the most recent storage technology used around the globe is SSD technology.

SSDs are short for solid-state drivers and the name is because these devices have no moving parts compared to its predecessor like the HDD. The solid-state drive is very efficient and can be implemented easily in computers and recently they have flooded the market. What makes SSDs special is they use a simple chip-based storage space with a fast transfer rate and a compact size.
Well, with these SSDs taking up the market away from HDDs and other storage drivers, SSDs have to be developed and implemented with good support and compatibility features. But even with god support, errors may occur in the computer due to SSDs. One of the most common errors that can occur is the NVME not showing up in the BIOS. Will, this error is very simple to resolve and users can follow simple methods to resolve the error. Well, here in this article, we will discuss some simple methods to fix the issue and use the SSD on the computer with ease.
Recommended Post:- Fixed: There is a problem with this Windows Installer Package
Well, SSDs can be classified based on the technology used for transferring files and some of the most commonly used technologies are Serial Advanced Technology Attachment(SATA), M.2, Peripheral Component Interconnect Express(PCIe) and Non-Volatile Memory Express. Here, the NVME technology provides the fastest transfer speed with the ability to transfer files up to 3.3 Gbps. So, with a good transfer speed, this technology is used commonly and most motherboards come with an NVME slot to option allow connecting of the SSD.
With all this said, let us jump into resolving the problem at hand to do that we have to understand why the NVME is not shown in BIOS once we know the reason, we can fix the issue with ease.
What Causes NVME to Not Show in the BIOS
So, the reasons for NVME not showing up in the BIOS are as follows.
- Outdated Disk Management Software: The system utility that is responsible for managing the disk connected to the system might have been outdated and with SSDs being modern technology, the disk management utility has to be up to date to run such powerful storage devices.
- Secure Boot: Secure Boot is a simple feature that is in place to protect the system from external threats and when new hardware is introduced and the signature is conflicting, the device gets blocked and doesn’t show in the BIOS.
- Shared Bandwith with Other Ports: Well in some motherboards the NVME slot’s bandwidth is shared with other ports. In such cases, when you install an M.2 the other port like SATA are disabled and you can only use this channel.
- Compatibility Support Module: The Compatibility Support Module when enabled doesn’t allow modern devices like M.2, and NVME to get recognised by the system, so the issue persists.
- Conflicting Driver Letters: When drivers have the same driver letters that will be a conflict and this may lead to the NVME not showing up in the BIOS.
So, these are the major reasons for SSDs not being shown on the BIOS and here are three easy methods to resolve the issue.
Simple Methods to Resolve the NVME not Showing on BIOS Issue
Mentioned below are some simple methods to fix the NVME not showing on BIOS error. Follow along and fix the issue with ease.
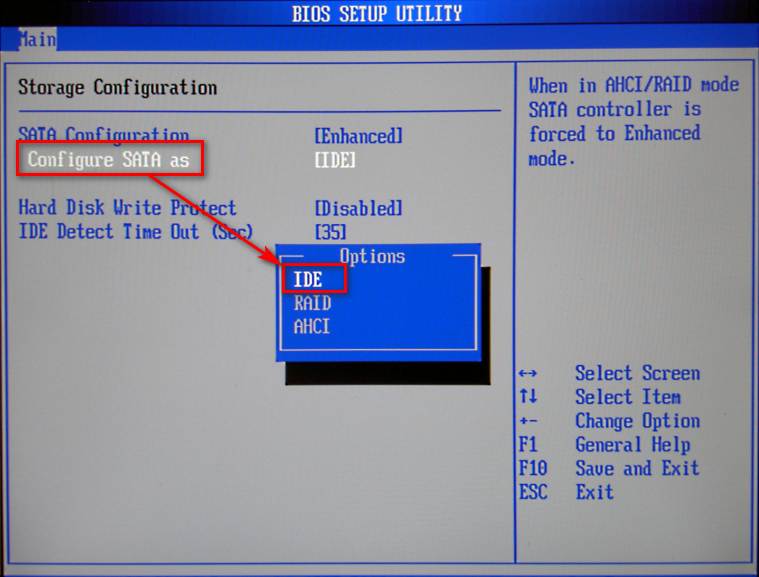
Method 1: Configure the M.2
- To configure the M.2 SSD, open the BIOS by pressing the F key or the Del key on the keyboard when the computer is starting.
- Here, in the BIOS, go to the storage configuration tab.
- Here, under the SATA configuration, click on configure SATA.
- Now, choose IDE by pressing enter.
- Now, save the changes by pressing F10 and exit BIOS.
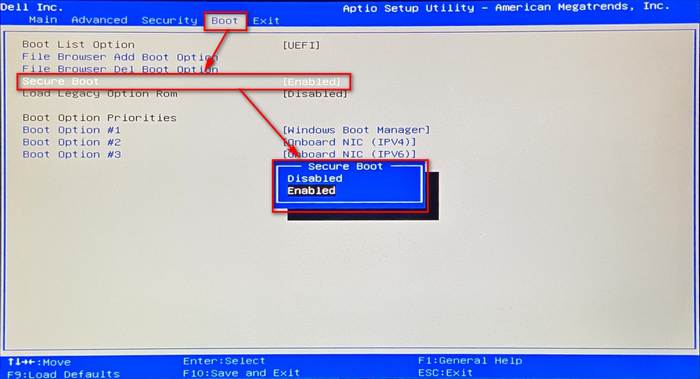
Method 2: Disable Secure Boot
- To disable Secure boot, open the BIOS by using the appropriate key when starting the computer.
- Now, in the BIOS go to the security tab.
- Here, click on secure boot and select disable option.
- Now, head over to save and exit.
- Now, save the changes and press yes next.
- Now, reboot the computer.
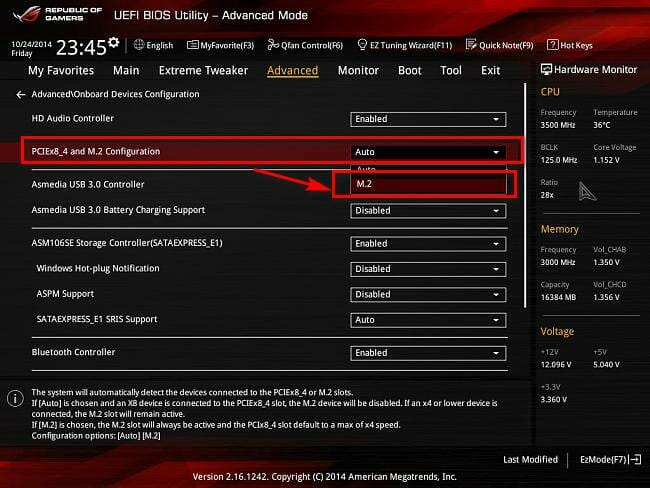
Method 3: Set PCIe Settings to M.2
- To set PCIe settings to M.2 reboot your system and now enter the BIOS by pressing the appropriate key when the computer starts to boot.
- Select the advanced settings.
- Hereunder the configuration of the onboard device, look for PCI Express slot bandwidth.
- Here, set the value to M.2 if it is not already set.
- Press F10 and save the changes.
- Now, exit BIOS and reboot the computer.
So, these are the three simple methods that you can employ and fix the NVME not showing up in the BIOS error on your Windows computer. The issue is pretty simple and you can resolve them with ease using these methods.
Hope the information provided above was helpful and informative, with these simple methods you can resolve the NVME not showing on BIOS issue on your computer.


