NsLookup is a tool included with many operating systems that can look up IP addresses and perform other searches on DNS domains and servers. This resource is in a utility called nslookup.exe. NsLookup is a basic way to get basic DNS information quickly and easily.

NsLookup is usually a command line tool. That is, it uses the command line architecture that is familiar to many users of old PC-DOS operating systems. To use command line tools, you may need to exit the Windows-based environment to access the command line interface. In addition to looking up server information, you can use NsLookup to test IP connectivity. Users can set things like retries and timeouts, specify root servers, and get debug information. NsLookup can also be used to inspect email exchanges or MX records that specify email routing based on servers connected to a specific domain.
Recommended Post:- Mobile Hotspot not working on Windows 10 & 11 – Quick Guide
So, the issue we are discussing here is that the Nslookup command is working fine but the ping drops all of a sudden. Well, this happens when the computer is unable to comprehend and connect to the requested host. So, here in this article, we will discuss in detail the fixes to resolve the Nslookup works but ping fails on Windows 10 and 11.
Simple methods to fix the Nslookup work but ping fails on Windows 10 and 11
So, some of the common manifestations of the error on your Windows computer are Nslookup resolves the IP, but ping does not. This may be due to your antivirus program or firewall. Nslookup fails traceroute – may be related to some services restarting them may fix the issue. Nslookup cannot fix ping problems. So, with the basics covered, let’s check out the fixes to resolve the issue on a Windows 10 and 11 computer.
Method 1: Check the Antivirus Tool on your Computer
According to users, if Nslookup works but ping fails, the problem may be with your antivirus. Several users have reported problems with Kaspersky and its firewall performance. The solution would be to disable this tool and check if that fixes the problem. Of course, the problem must not only be related to Kaspersky, but also to other antivirus programs. So, it is better to check whether your antivirus is the problem before proceeding with other methods.
Method 2: Use the Command Prompt to Resolve the Issue
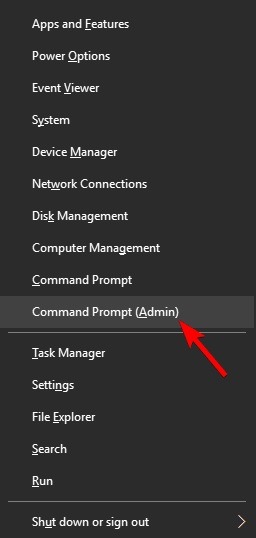
- Press Windows Key + X to open the Win + X menu.
- Select Command Prompt (Admin) (or PowerShell (Admin)) for older operating systems. Win + X nslookup menu works
- Run the following commands:
- netsh winsock reset catalog
- netsh int ip reset reset.log
- ipconfig /flushdns
- ipconfig /registerdns
- route /f
- Now, check whether the issue has been resolved.
Method 3: Update the Drivers
- Updating the drivers is a simple yet effective method to fix issues with the network drivers. So to update the drivers, open the device manager on your computer.
- Here in the device manager, find the network driver and then update the driver.
Method 4: Restart the DNS Client Service
- Press the Windows key + R to open the Run dialog box.
- Type services.MSC and press Enter or click OK. running the Nslookup window works but the ping fails
- Locate DNS Client, right-click and select Stop.
- Wait a few moments, right-click DNS Client again and choose Start from the menu.
Method 5: Add a Dot after the Searched Domain Name
Adding a dot after the domain seems to resolve the issue on your computer, so try to include a dot after the domain and check whether the issue is resolved.
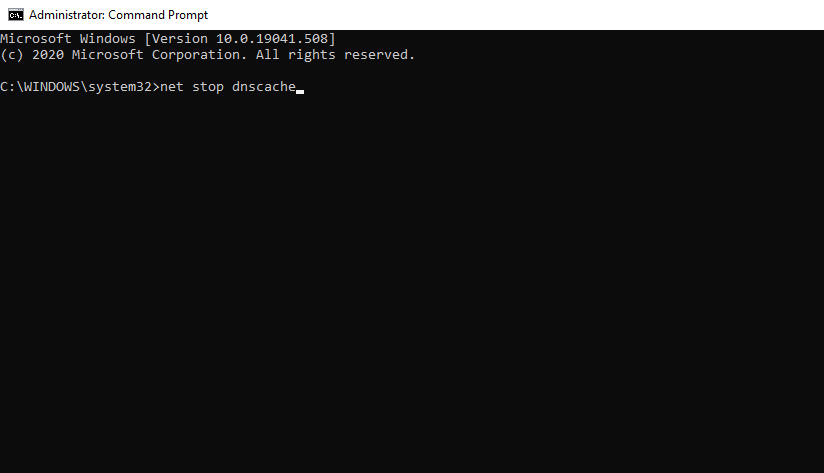
Method 6: Restart the DNS Cache Service
- To restart the DNS cache, launch a command prompt as an administrator.
- Run the following command:
- Net stop dnscache
- Running these two commands will restart the DNS cache service and should fix the problem.
Method 7: Change the IPv4 Settings
- Click the network icon on the taskbar and select Network from the menu.
- The Nslookup network icon not working
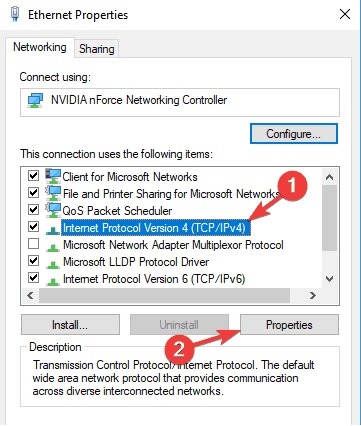
- Click the change adapter options on the right. A list of all network connections will be displayed. Right-click the network connection and select Properties from the menu. Select Internet Protocol Version 4 (TCP/IPv4) from the list and click the Properties button.
- Now click on the “Advanced” button.
- Go to the DNS tab and select Add this DNS suffix (in order). Click the Add Now button.
- domain suffix Nslookup not working.
- Enter when a new window appears. as a domain suffix and click Add. Save the changes. Adding the Nslookup suffix doesn’t work.
Method 8: Disable IPv6
- Click the network icon on the taskbar and select Network from the menu.
- The Nslookup network icon not working
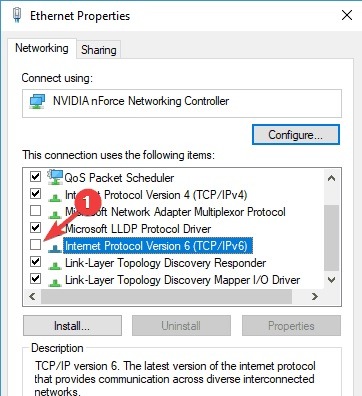
- Click the change adapter options on the right. A list of all network connections will be displayed.
- Locate Internet Protocol Version 6 (TCP/IPv6) in the list and disable it. Now click Apply and OK to save the changes. The IPv6 connection test failed
- After disabling IPv6, check if the issue still occurs.
Method 9: Use Google DNS
- Click the network icon on the taskbar and select Network from the menu.
- The Nslookup network icon not working
- Click the change adapter options on the right. A list of all network connections will be displayed. Right-click the network connection and select Properties from the menu. Select Internet Protocol Version 4 (TCP/IPv4) from the list and click the Properties button.
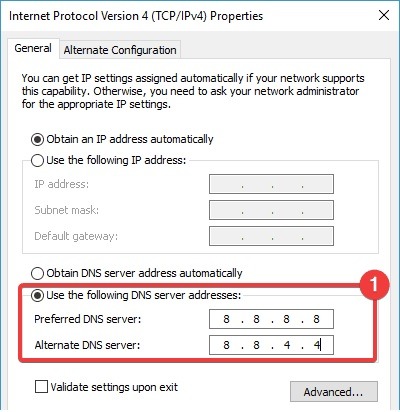
- Then select Use the following DNS server addresses.
- Enter 8.8.8.8 as the default setting and 8.8.4.4 as the alternate DNS server. Click OK to save the changes.
Hope the information provided above will be of great help for you to fix the Nslookup works but the ping fails on Windows 10 and 11.


