Does Windows Security’s memory integrity feature have a grayed-out appearance? Is your computer displaying the message “Memory integrity issues Your device may be at risk “but the toggle will not turn on? When your device is infected with malware, the memory integrity feature stops malicious software from accessing high-security processes.
But why is this feature disabled or grayed out? We’ll go over the reasons why you are unable to activate this feature in this post, as well as how to find and resolve the underlying issue.
What Causes Memory Integrity to Be Grayed Out in Windows 11
Your drivers are the primary cause of Windows 11’s memory integrity issues. This problem is more likely to occur when they get old or corrupt. If your system has incompatible drivers, the memory integrity feature may also stop working.
Most error messages include a description of the problem, making it simple to rectify. You can update your operating system, roll back an update, uninstall incompatible drivers, repair broken drivers, restore corrupted system files, and upgrade your operating system. Let’s discuss various fixes to get the feature working again.
Recommended Post:- Fixed: Windows was unable to install your base System Device
Should Windows 11’s Memory Integrity feature be enabled?
If Windows 11’s memory integrity is disabled, you should set it on to improve your security. Memory integrity off: What does that mean? Basically, these are the main justifications for turning it on:
- Protection from malicious code: Because the essential processes are isolated in memory, malicious software cannot take over these processes.
- Preventing unauthorized access to your computer: Enabling memory integrity stops third parties from using your computer without authorization, notably by stealing lower-level drivers.
- Increasing overall security: On a Windows 11 PC, HVCI technology increases overall security and safeguards your privacy.
Finally, if you want to use Windows 11 for gaming, you should think about turning on memory integrity.
Windows 11: How do you enable Memory Integrity
When you wish to enable this feature on Windows 11, there are a few more conditions you must meet. Which are:
- If your motherboard’s BIOS has virtualization deactivated, enable it on your computer.
- To be secure, update Windows to the most recent version.
- Once you’ve done that, use these procedures to turn on memory integrity in Windows.
Solution 1: Locate and resolve driver problems
Because outdated or incompatible drivers are frequently at the foundation of the problem, let’s begin by verifying your drivers. Before going to investigate driver issues in Device Manager, do the following:
- Step 1: The first step is to uninstall a third-party driver if you installed a new one and are now experiencing memory integrity difficulties.
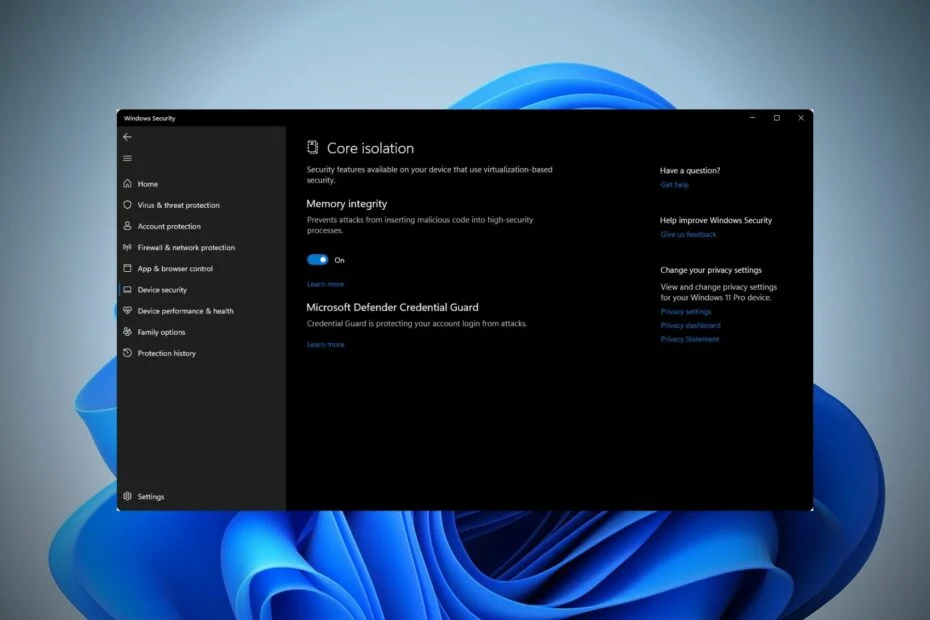
- Step 2: In the Windows Security app’s left sidebar, click on the Device security tab, then select Core isolation details.
- Step 3: Now, in the third step check this box to enable memory integrity. If you receive an error notice instructing you to “Resolve any driver incompatibilities and scan again,” click the Review incompatible drivers link.
- Step 4: Make a list of any drivers that Memory Integrity considers incompatible.
Following the above-mentioned inspections, perform the following measures to rule out driver issues:
- Step 1: The first step is to Right-click on the Windows Start button and select Device Manager.
- Step 2: On the View tab, select Show hidden devices.
- Step 3: Look for the device with an exclamation point inside a yellow triangle or the driver(s) with problems as indicated by the Memory integrity.
- Step 4: In the third step right-click on the device and select Update Driver.
- Step 5: If updating the driver does not resolve the problem, right-click it and select Properties.
- Step 6: Go to the General tab and read the statement in the Device status box.
- Step 7: Make a note of the error code, then visit the Microsoft Support website to see a list of all Device Manager-related issues.
- Step 8: To resolve the issue, discover the relevant code information and implement the Microsoft-recommended solution.
What if there isn’t a driver with a yellow triangle, or if the Microsoft-recommended workaround doesn’t work? You will then need to use third-party tools to locate and uninstall the incompatible or corrupt driver.
Solution 2: Locate and remove incompatible drivers
If you are unable to discover the incompatible driver in Device Manager, use a third-party program such as Autoruns to find and uninstall corrupt or incompatible drivers.
You can accomplish this by performing the following actions:
- Step 1: Download Autoruns from the Microsoft website.
- Step 2: Unzip the compressed file.
- Step 3: Right-click the application’s executable file and select Run as administrator.
- Step 4: Navigate to the Drivers tab.
- Step 5: Track down the troublesome drivers, since they will be highlighted.
- Step 6: Once you’ve located them, uncheck the box to disable them.
- Step 7: If any driver fails to disable, right-click on it and select Delete from the context menu.
- Step 8: Download and install the latest recent drivers from the manufacturer’s website, or restart your device to let Windows do it for you.
The Autoruns software will assist you in detecting and removing any drivers that Memory Integrity previously identified as incompatible.
Solution 3: Uninstall/Remove the relevant Apps
If deleting the incompatible drivers does not cure the problem, you should uninstall any apps or software that you installed from the same manufacturer as the drivers. Follow the steps below to accomplish this:
- Step 1: Open the Windows Start menu by right-clicking it and selecting Apps and Features.
- Step 2: In the list of installed apps, look for the program from the same vendor.
- Step 3: When you find them, click the three vertical dots next to them to select Uninstall.
Uninstalling the relevant apps from the same developer should solve the problem. If it does not, check for a Windows Update issue.
Solution 4: Correct update-related problems
You should make sure your system is up to date and that there are no outstanding updates if incompatible or corrupt drivers aren’t the issue.
- Step 1: Right-click the Windows Start button and choose Settings to do this.
- Step 2: Next, go to Windows Update and select the button labeled “Check for updates” on the right.
- Step 3: To force Windows to update your system, click Resume updates if they are pausing.
Additionally, if you recently installed an update and ran into an issue, you should uninstall it. Apply the following repair if the issue is not due to pending or recently installed updates.
Solution 5: Repair Damaged System Files
Another common factor in unforeseen problems with Windows features is corrupt system files. The Memory integrity functionality may have stopped working after a virus infected your device and destroyed your system files. To eliminate this possibility, you must confirm that your system files are complete. In this situation, an SFC scan may be beneficial.
Use Windows Search to look for “Command Prompt,” then right-click on the resultant Command Prompt and choose “Run as administrator.”
Then enter after typing “SFC /Scannow”.
To fully assess the results when the scan is finished, please see our instructions on fixing corrupt system files using Windows built-in tools.
Solution 6: Turn Windows Security Defender’s Memory Integrity feature on.
- Step 1: Type Windows Security into the Start Menu and hit Enter.
- Step 2: To expand the menu options, click on the three vertical lines in the top left corner.
- Step 3: Access Device security.
- Step 4: Under Core isolation, select Core isolation information.
- Step 5: To activate it, turn on the switch.
- Step 6: When your PC prompts you to restart, do so.

Memory integrity will look for mismatched drivers when the switch is turned on. It won’t switch on if there are any incompatible parts.
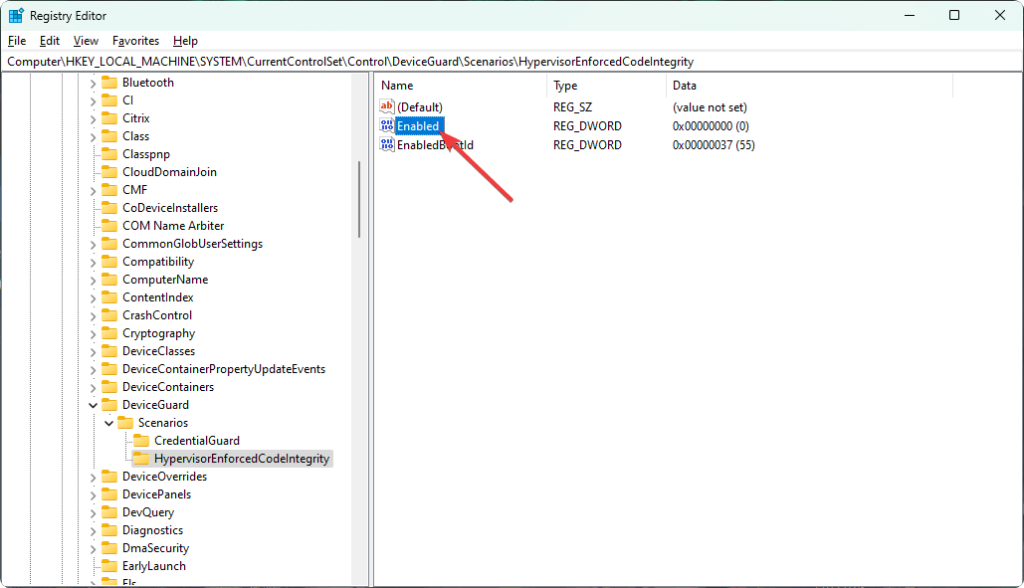
Solution 7: Utilizing Registry Editor to Enable Memory Integrity
- Step 1: To launch the Registry Editor, type Regedit into the Start menu and press Enter.
- Step 2: Navigate now to the following location:
- HKEY_LOCAL_MACHINE\SYSTEM\CurrentControlSet\Control\DeviceGuard\Scenarios\HypervisorEnforcedCodeIntegrity
- Step 3: Now, double-click on the Enabled option.
- Step 4: To save the settings, change the value from 0 to 1, then click OK.
- Step 5: Lastly restart your computer.
When Windows Security Defender cannot be located on your Windows 11 computer for some reason, this solution is great. However, you might not be able to set memory integrity if you installed Windows 11 without TPM 2.0.
Finally, it’s critical to comprehend how crucial memory integrity is in Windows 11. On both Windows 10 and 11, core isolation is a technology that changes the game.
Conclusion
Memory integrity is a crucial security feature, and if it is not enabled, your device’s security could be gravely jeopardized. Hopefully, by implementing the fixes listed in the post, you’ll be able to fix the issue and quickly enable Memory Integrity.


