Technology has grown rapidly, leading to the development of other related industries and in the past few decades gaming has become a craze among people with this craze, very many fields of the tech world developed and now, we are experiencing artificial intelligence and virtual reality-based technologies and one technology that rapidly developed was the display technology. One such display technology that was created was multiple monitor support, which allowed users to attach multiple monitors to a computer and run them simultaneously. Multiple monitors support features were well supported by all major OS platforms and Microsoft took it a bit ahead by infusing many powerful features providing users with better usability features for multiple monitors on computers.

So, with multiple desktop systems introduced in the computing ecosystem, some businesses use this technology to work efficiently. So, this technology has come into the mainstream and there have been many developments that revolve around this tech. Well, connecting multiple monitors on a computer is not very simple and a lot of work goes into developing compatibility features. Even though the Windows OS is a very compatible OS, at times the OS cannot handle or comprehend multiple monitors to ease the connectivity and compatibility, two aspiring people came up with a brand and a product named DisplayLink. DisplayLink is a driver software developed to make connecting multiple displays with a computer easy and simple through USB and other options. Currently, the DisplayLink drivers are used by millions and even Microsoft downloads a version of it so, that users can easily connect multiple displays on their computers and run efficiently.
Since the development of the DisplayLink Driver technology, users have been using it and effectively using it t connect to multiple computers here in this article we will elaborate and discuss how to download and install the DisplayLink Driver on Windows 10 and 11.
Recommended Post:- How to Fix api-ms-win-crt-runtime DLL Missing Error in Windows 11
How does the DisplayLink Driver work and Who needs this Driver
So, before we get into learning the simple methods, let’s first see, how this works and who needs the DisplayLink Driver and why is it important. As mentioned above, the DisplayLink driver is an essential component of the display unit that allows users to easily connect multiple displays on a computer. It works by making available all the displays connected to the computer via different modes and allows the OS to recognise these devices with ease to make easy connections.
It also provides the OS with features like allowing the OS to decide what goes to which display and other features which are essential to smoothly using multiple displays on Windows. Well, this is all about the functions of the DisplayLink Driver and it is a must-have driver for people who often use multiple displays but also users who have nothing to do with multiple displays can download and have it on standby. With this said, let’s dive into learning the method for downloading and installing the DisplayLink Driver on Windows 10 or Windows 11.
Simple Method for Downloading and Installing the DisplayLink Driver on Windows 10 and Windows 11
Mentioned below is the simple method to download the DisplayLink Driver on Windows 10 and Windows 11.
- To download the DisplayLink Driver for Windows 10 and Windows 11, open any web browser of your choice.
- Here, in the web browser, search for an authentic website to download the DisplayLink Driver on your computer.
- As the DisplayLink Driver is supported on multiple platforms like Windows, Mac etc, you have to choose Windows and the specific version of the Operating System on your computer.
- Now, select the download option to download and driver on your computer.
- Now, once the file is downloaded, you can go ahead and install it on your computer.
How to Install DisplayLink Driver on Windows 10 or Windows 11
- Now that you have the downloaded installation file, navigate to the location it is saved on your computer using the file explorer.
- Here, right-click on the installation file’s icon and then select the run as an administrator.
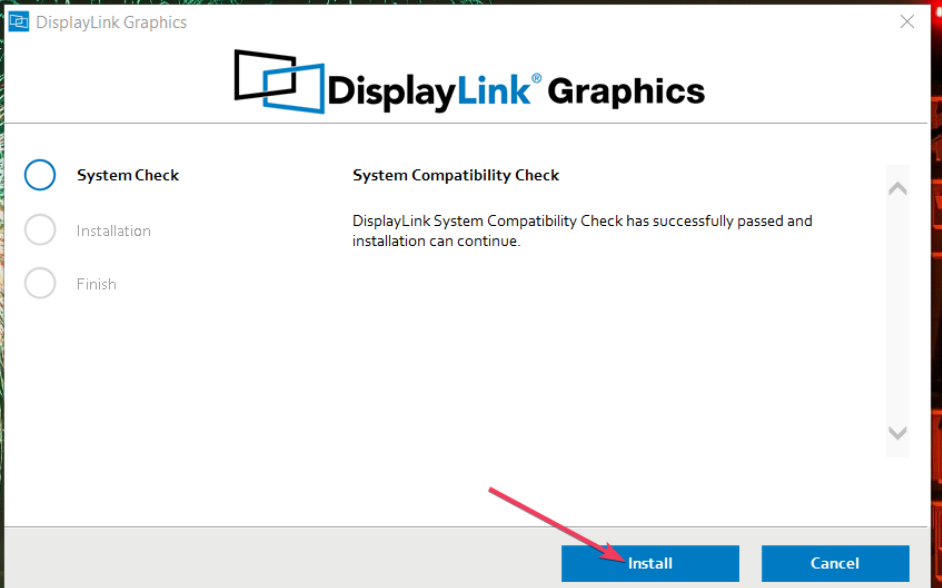
- Now, follow the installation wizard and install the driver on your computer.
- Now, once the installation is complete, you can restart the computer to allow the changes and installation to be accepted by the system.
So, now that the driver is installed you need to enable it to get started with using it, and to enable the driver:
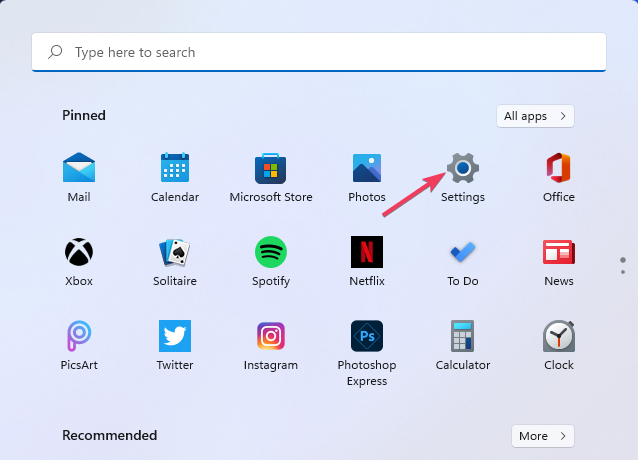
- Open the settings application by using the shortcut Windows + I on your keyboard.
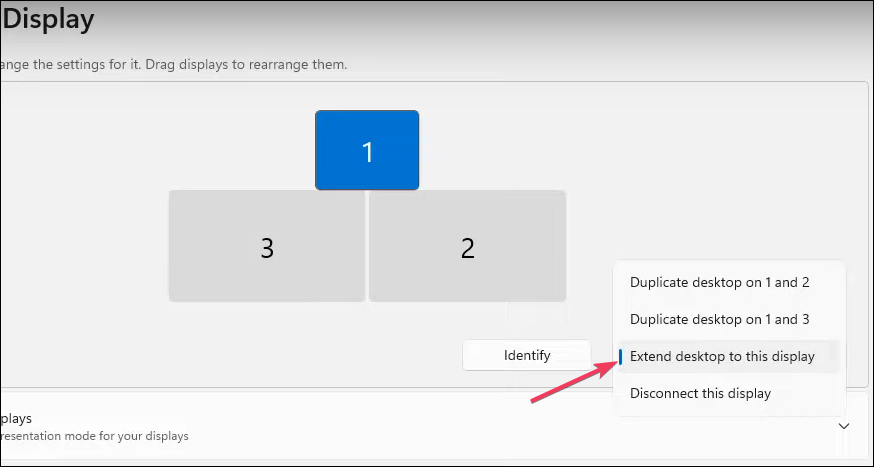
- Now, select the display option under the system tab.
- Here, select the Extend Desktop to this Display option.
- Now, select the keep changes button to save the changes you have made.
So, this is how simple the process is. If you are in need of multiple displays, you can easily download the DisplayLink Driver on your computer and then easily connect to multiple displays. With the DisplayLink Driver on your computer, you can efficiently connect to multiple displays and function with ease.
If you wish to make use of the DisplayLink Driver software to handle multiple displays, you can install the software and make use of it.
Hope the information provided above was helpful and informative, with the simple process mentioned above, you can download the driver, install it and then enable it on your Windows 10 or Windows 11 computer.


