Windows 10 is by far one of the best and advanced OSes in the market, this will remain the same until Windows 11 releases. Well Windows 10 OS has many intelligent features that provide users with great accessibility. So, when it comes to power saving, Windows 10 Os has many built-in and automatic features that reduced the use of power, the OS is smart and identifies the inactive components and cuts off the power. By this, the power consumption of the computer drastically reduces and for laptops and tablets, the battery life is extended. There are many power tricks that can be used, to conserve power and work efficiently.
USB peripherals are very much important in a computer. Most external devices like, mouse, keyboards, USB sticks, and external hard drives are connected to the computer through the USB peripherals on the computer. Even with wireless tech USB is pretty basic and most laptops and PCs come with two or three USB peripherals. Well, with this said, the USB peripherals are parallelly developed and newer versions are released to make the speed and efficiency of the peripherals. With such an important role, the USB peripherals need to be well supported and managed.
Power saving and efficient power management are important for all computing devices. Most modern OSes are smart enough to automatically manage to conserve electricity. With recent tech advancements, most computer components are energy efficient and the OSes are built to maintain maximum power efficiency. Well one key power efficiency strategy built into the OS is the option to cut off the power supply to unused hardware, so the power is channelized to the right hardware devices. One such power conservation strategy in Windows 10 OS is to cut off the power supply to the USB peripherals when they are not in use.
So, power-saving by cutting off the power supply might not be a great option as the components might have trouble with functioning properly and when there is a need for the component, there might be a sudden lag. Well, one such component that is cut off by the OS is the USB peripherals. What the OS does is cuts the flow of power to the USB peripherals that are not in use. Even though this system is great for energy conservation, it is not very good for, the peripherals and sometimes this causes errors and issues in the USB peripherals. Well, if you prefer to disable this automatic feature you can manually disable the rule.
So, here in this article, we will see how you can disable the automatic feature, so all your USB peripherals are fully powered and will be active even if it is not in use. So with this said, let us dive into knowing the method to disable the automatic power suspension feature.
Recommended Post:- Fixed: This PC Can’t Be Upgraded to Windows 10 Error
How to disable USB selective suspend in Windows 10
Well, the method mentioned below is pretty straightforward and doesn’t involve the use of complex methods. Use this method and un-suspend the USB ports to effectively use them without any hindrance.
- To disable the USB selective suspend feature, open the control panel by searching for the control panel in the search bar.
- Now, in the control panel application, select the hardware and sounds tab.
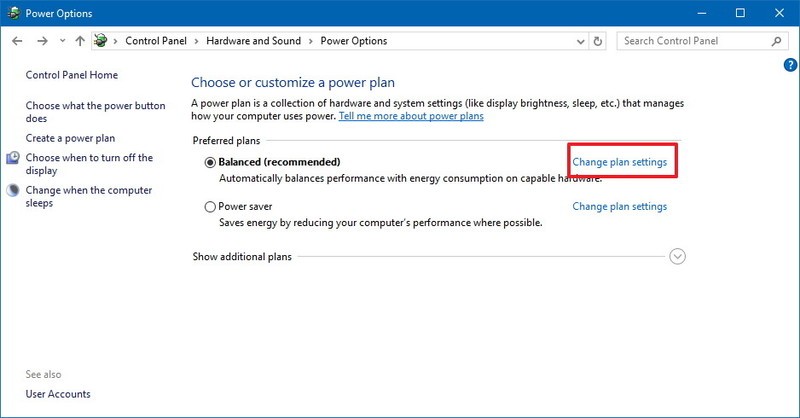
- Here, click on the power options.
- Now, under the preferred plan, click on the “change plan settings”(here you can change the plan of the power settings).
- Now, you will be navigated to the edit plan settings window.
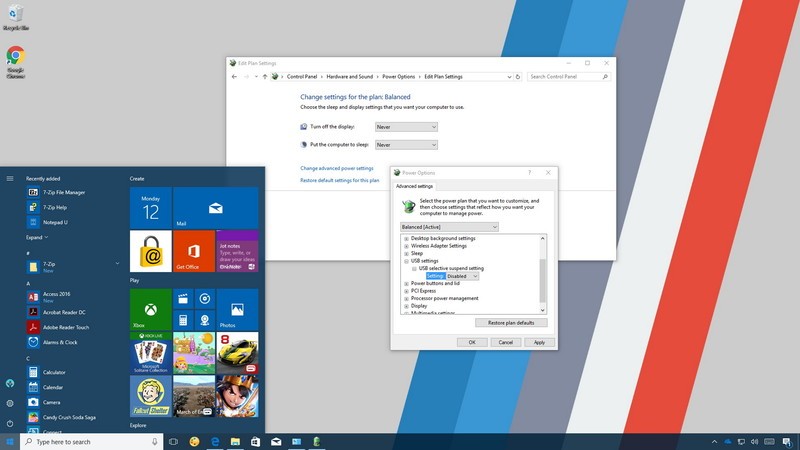
- Here, select the “Change advanced power settings” option.
- Now, in the advanced power settings, you will find the list of power options that you can enable or disable.
- Find the USB settings and click on the plus icon near it to expand it.
- Now, expand the USe Selective suspend option, and click on then “enabled” to bring the drop-down menu with the option disabled.
- Now, select the disable option, and then hot the apply button to save the settings, once done click on the Ok button and exit the power settings.
- This is pretty much it for disabling the USB selective suspension. Well, if you are using a laptop or a tablet, you will find an option called when on battery, so click on the enabled option to summon the drop-down menu, now select the disabled option, and then save the settings.

So, with the advanced power settings in Windows 10, you can change and modify the power settings on your computer, when you do, just make sure that you don’t disrupt the functionalities as the performance and stability can be affected. If you want to change the power settings, use guides available online to properly change the settings without affecting the performance or stability.
So, here is a bonus, this trick will surely help you with power conservation and effective computer performance. In Windows 10 computers, there are different power modes like power-saving, high performance, and balanced. You can choose from these power options to effectively use your computer, you can switch to power saving mode when you are not using the computer for high-end operations, and choose the high performance when using a high-end task like video editing or gaming. Well, these will come in handy with your power management.
Hope the information provided above was helpful and informative, with the power settings, try changing some settings to customize your computer for your requirements.
If you want to conserve electricity, try using the hibernate mode, when you don’t use the computer or shut down it completely.


