As Windows users, we all must be familiar with the start menu. It has been one significant feature of the Windows OS that has been there from the very early stages of the OS. Namely, even the first version of Windows (Windows NT 1) had this feature on the desktop. So, the start menu is one of the undisputed menus on the Windows OS, its development has been peculiarly well done by Microsoft.
The location of the start menu icon on the taskbar has been pretty much the same, that is the left side bottom corner is where the icon is found until now. With each OS upgrade, Microsoft threw in something new that changed the features of the start menu, and mostly all the time the looks of the start menu icon changed (which is pretty much always the Windows logo), and in the latest Windows OS- The Windows 11, the start menu icon has been moved to the center of the taskbar which is something new that Microsoft has tried in the OS.
Well, if you have little to no idea of what we are talking about, here is a simple explanation of what the start menu is: The start menu is the default menu that appears at the bottom-left corner of the screen. The start menu houses different things within it and you will be able to access these features just by clicking on it using the mouse. Some common options available in the start menu are the power option, accounts option, applications that have been installed on the computer, pictures, and other files that are on the computer.
Recommended Post:- How to Disable Animations in Windows 10
So, basically, the start menu is something that gives you the option to access anything on the Windows computer through the various options it houses. Well, such a useful option available on Windows makes the OS easy to use, and moreover, with Windows 11 the start menu is very much customizable allowing users to customize it in whichever way is suitable. So, here in this article, we will discuss some ways to customize the start menu on a Windows 11 computer.
So, why exactly is Windows 11, and why not Windows 10 or previous OSes? Well, to put it in simple words, Windows 11 is a very powerful OS with a great user interface whereas its predecessors like Windows 10 or Windows 8 were not so customizable and also Windows 11 is the latest and the most relevant OS, it is important that we explore the options and customizability available on the OS.
So, customization of the start menu is possible and you can move most of the options here and there and do much more with the interface to make it suit your taste. With the User Interface being made very smooth and with curved edges, customizing the interface will be a very great experience. So, here are some simple steps to customize the start menu with ease. So, follow along and get your start menu a new look.
Simple Ways to Customise the Start Menu
With all said, we can dive into the methods to customize the start menu so you can make the start menu look the way you want.
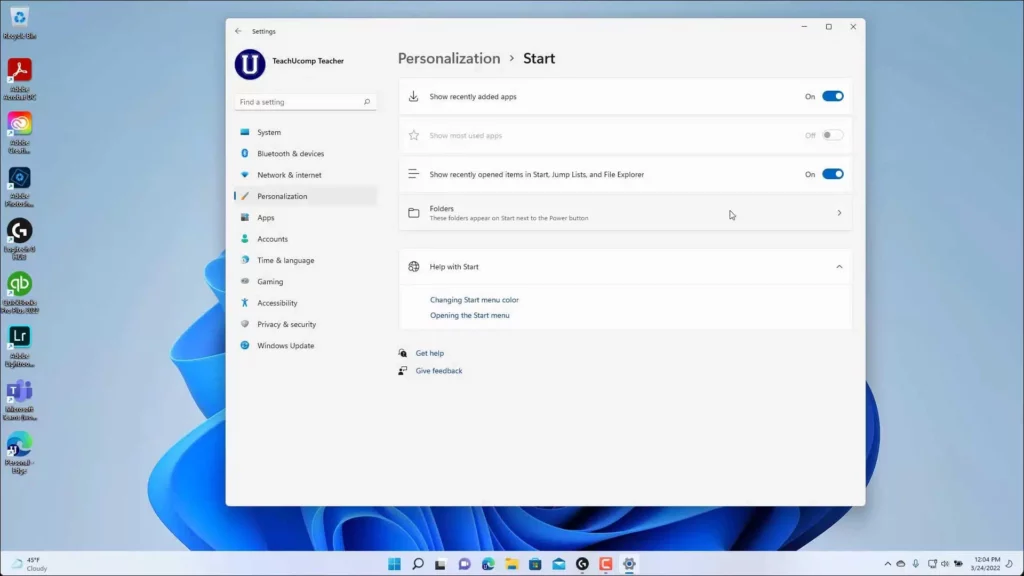
- To customize the Start menu in Windows 11, open the Settings app by pressing the Windows + I icon (which is the keyboard shortcut for the settings application).
- Alternatively, you can right-click the Start button and then click the Settings command on the popup that appears.
- Then click the Personalization link on the left window pane of the Settings app window to display the Personalization settings on the right.
- Then click the Start link in the Personalise List to display its settings on the right side of the window.
- To see recently added apps from the Windows 11 Start menu, click the Show recently added apps toggle switch and set it to the On setting.
- To hide them, reverse-click on them to toggle the option off.
- To add a button to the left of the Windows 11 Start menu power button to access general user folders or the Settings app, select the Folders to link on the right side of the Start category in the Settings tab. Click to see a list of windows and folders to use. You can add to this section.
- To add a button to the left of the Windows 11 Start menu power button to access general user folders or the Settings app, click the Folders link to the right side of the Start category in the Settings tab. Click to see a list of windows and folders to use. You can add to this section.
- To add a listed folder or program, click the shift key to toggle it to the “on” position.
- To hide it, click the toggle switch in the “off” position. If you choose to add a button for a folder or application, you can open it by clicking the button that appears to the right of the power button in the Start menu.
- To close the settings window after customizing the Start menu, click the X button in the upper-right corner.
So, this is how simple it is to customize the Windows 11 start menu. The options available are very handy and can be implemented to give the OS a very enhanced look.
With such simplified steps presented to you, you can easily make changes to the start menu with ease, so hope it was helpful and you will make the best use of it and make your start menu look efficient and aesthetic.


