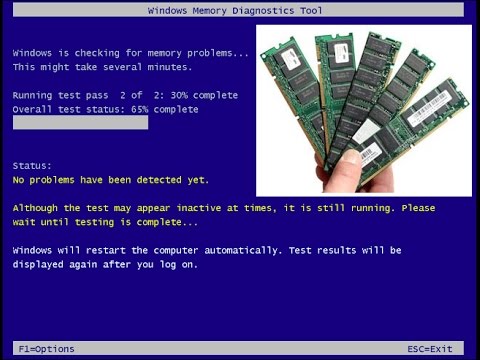
Have you ever wondered how to tell whether your PC has bad RAM? This was accomplished with the assistance of a hidden built-in tool by Microsoft known as the Windows Memory Diagnostic tool (WMD Tool). When the system identifies a problem with the RAM, this utility usually displays a notification to the user, as illustrated below.

Windows 10 and previous systems provide a memory diagnostic tool for verifying and testing RAM. When you open it, it will scan your RAM for any problems while operating on your machine.
Unfortunately, some customers have experienced stuck problems with the Windows memory diagnostic application after using it.
When users select the Restart Now option, the machine reboots and runs a test. As the test progresses, it displays the percentage of completion. This exam takes a significant amount of time, ranging from half an hour to a whole day. If the scan hasn’t progressed much in the last 20 hours, it could signify that the Windows Memory Diagnostic tool has been stuck owing to system malfunctions or damaged hardware. This tool is usually stuck or frozen for a long period at 1% or 21%.
Recommended Post:- Fixed: Intel System Usage Report Uses too Much CPU
What is Windows 10?
Windows 10 is a Microsoft operating system that is designed for use on personal computers, tablets, embedded devices, and internet of things devices.
As a follow-up to Windows 8, Microsoft released Windows 10 in July 2015. Windows 10 will be supported until October 2025, with Windows 11 serving as its replacement.
Anyone using Windows 10 can update older machines from Windows 7 or Windows 8 to Windows 10 without re-imaging or performing time-consuming and intrusive system wipes and upgrades. To upgrade from a previous version of Windows 10, IT or users run the Windows 10 OS installer, which moves any apps and software from the prior operating system, as well as settings and preferences, to Windows 10.
Windows 10 includes built-in capabilities that enable corporate IT departments to secure and govern devices running the operating system via mobile device management (MDM) software. Enterprises can also employ traditional desktop administration software, such as Microsoft System Center Configuration Manager.
Organizations and users can customize how they patch and update Windows 10. IT and users can obtain a Windows 10 upgrade via the Windows Update Assistant to start an upgrade manually or wait for Windows Update to offer an upgrade when it is scheduled to run.
All About RAM (Random Access Memory) and its Working
RAM (Random Access Memory) is the working memory of your computer. The operating system and PC programs are constantly writing data to RAM and reading it back. When you load a web page, for example, the browser stores that page in RAM while you read it.
However, if the RAM is faulty, you may find several challenges when attempting to execute software packages. This may result in application crashes, data corruption, and other system problems.
If your computer’s RAM is bad, the Memory Diagnostic program can help you fix it.
About Windows Memory Diagnostic tool
The Windows Memory Diagnostic tool is a highly valuable resource for troubleshooting when the computer begins to function slowly, freezes, hangs, displays a blue screen, or reboots on its own, and it can assist detect problems with installed applications, whether caused by memory difficulties or not.
The tool examines the computer’s Random Access Memory (RAM) and reports any faults discovered. To run the Windows Memory Diagnostics program, follow these steps.
One of the better free memory testing apps is Windows Memory Diagnostic. We’ve been using it for years as a backup when Memtest86 detects a memory problem.
To get started, go to Softpedia.com and look for Microsoft’s Windows Memory Diagnostic download page. This software is no longer hosted by Microsoft.
Once there, select DOWNLOAD NOW from the menu on the left, and then select one of the download links; either should work.
Run mtinst.exe after it has been downloaded. Save the windiag.iso ISO image to your desktop by selecting Accept and then Save CD Image to Disk. You can shut the other window by selecting OK on the confirmation prompt.
You must now burn the ISO file to a CD. We haven’t been able to correctly burn WMD to a USB drive, such as a flash drive, therefore you’ll have to use a disc. Burning an ISO file differs from burning other types of files.
After writing the ISO image to the CD, restart your computer with the disc in the optical drive. Windows Memory Diagnostic will begin evaluating your RAM instantly.
Windows Memory Diagnostic shall continue to run indefinitely unless you stop it. One clean pass is generally plenty. When you see Pass #2 begin (in the Pass column), your test is over.
Replace the RAM if WMD finds a fault. Even if you aren’t having any troubles right now, you will most likely soon. Replace your RAM now to save future frustration.
How to Run Windows 10 Memory Diagnostic Tool
Because these instructions need you to restart your computer, save any open files, and shut down any running applications before starting. Here we go.
- Step 1: Launch the Control Panel.
- Step 2: Navigate to System and Security.
- Step 3: Navigate to Administrative Tools.
- Step 4: Select the “Windows Memory Diagnostic” shortcut and double-click it.
- Step 5: Select “Restart now and check for problems” (The tool also offers an option to schedule a test in the next reboot).

When your computer reboots, it will boot into the Windows Memory Diagnostics environment, and the testing will begin immediately in Standard mode. The tool will execute all of the scans accessible in the Basic mode in this setting.
Examining Test Results
While you can see the status during the scan, your computer will restart immediately once the test is over, and you’ll need to utilize the Event Viewer to examine the test data to determine whether you have a damaged RAM module or not.
- Step 1: Launch Start.
- Step 2: Open “Event Viewer” by searching for “eventvwr.exe” and pressing enter.
- Step 3: Open the Windows Logs folder and expand it.
- Step 4: Right-click System and then select Find.
- Step 5: In the Find Window, type “MemoryDiagnostics-Results” and click the “Find Next” button to continue.
- Step 6: Double-click the “MemoryDiagnostics-Results” source in Event Viewer to view the message. If the result says “The Windows Memory Diagnostic tested the computer’s memory and found no issues,” you can rule out memory as the source of the issue.
If the result contains one or more errors, do an extended memory test and re-check the results. If you continue to notice at least one error, one of the RAM modules is most likely faulty and should be changed.
How long should it take for a Windows Memory Diagnostic to complete?
Depending on the RAM amount, the Windows Memory Diagnostic tool in extended mode can take anywhere from 15 minutes to 20+ hours.
When conducted in extended mode, Windows Memory diagnostics can take many hours to complete. Furthermore, the Windows Memory Diagnostic tool has been known to become stuck at 1% and 21% advancement for hours at a time.
However, if the tool remains stuck for a full day or more than 10 hours, the cause could be a system glitch.
We’ve provided a few troubleshooting steps in this post to assist you to resolve the Windows memory diagnostic tool stuck/frozen issue on your Windows machine.
How to fix the Windows Memory Diagnostic tool stuck issue?
Microsoft Windows has a useful tool for diagnosing RAM issues on your PC. Memory issues might cause your computer to lose data or stop performing in certain conditions.
You can quickly examine your machine for memory problems by using the default Windows Memory Diagnostic tool. However, the Windows Memory Diagnostic tool occasionally freezes at around 21%. If you repeatedly encounter the same issue, these are the best solutions.
The Memory Diagnostic program on Windows takes anywhere from 15 minutes to 10+ hours to run, depending on the RAM amount. End users may be confused if the tool becomes stuck on 1%, 21%, or any other figure. While it is usual for the app to become stuck at 21%, if the predicted time is more than 12 hours, a system problem may exist. Let’s look into the issue.
Give Enough Time
As previously stated, running the Windows Memory Diagnostic program on your machine may take up to 10 hours. It can sometimes stay at 21% for more than five hours. It’s perfectly natural. Only start sweating if the tool has been stuck for more than 10 hours. If you haven’t seen any movement after 10 hours, it’s time to troubleshoot the problem using the procedures below.
Disable all Services and Retry
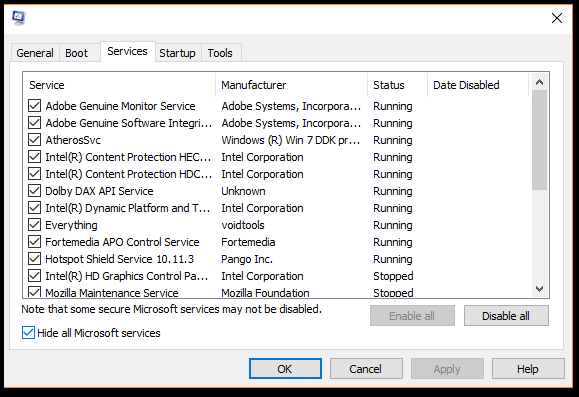
You should disable background apps and services and try again using the Windows Memory Diagnostic tool. However, you should not disable needed Microsoft services at launch. During the reboot procedure, you may notice difficulties.
- Step 1: Press the Windows + R keys together to bring up the Run menu.
- Step 2: Enter MSConfig and press Enter to launch the System Configuration menu.
- Step 3: Select the Hide all Microsoft services checkbox.
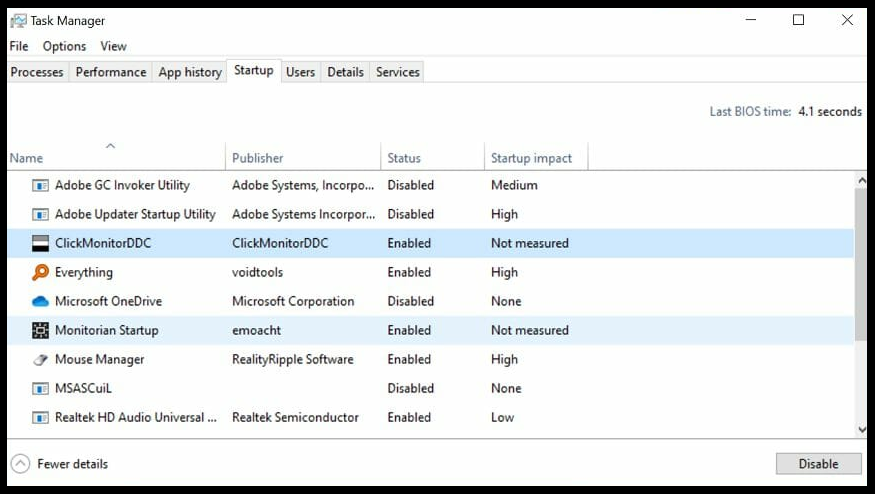
- Step 4: Go to the Startup tab and click Disable all.
- Step 5: Select Task Manager from the options below.
- Step 6: From the following menu, disable all startup programs and services.
The Cache Should be Enabled
While running the Windows Memory Diagnostic Tool, you can enable caching.
- Step 1: When the Memory Diagnostic tool’s blue screen appears, press the F1 key.
- Step 2: Press the Tab key to navigate to the Cache option.
- Step 3: To apply the modification, select On and press F10.
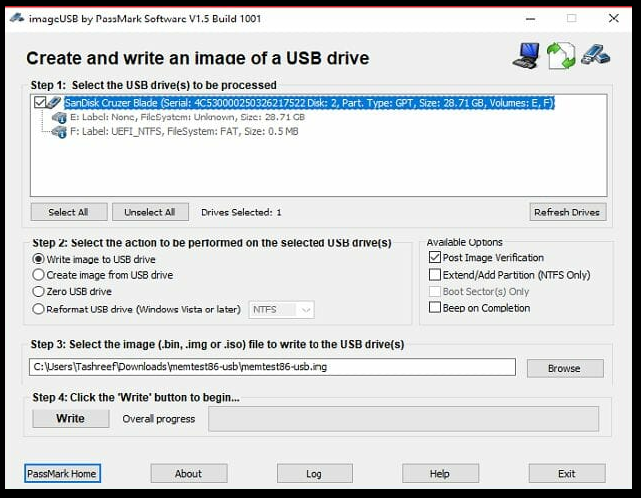
- Step 4: Connect your USB drive to the computer in step four.
- Step 5: Open the extracted folder and run the imageUSB.exe file.
- Step 6: Ensure that the linked drive is detected in the ImageUSB window.
Turn off your computer, insert a USB pen drive, and then restart it. When you restart your computer, the tool will start immediately.
Launch the Windows Security Tool
Do you routinely download programs and media assets from untrustworthy websites? You may have infected the computer with malicious files. Rather than relying on a third-party anti-virus app, use the built-in Windows Security tool to remove harmful files and run the Windows Memory Diagnostic tool without difficulty.
- Step 1: Press the Windows key and type Windows Security into the search box.
- Step 2: Press Enter to launch the app.
- Step 3: From the left sidebar, select Virus & threat protection.
- Step 4: Perform a quick search of your computer and remove any malicious files.
If you run the Windows Memory Diagnostic program again, it will not get stuck at 21%.
Pros and Cons of Windows Memory Diagnostic
While it is not the finest RAM test tool available, it is an excellent backup:
Pros
- Anyone can utilize the application at no cost.
- The download size is extremely modest.
- To use the utility, Windows does not need to be running or installed.
- Anyone may use and benefit from it because it is simple to use.
- There is no need for user intervention because the memory test is automated.
Cons
- The creation of a starting disc and a CD image adds additional procedures.
- Only the first 4GB of RAM will be tested.
More Information about Windows Memory Diagnostic
Windows Memory Diagnostic includes more test choices, but none are required for a normal memory test. Multiple tests are run to identify the obscure memory hardware issues.
Windows Memory Diagnostic memory test sets will run indefinitely until the PC is turned off.
To execute memory tests, no operating system is required. Windows Memory Diagnostic is included in Windows 7’s System Recovery tools.
Conclusion
If your Windows device frequently crashes or freezes, it could be a sign of memory issues. Fortunately, the Windows Memory Diagnostic tool can assist you in resolving these problems.
It is normal for the Windows Memory Diagnostic Tool to become stuck at 21% or 29% for hours on end. If the tool has been frozen for more than 20 hours, use these troubleshooting steps to resolve the issue.
If you follow the guidelines we’ve provided, using this tool is quite simple. However, if you are having difficulty resolving Windows memory issues, it may be time to upgrade to more powerful RAM.


