Security and data protection is one of the concerns of any tech company as the internet and digital devices can easily be attacked by cybercriminals with powerful viruses, malware adware, and many other means, all the tech companies have done their part in providing at least the basic security feature to defend from cybercrimes and also to prove that they care for their users’ safety. Microsoft has also introduced their Windows defender software to provide Windows OS from viruses and malware, Windows defender was first introduced in Windows XP as basic and free antivirus software for Windows. The software was pretty dumb and had no real benefit as the virus and malware were much advance and Defender was not able to keep up with providing security.
Windows Defender was put out by Microsoft to provide security to its users, but Defender is not as powerful as the virus and malware. The software is not frequently updated to keep up with the current security trends. The software interrupts with many functionalities and affects the workflow by interrupting the workflow. Defender accidentally deletes or removes some important files from the computer considering them to be potential threats. Such behaviors can be annoying at times and cause havoc to the users. Sometimes you need to disable the defender to carry on with some activities as the defender can interrupt the functioning.
Antivirus software is kind of a must-have on your computer device as your computer may get infected by a virus anytime. Viruses and malware enter your computer through various pathways, they get downloaded from the internet when you are surfing or downloading some files from an unauthorized website, virus can enter your PC from the USB stick or any data device you use.
Windows Defender is one of the antiviruses but it’s not that effective and going for a paid one is better than using the Windows defender as windows defender lacks most of the features that are necessary for keeping you safe. You can download any of the best-paid versions of the antivirus from the internet and use them as they will serve the purpose and better assist you with maintaining the overall security of your computer. You can also use some of the free antivirus software to defend your computer from viruses and malware if you have no intention of buying a paid version.
Recommended Post:- Fixed: Image Preview Option Is Missing From Context Menu In Windows 10
How to Permanently Disable Windows Defender On Windows 10
Disabling the antivirus is pretty simple and Microsoft provides you the option to do so. You can permanently put the antivirus on sleep and work efficiently without any interruption.
Follow the steps mentioned below to disable the Windows Defender on Windows 10:
- Open up windows security by searching it in the search bar.
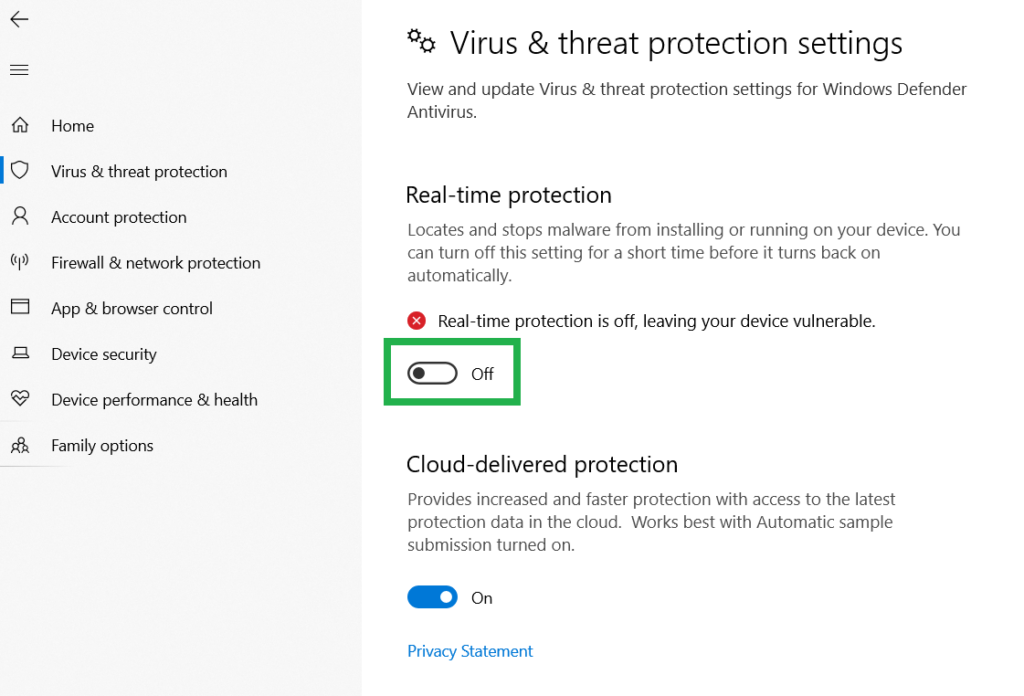
- From the left pane of the screen, choose the virus and threat protection.
- From the right window pane, click on the manage settings option.
- Now click on turn off the real-time protection to disable the Windows defender from protecting your computer in real-time.
- This is a temporary solution for disabling Windows defender until the next restart, once you restart the computer, the Windows Defender will be activated.
Now let’s learn how to disable Windows Defender permanently using the group policy:
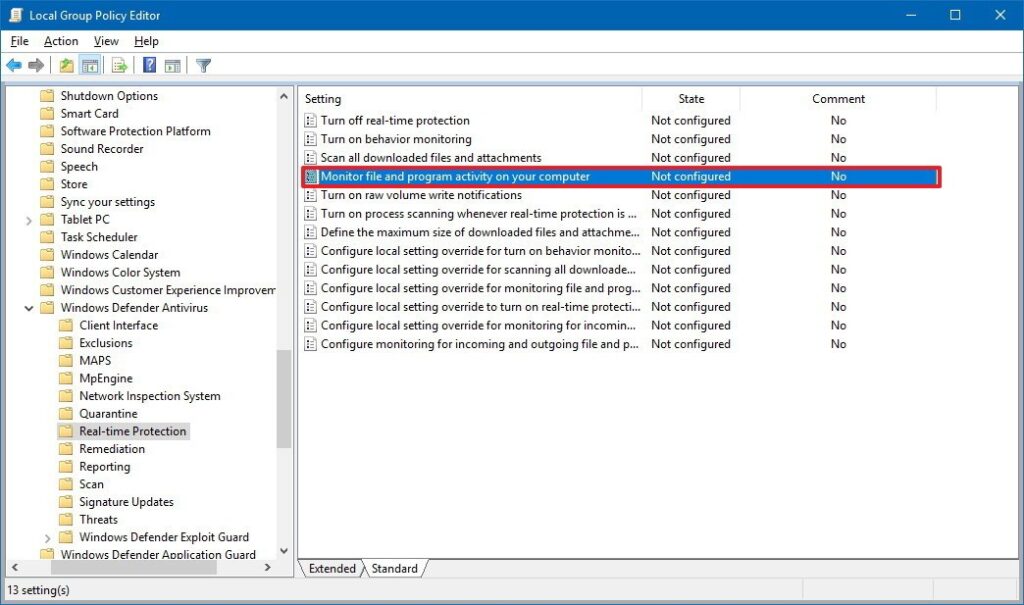
- Open up the group policy editor by searching the gpedit.msc in the run command.
- You will open up the local group policy editor.
- Now, navigate to this path Computer Configuration > administrative templates > Windows Components > Windows Defender Antivirus.
- On the right windows pane of the glocal group policy editor, double click on the turn-off Windows defender antivirus policy.
- Now change the enabled option to disabled to disable Windows defender.
- Once done with these steps, click on apply and click Ok to apply, and save the choice.
- Now you have permanently disabled Windows defender on Windows 10 PC.
The local group policy editor will work only on the Enterprise version and education version of Windows 10.
If you install a third-party antivirus on your Windows computer the antivirus will automatically disable Windows defender from making changes to your computer as you cannot use two antiviruses simultaneously. You will not have to disable it separately.
Once you have disabled the Windows Defender antivirus on your Windows 10, you can freely install software, that ware being restricted by the antivirus software. You can now function better as there will be no defender to annoy you while you are working. You can function better with your computer without the antivirus disturbing you.
If you chose to disable the software for a temporary period of time you can disable the real-time protection from the security feature as mentioned before in this article you can avail this when you are about to do some operations like installing a software, by this Windows defender will not interrupt the installation process by any chance. The antivirus will switch back on when you reste=art the computer manually or when you turn the antivirus on yourself.
Hope the article was informative and you were able to disable Windows defender on windows 10. As mentioned you can only use the group policy editor on the enterprise and educational version of Windows 10 and need to manually disable Windows defender on the home version of Windows 10. This process is simple to follow and can be easily be done by anyone. You can opt for a professional antivirus instead of using Window defender as it is not efficient and can come in the way of many processes and annoy you during your work.


