Hello readers, many of You may want to utilize macOS on a Windows PC at times or wish to experience macOs. In the initial days, there was a barrier between the two worlds.
But there’s excellent news if you use Windows 11 and wish to access macOS. You can use your Windows 11 machine to run Apple’s macOS by following a few easy workarounds.
This implies that you can now take advantage of the exceptional capabilities that macOS offers without switching to a MacBook.
The macOS users always utilize Apple hardware, which cannot be used on a Windows computer, but this barrier is gradually decreasing.
Today, with the help of Virtual Machine software, you can install macOS on your Windows PC. And in this post, we’ll look at how to install Mac OS X in VirtualBox on a system running with Windows.
In this demonstration, we will install macOS on Windows using VMware Player, a third-party virtualization software.
The benefit of utilizing this program is that it does not require you to format or migrate your system data to install it. To imitate the experience, simply create a virtual disc on your PC with VMware and install macOS. So, what are you waiting for? Let us quickly begin.
The Windows operating system is a popular software that controls all the hardware and services of any apps installed.
Microsoft created this operating system, first launched as Windows 1.0 in 1985. Since then, one of the most widely used operating systems worldwide has developed from Windows.
A wide range of hardware, including desktops, laptops, servers, and mobile devices, can run the Windows operating system.
Unlike other operating systems, Windows uses a graphical user interface (GUI) that enables users to interact with the computer using buttons, icons, and visual menus instead of written commands.
Windows also comes with many capabilities, like plug-and-play ease of use for connecting extra devices like printers, scanners, and cameras, and multitasking ability, which permits multiple apps to operate simultaneously.
Defining MacOS
The operating system (OS) for Apple laptops and desktop computers is called MacOS. Every Mac is powered by a proprietary graphical operating system.
Operating systems communicate with a computer’s hardware by assigning it the resources it needs to finish tasks that are assigned to it, such as executing an application. Operating systems allocate memory, computing power, and file storage, among other resources.
MacOS is generally fast and responsive since the operating system is tailored to the particular hardware. Almost a year later, Apple released an update for macOS.
1984 MacOS was released to operate Macintosh personal computers (PCs). The operating system (OS) contributed to the popularity of graphical user interfaces (GUIs), even motivating Microsoft to switch from its user input technique to GUIs for Windows OSes.
Can macOS be installed on a windows system?
If you like the appearance and feel of MacOS but can’t afford a Mac machine, install macOS on a PC running Windows 11.
Although it is feasible to download and install MacOS on a non-Apple machine using web programs such as Virtualbox or Vmware, Apple does not officially endorse this approach owing to copyright difficulties.
It’s also worth noting that the installation process can be complicated and time-consuming if you have yet to gain any hardware or software experience.
Pre-Installation requirements
Before deep diving into installing macOS on our Windows PC, let’s look at its requirements. They are as follows:
- Virtualization should be enabled.
- Download macOS Image
- Hyper V should be disabled
Enable Windows Virtualization Technology.
Users can utilize virtualization technology to imitate and run many operating systems on a single machine. To install macOS as a virtual machine on your Windows PC, make sure the Virtualization Technology is enabled in your computer’s BIOS. Here’s how you can verify it:
Step 1: Restart your Windows PC and enter the BIOS mode by pressing the designated Function key during boot. If you need help with the key, you can look it out on Google by entering your system’s model number.
Step 2: Navigate to the configuration tab and enable Virtualization Technology. Once finished, save your modifications and restart your computer.

To install Virtual Machines, disable Windows Hyper-V.
Microsoft Windows has a native virtualization solution named ‘Hyper-V’ by default, which allows you to construct and run virtual computers.
Because we use third-party virtualization software (VMware) to run our ‘Virtual macOS,’ which has significantly more customization possibilities, you must disable Hyper-V on your machine to avoid incompatibilities. Here’s what you should do.
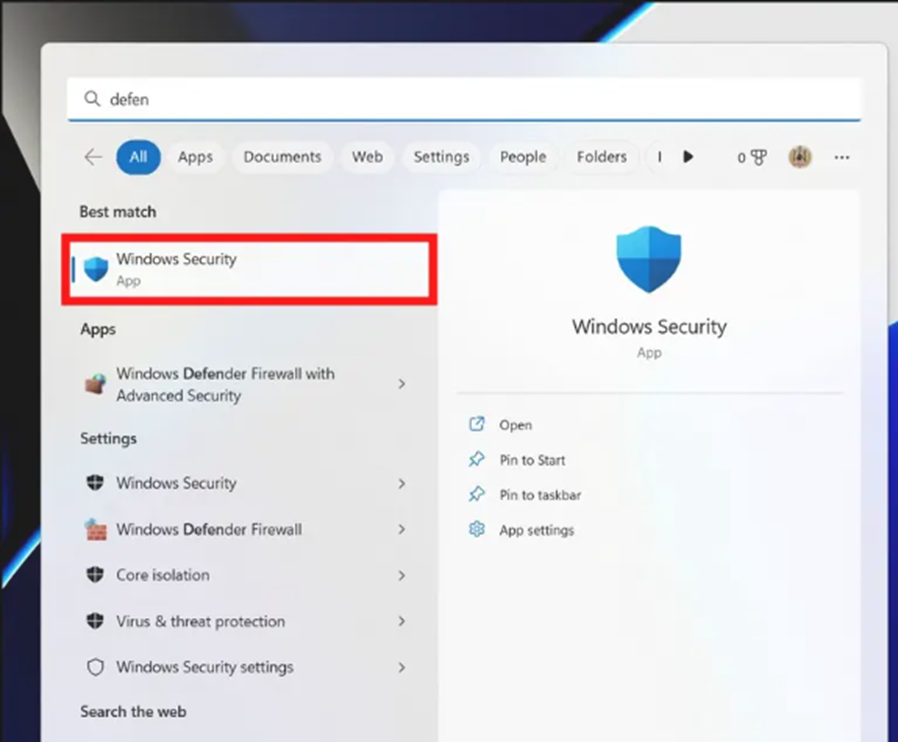
Step 1: Access Windows Security settings by using the Windows key.
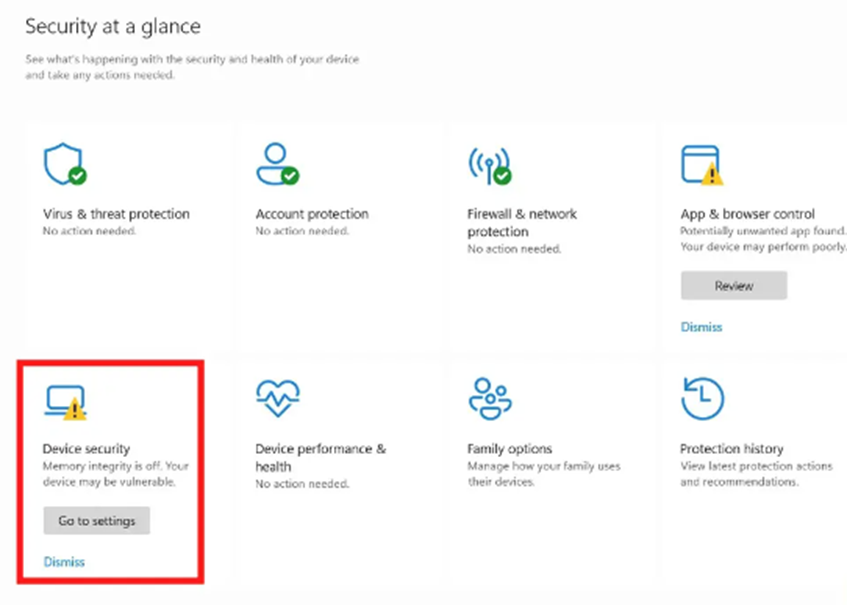
Step 2: Then, to configure it, click on the Device Security option.
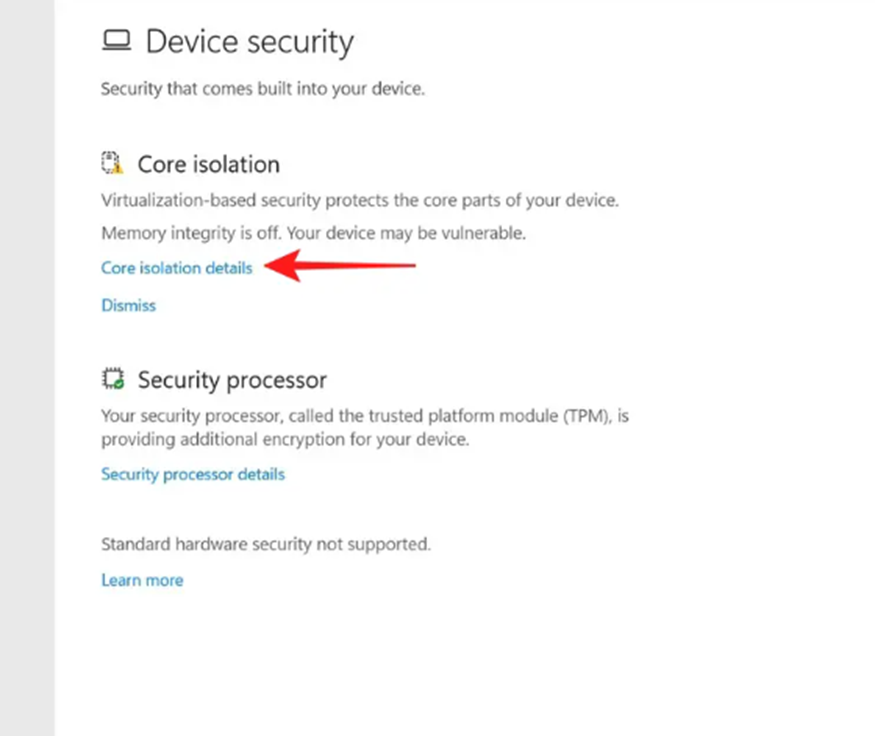
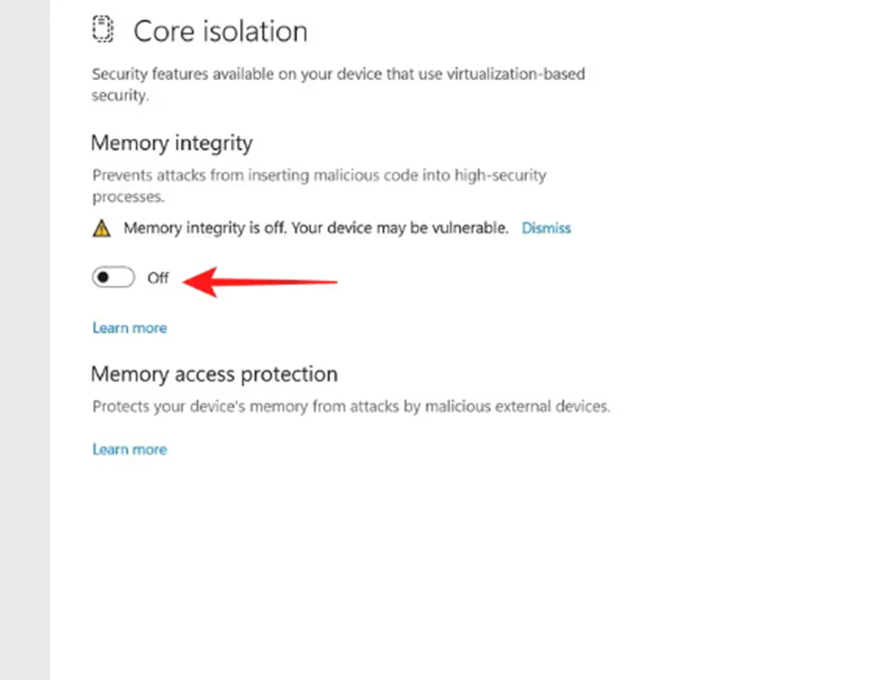
Step 3: Tap on the Core Isolation function again to access its options.
Step 4: Finally, switch off the Memory Isolation option to disable it. This will prevent Windows Security from interfering with modifications to the system product (in this example, Hyper-V).
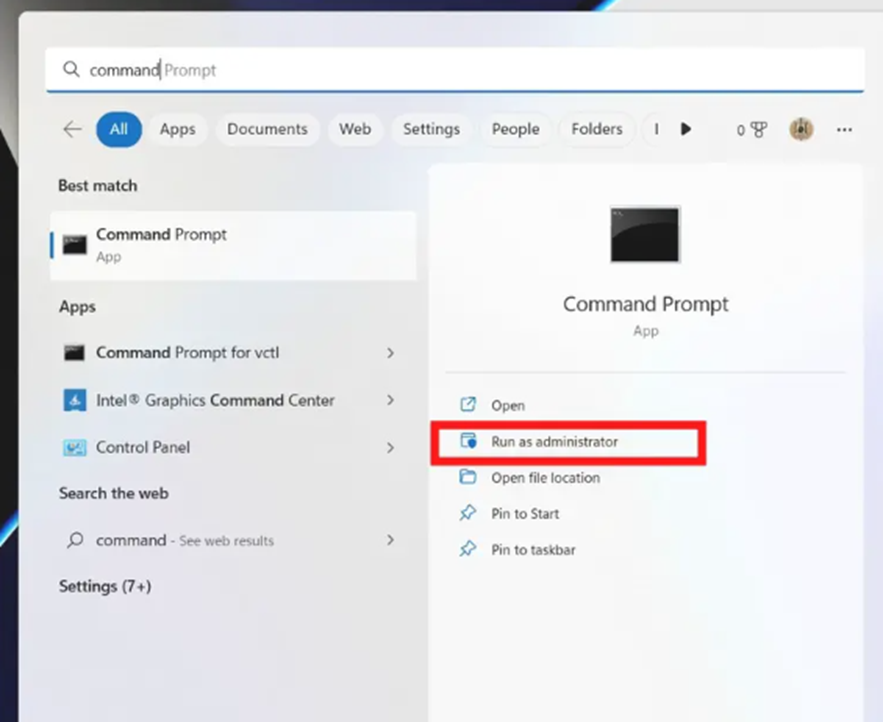
Step 5: Start Command Prompt with Administrator privileges.
Step 6: To turn off the Windows Hypervisor (Hyper-V), type the following command into the terminal:
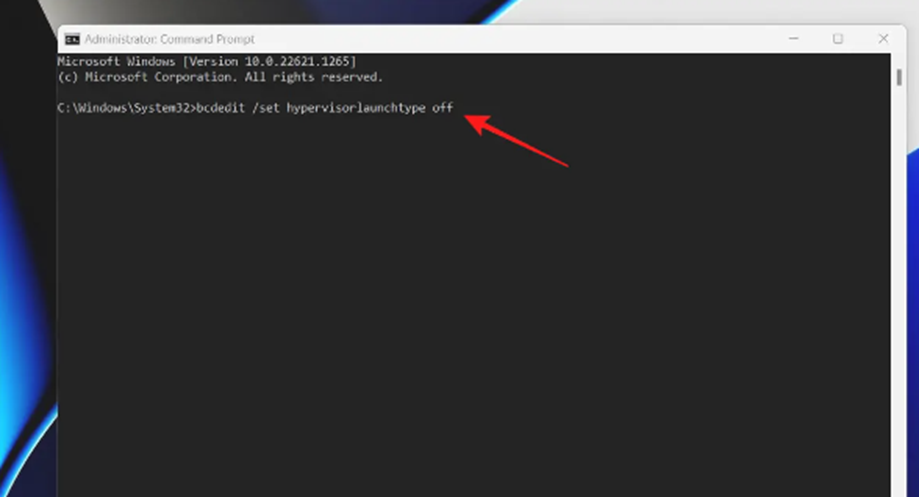
Step 7: To make changes take effect, restart your computer.
Get the macOS VMware Image.
The final requirement for installing macOS Catalina is the VMware image. To download it, follow these steps.
- Get the Mac OS X VMware image from Google.
- Use native or third-party decompression tools like WinRAR to extract the downloaded compressed file to your system.
- Once extracted, the .vmdk file utilized for installation will be visible.
Installing macOS on Windows 11/10 System
Now that you’ve completed the prerequisites let’s go over how to install macOS on Windows 11/10.
Step 1: Get the VMware Workstation Player from its official website and install it.
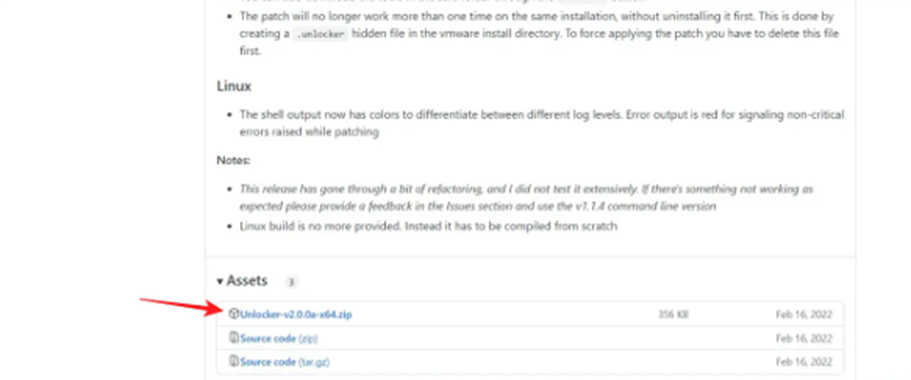
Step 2: After that, download the VMware Unlocker utility and extract it to a new folder.
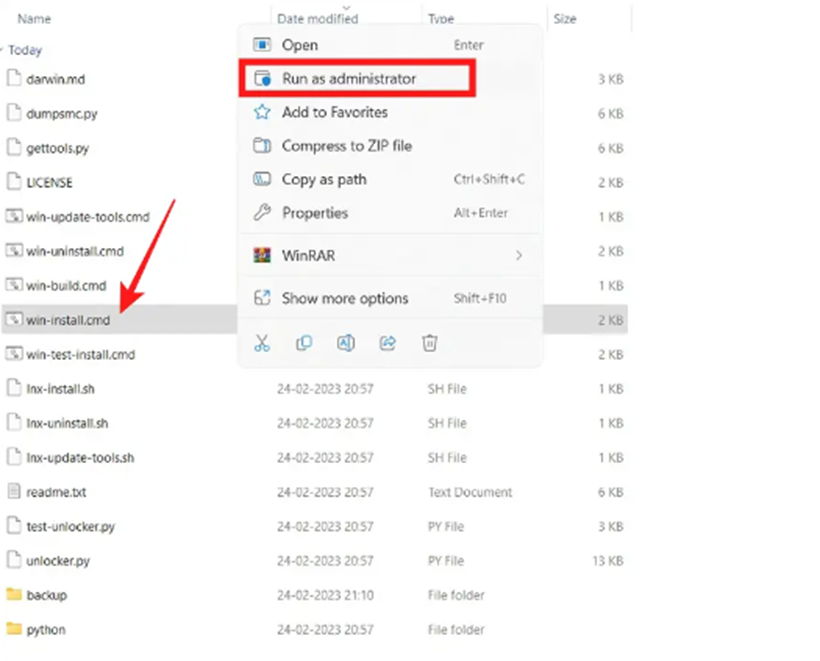
Step 3: Find the win-install.cmd file in the list of extracted files and right-click to run it as administrator.
Step 4: The commands in the win-install.cmd file will patch the installed VMware Workstation Player during installation to add an entry for Apple macOS.
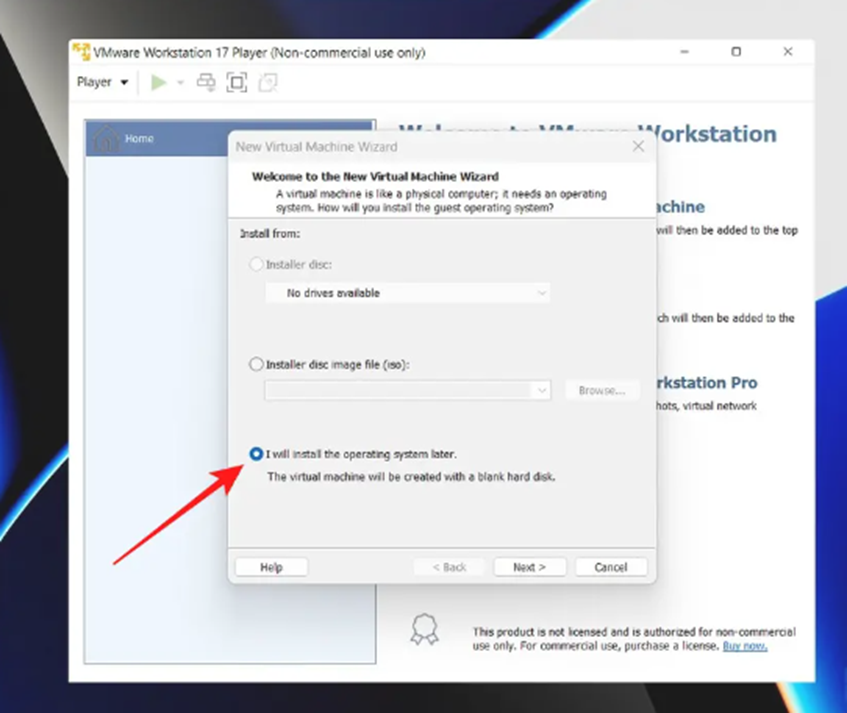
Step 5: Launch the VMware Workstation Player and launch a New Virtual Machine.

Step 6: Select ‘I will install the operating system later’ and press the Next button.
Step 7: To install macOS, choose Apple Mac OS X and macOS 10.15 from the list.

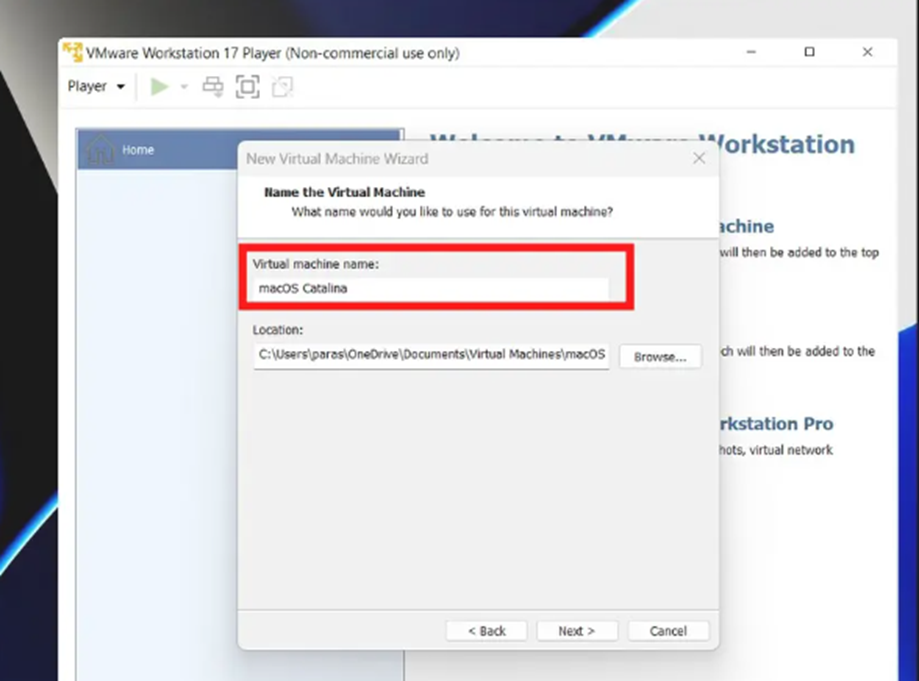
Step 8: Give your virtual machine a new name and click the Next button to proceed.
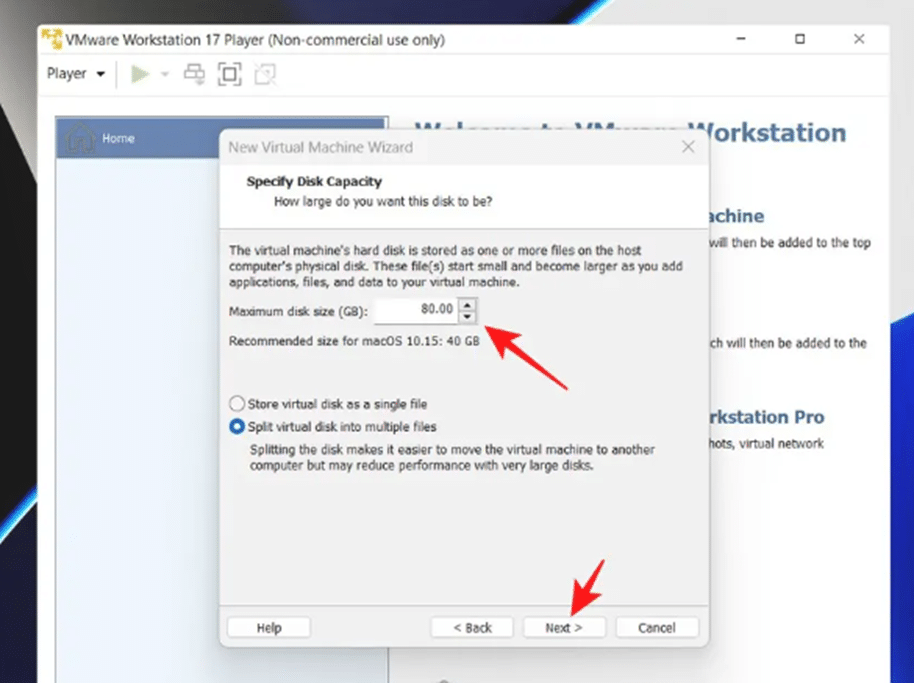
Step 9: Now, allocate at least 80GB of disc space and click the Next button to complete the configuration.
Step 10: To finish creating a new virtual machine, click the Finish button.
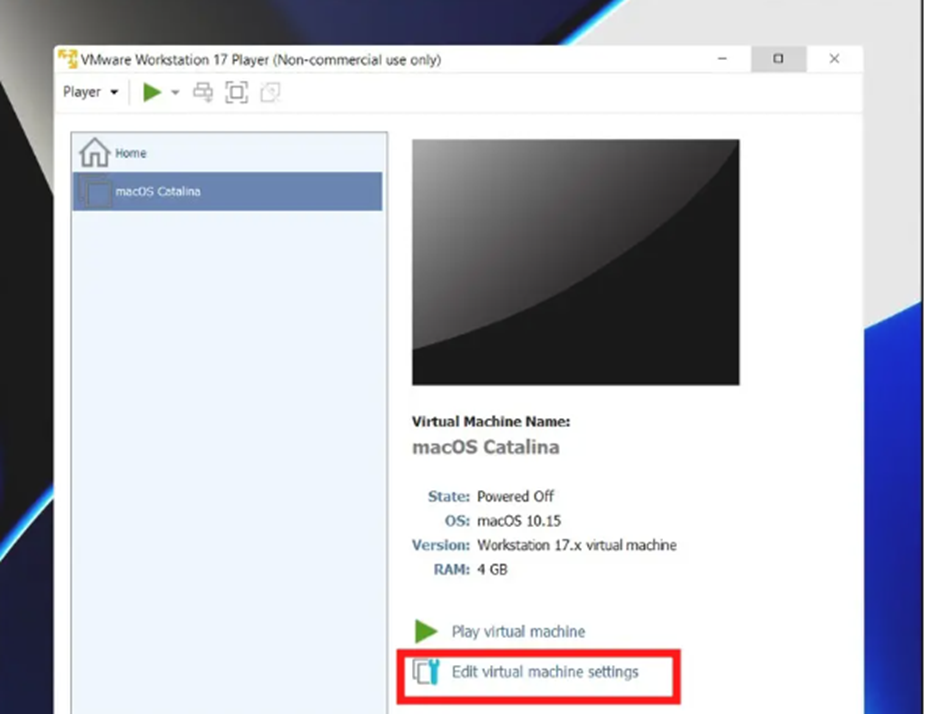
Step 11: Select Edit Virtual Machine Settings to modify the created VM’s setup.
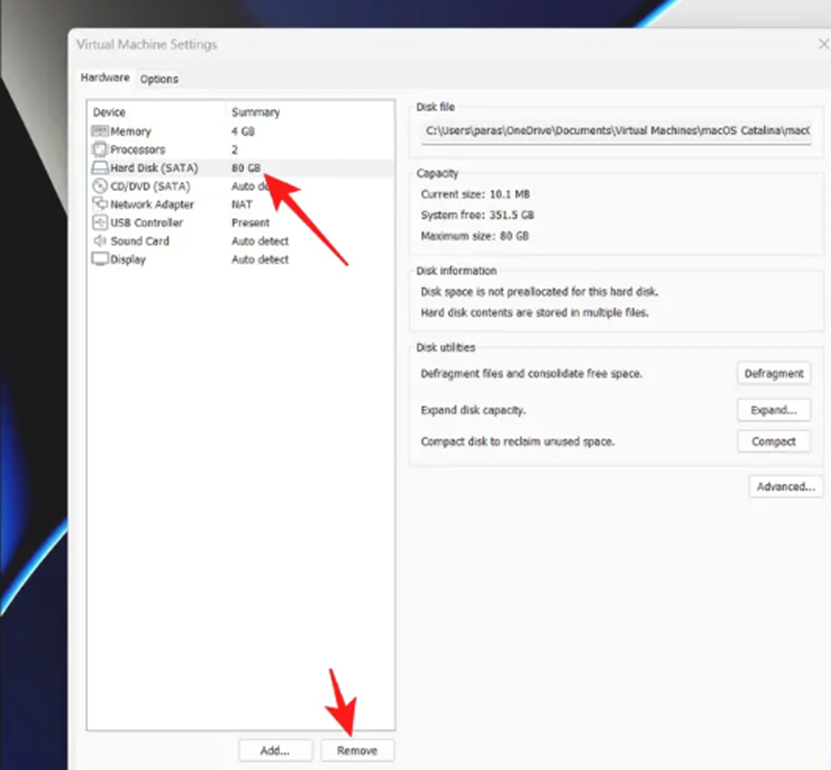
Step 12: To erase the Hard Disc, pick it in the left sidebar and click the Remove button.
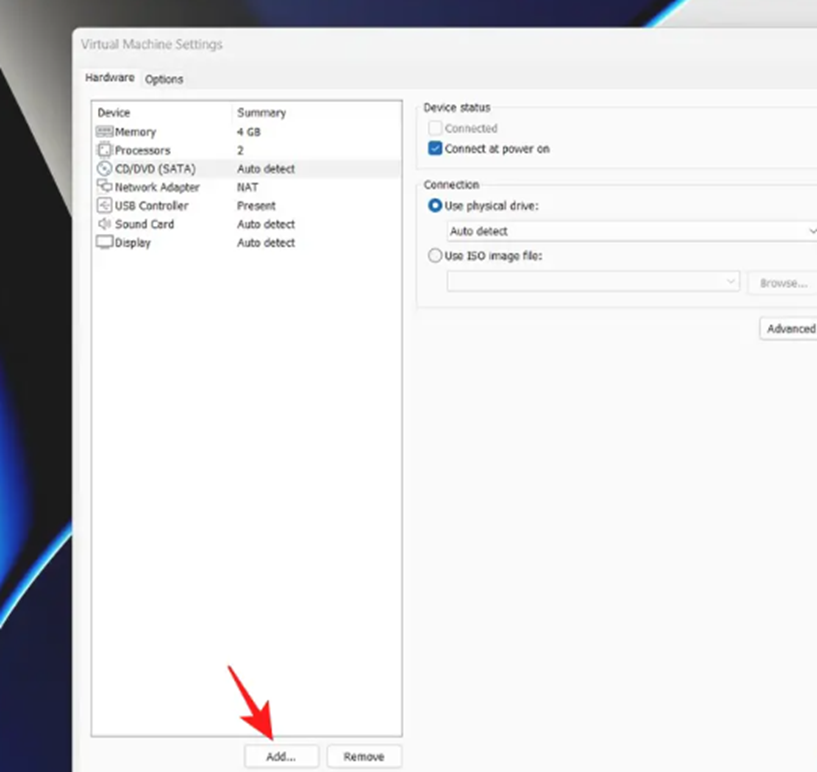
Step 13: After removing the virtual hardware, click the Add button to add new virtual hardware to your machine.
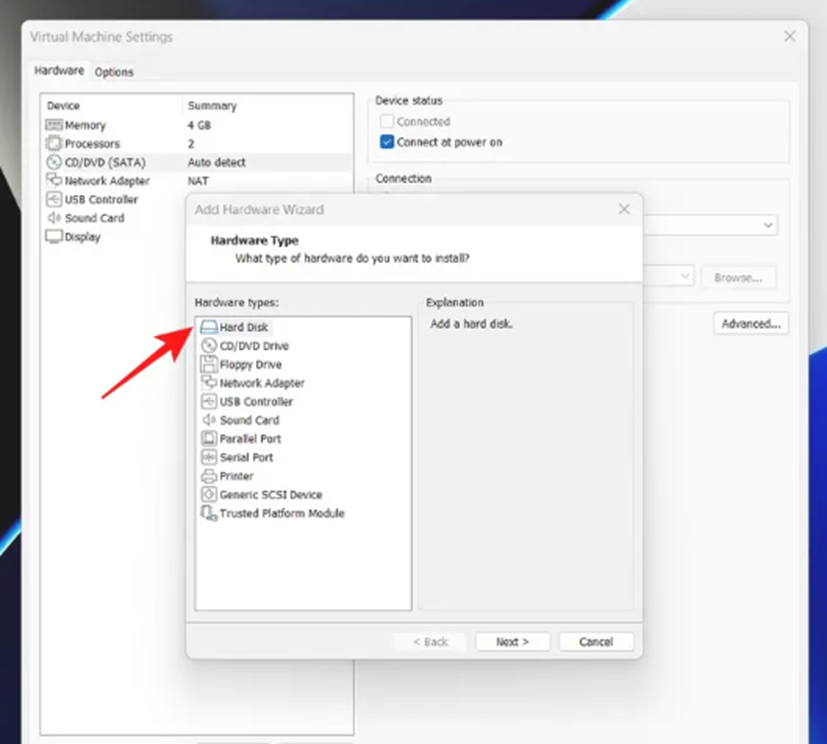
Step 14: Select a Hard Disk from the list of Hardware kinds.
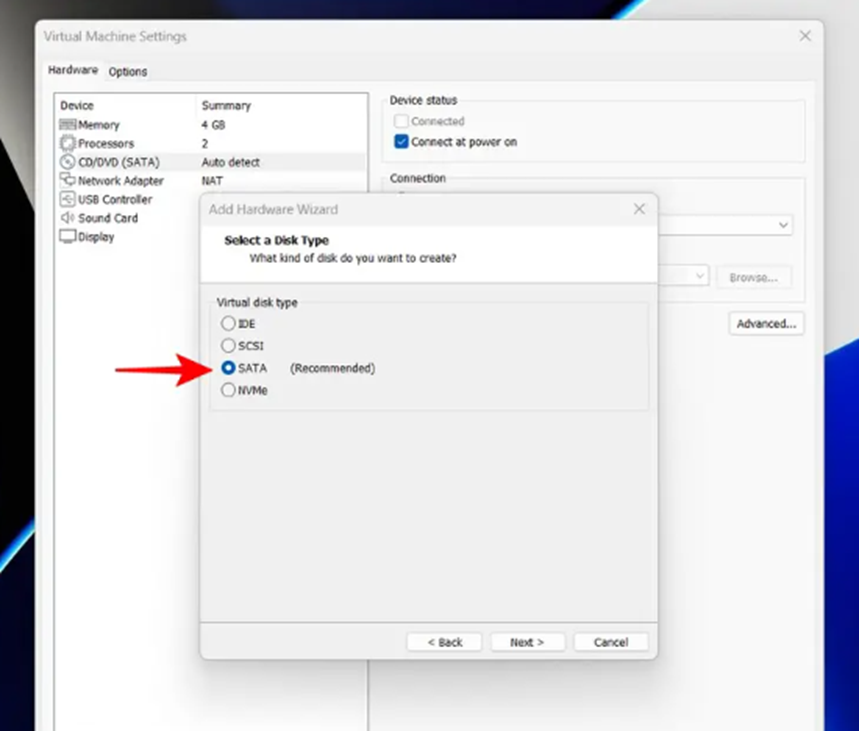
Step 15: Select SATA disc drive as the virtual disc type.
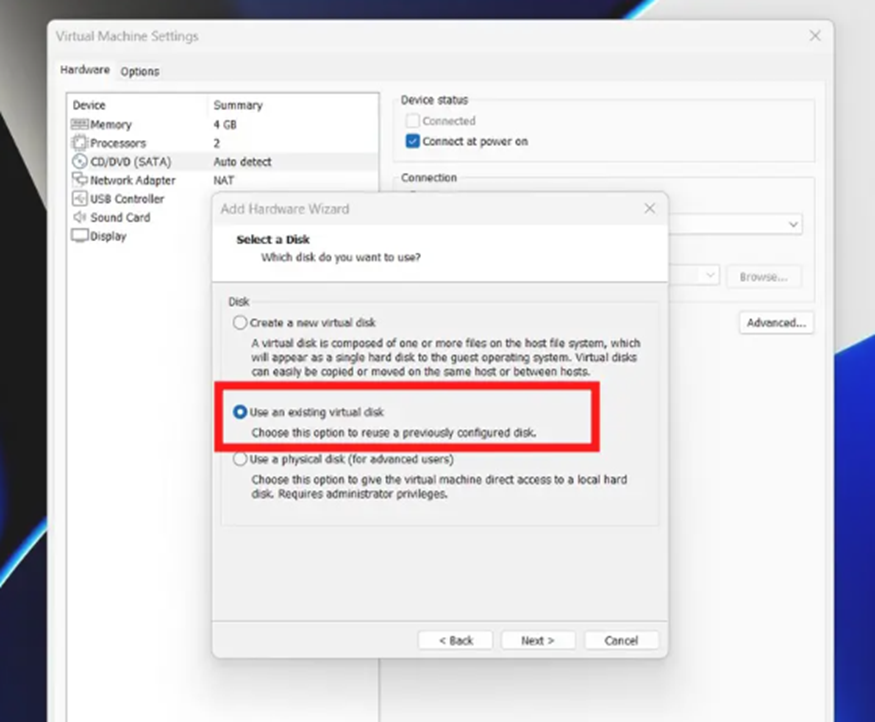
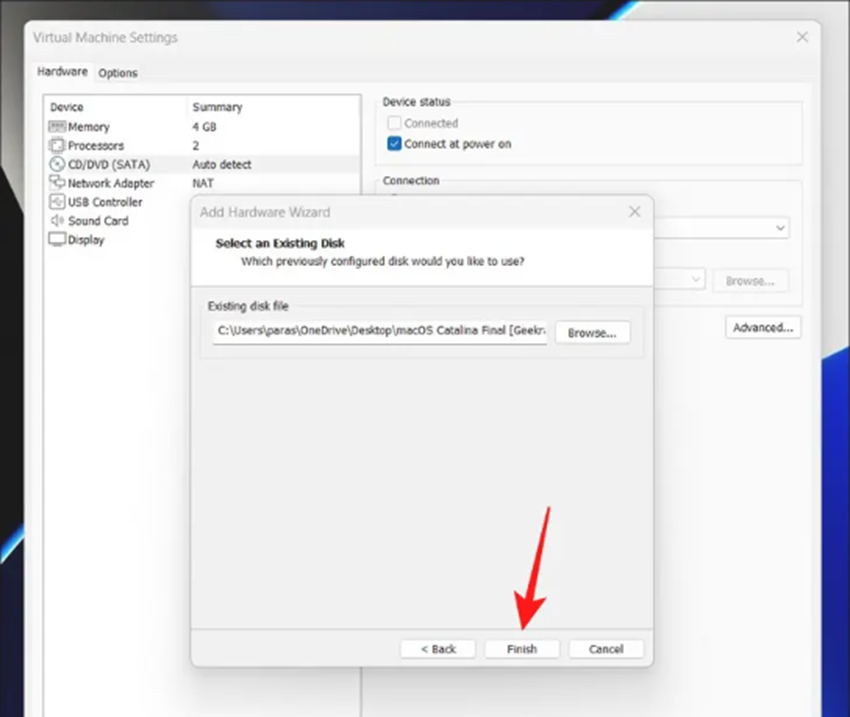
Step 16: Then click the ‘Use an Existing Virtual Disc’ button.
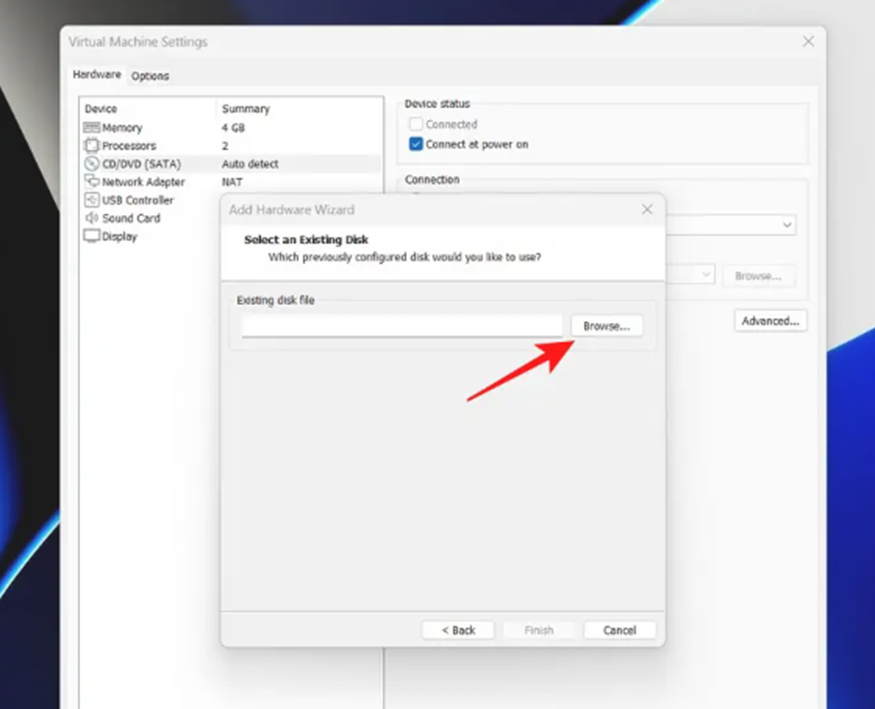
Step 17: On the next page, navigate to the.vmdk file you retrieved previously from the downloaded file by clicking the Browse button.
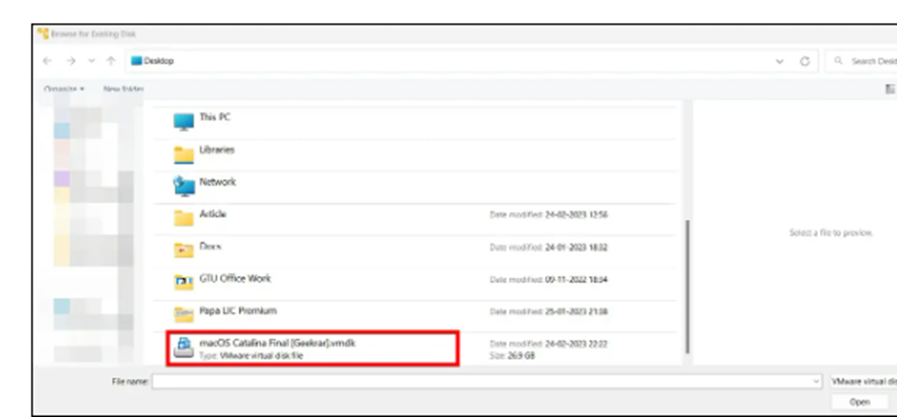
Step 18: To allocate the macOS.Select the vmdk file on your virtual machine and click the open button.
Step 19: To save your modifications, click the Finish button.
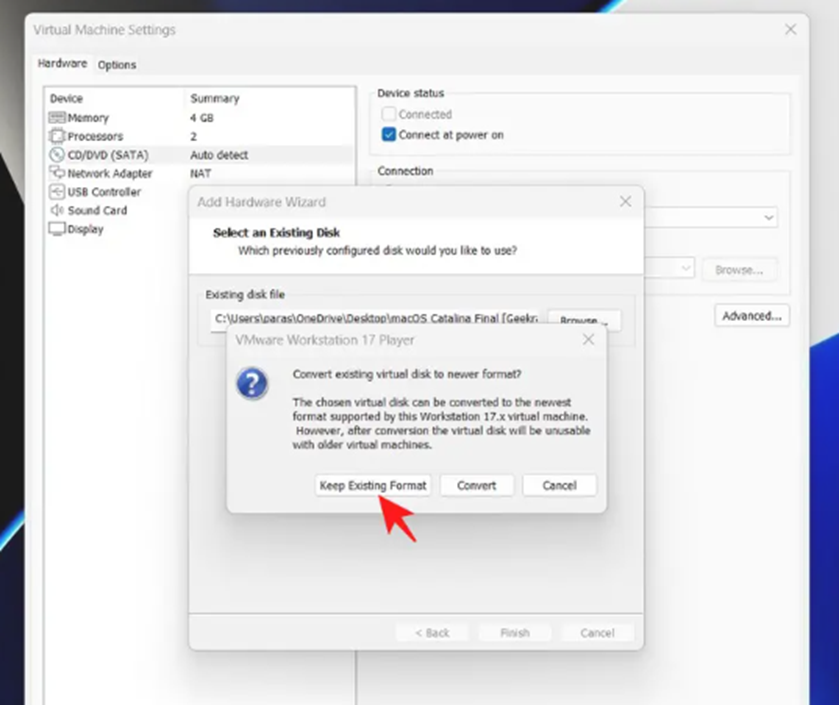
Tip: If prompted to convert a virtual disc to a newer format, select the Keep Existing Format option to keep the original disc format.
Step 20: To save the changes, click the OK button.
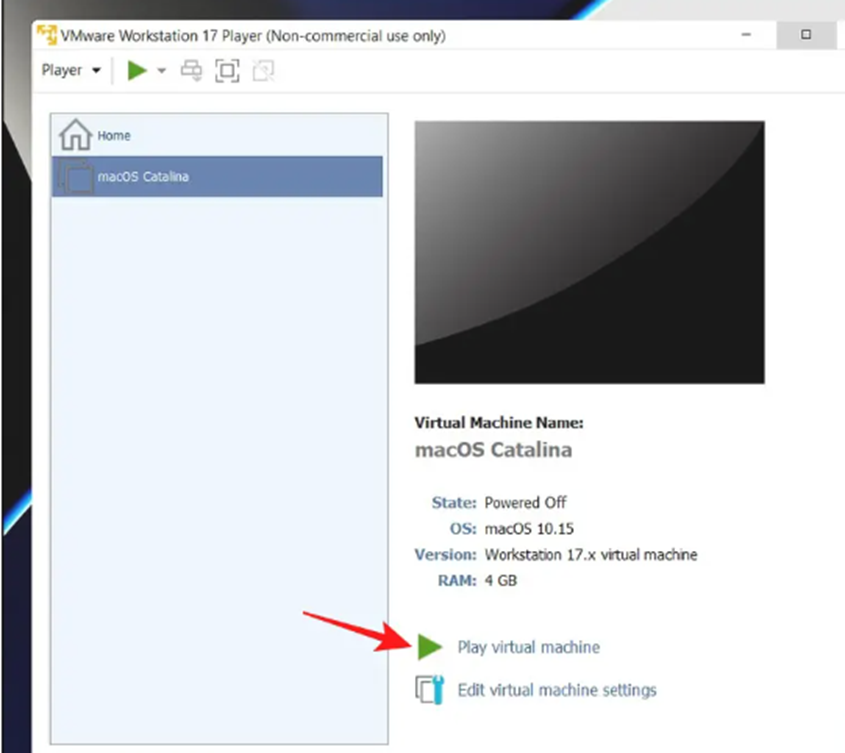
Step 21: Finally, select Play Virtual Machine to launch the macOS virtual machine.
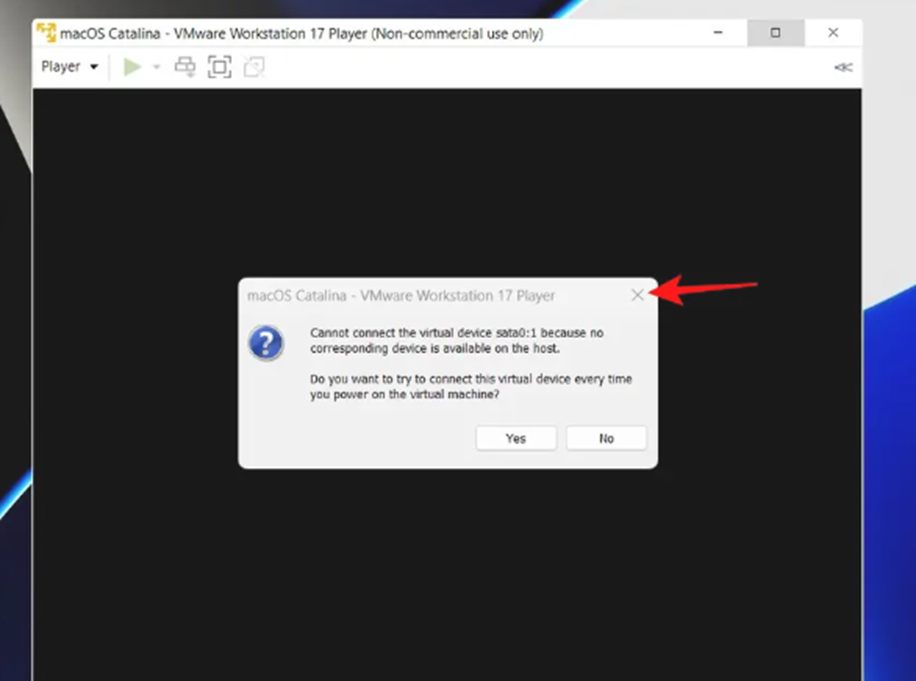
Tip: Simply close the popup to disregard the ‘can’t connect the virtual device sata0:1 warning.
Step 22: At this point, the Apple logo will appear when you boot into macOS.
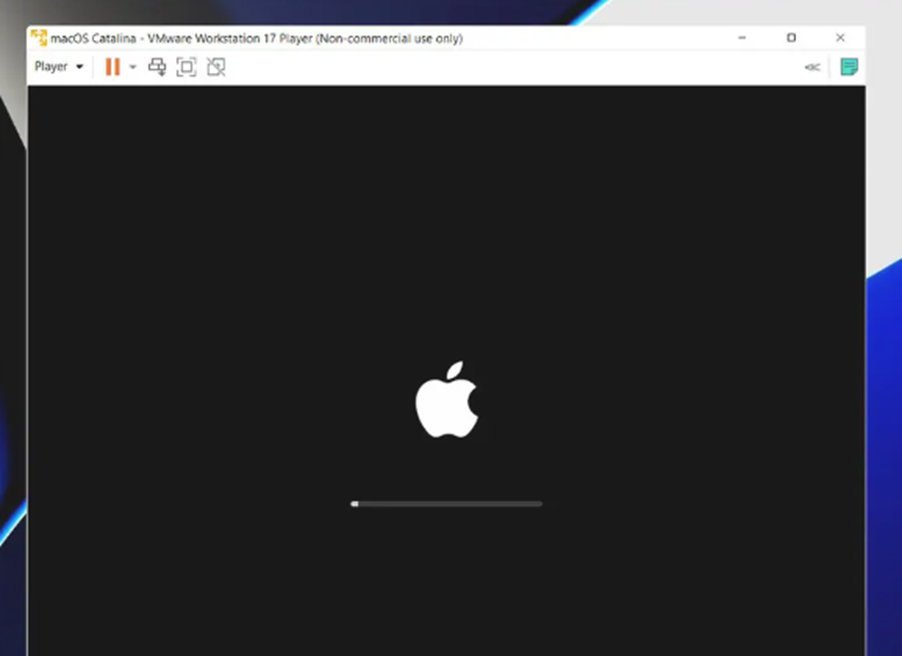
Step 23: Allow macOS to install on the designated virtual disc by waiting a few minutes. After the installation is finished, the virtual computer will restart itself automatically.

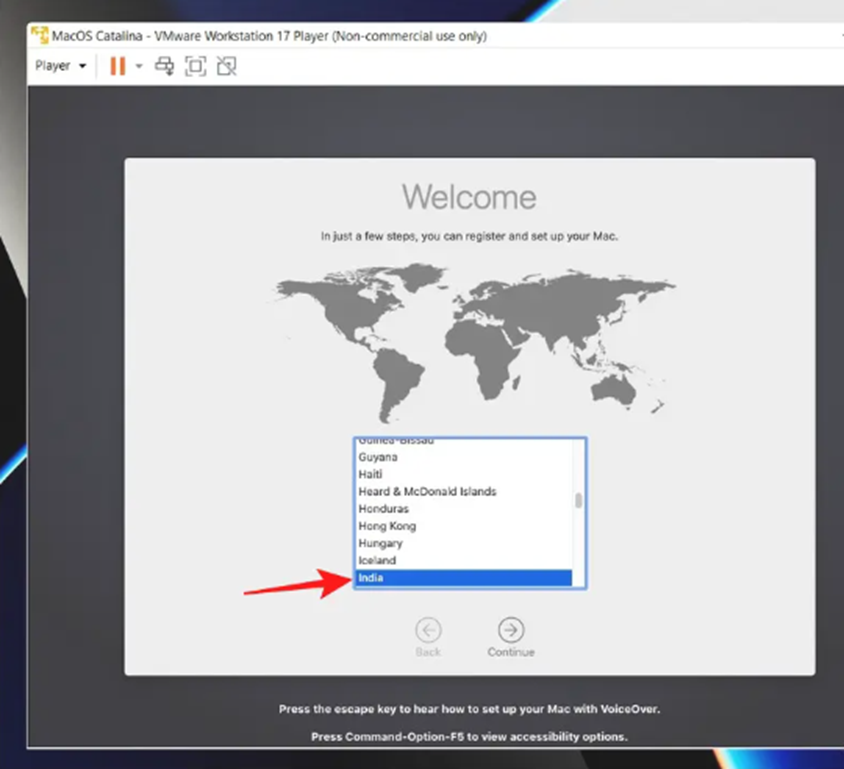
Step 24: Select your preferred region to install macOS after rebooting. You can also use the Escape key to configure Voiceover on your Mac.
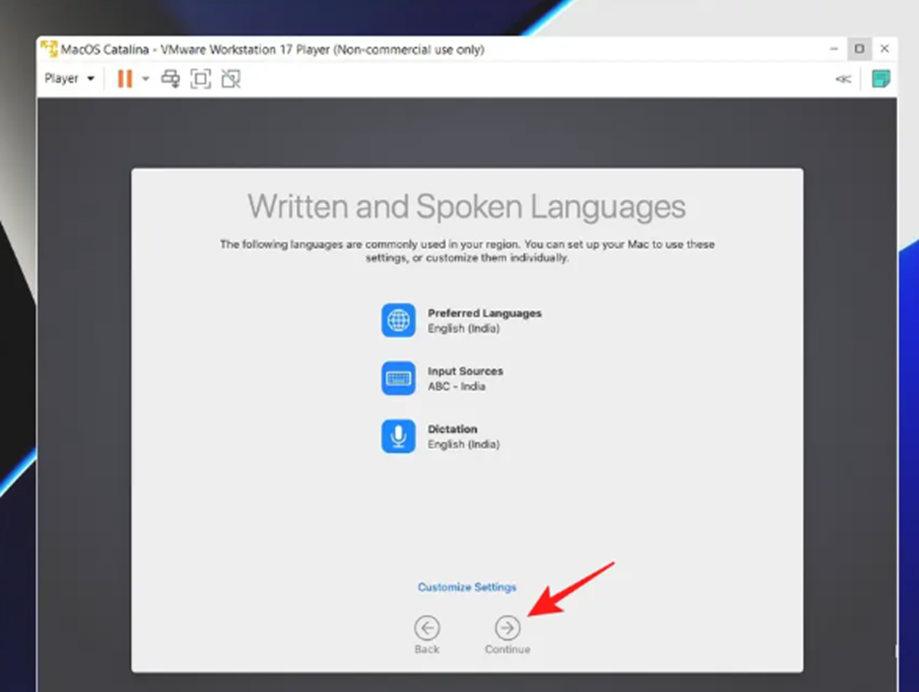
Step 25: Next, select the language you want to use in writing and speaking, then click Continue.
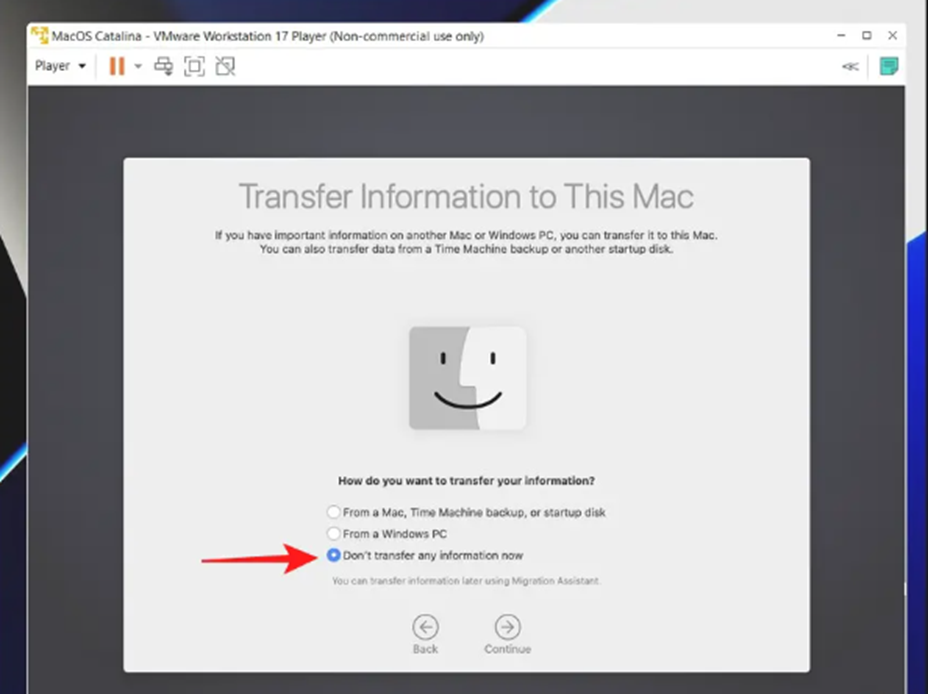
Step 26: The page to transfer data from your outdated Macbook or Windows computer will now appear. Select ‘Don’t Transfer any Information now’ to start macOS from scratch.
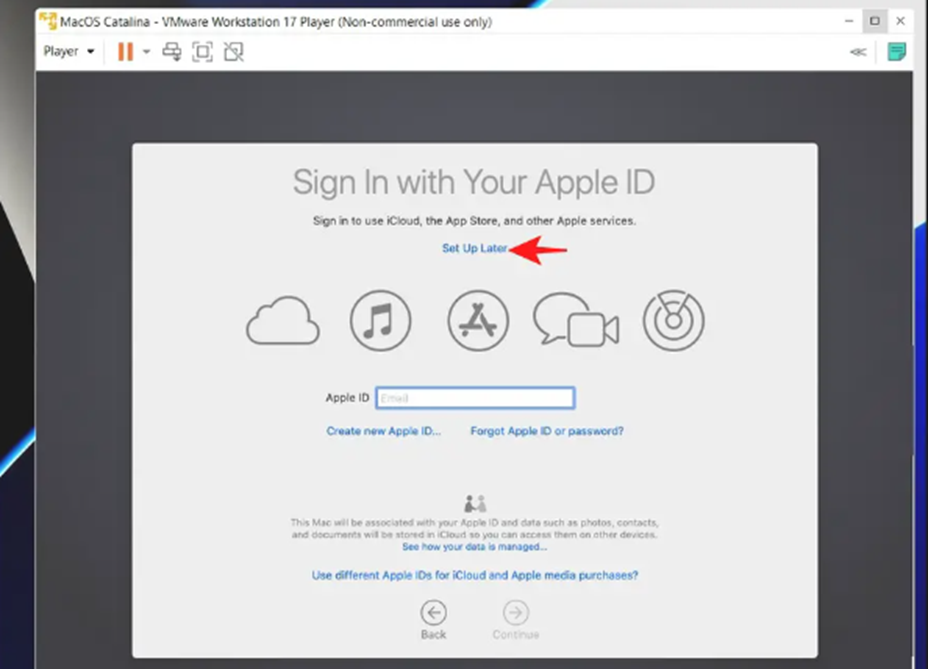
Step 27: Click the Set Up Later button to bypass the iCloud setup option. Consumers have frequently complained about being unable to finish the setup after logging into iCloud during the first setup. After starting the macOS, you can later log in to iCloud.)
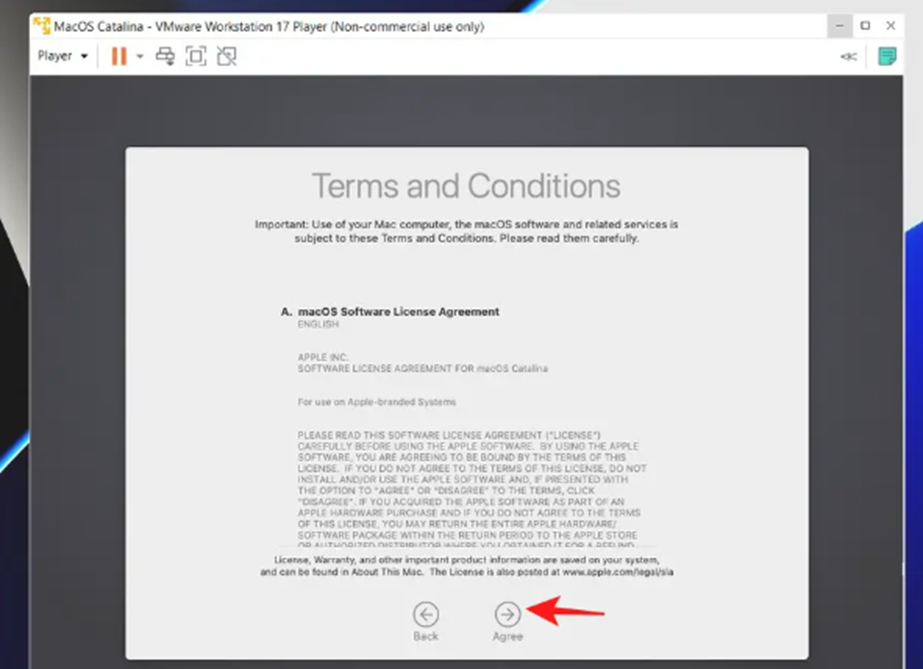
Step 28: Now click the Agree button to accept the terms and conditions on the following page.
Step 29: Click the Proceed button after entering the virtual machine’s desired Account Name and Password.
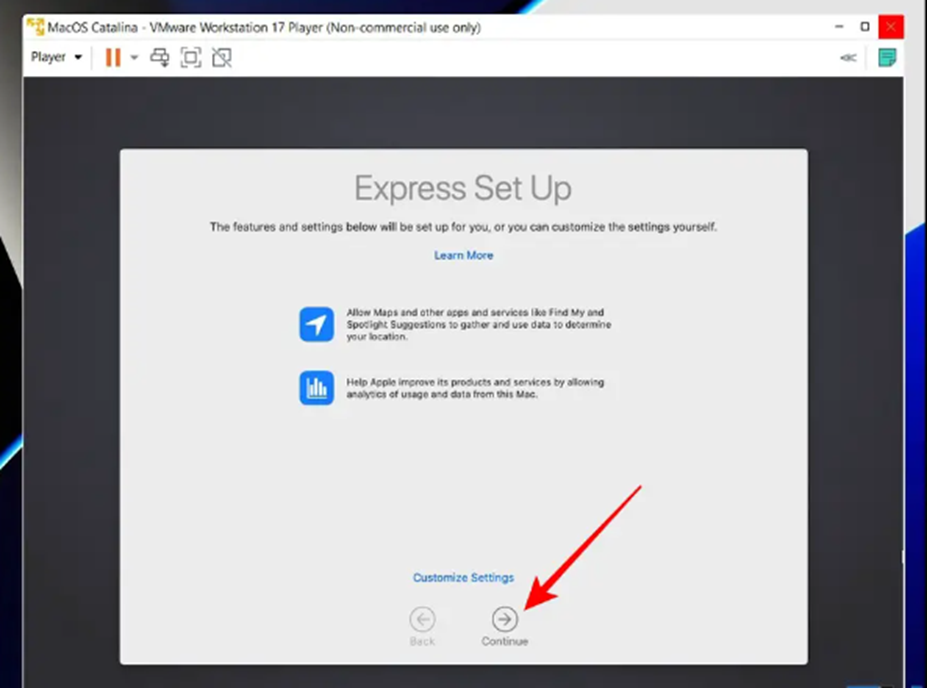
Step 30: Select Express Setup, then click the Proceed button. You can click the Customize Settings button during installation to change some features.
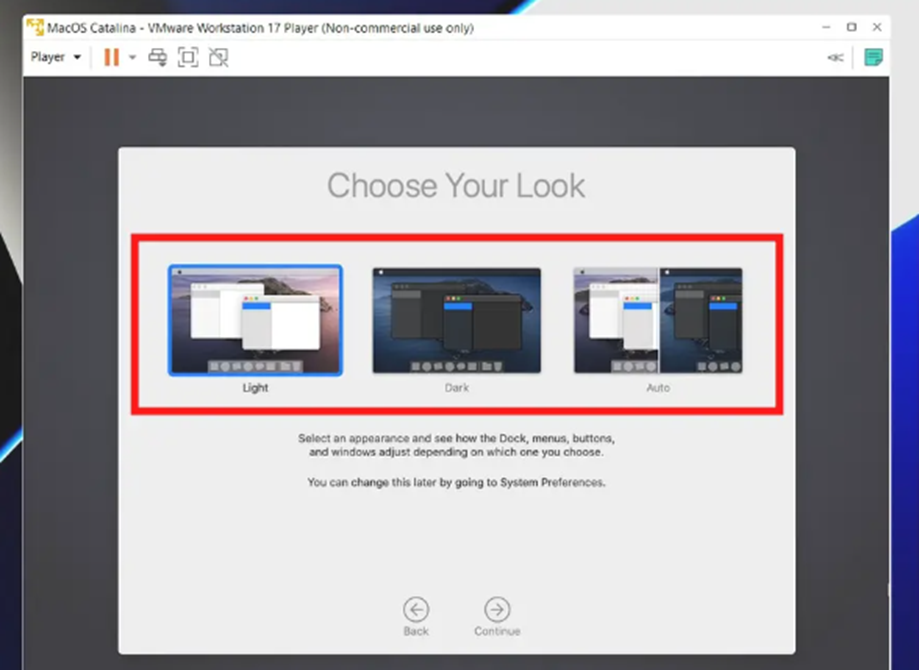
Step 31: Click Continue after choosing your macOS theme appearance.
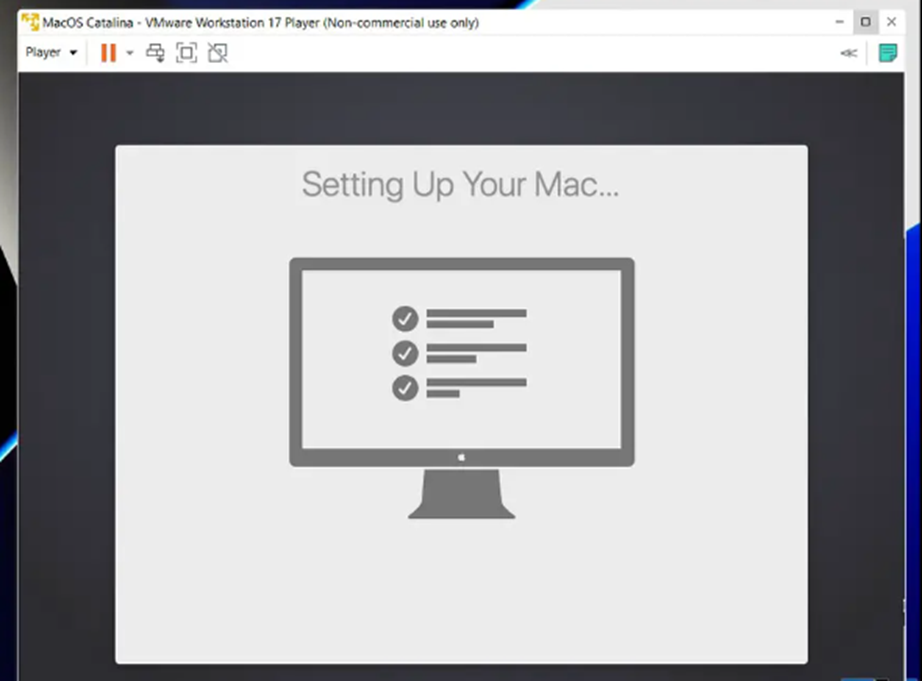
Step 32: That is all! To complete setting up your Mac, wait a few seconds.
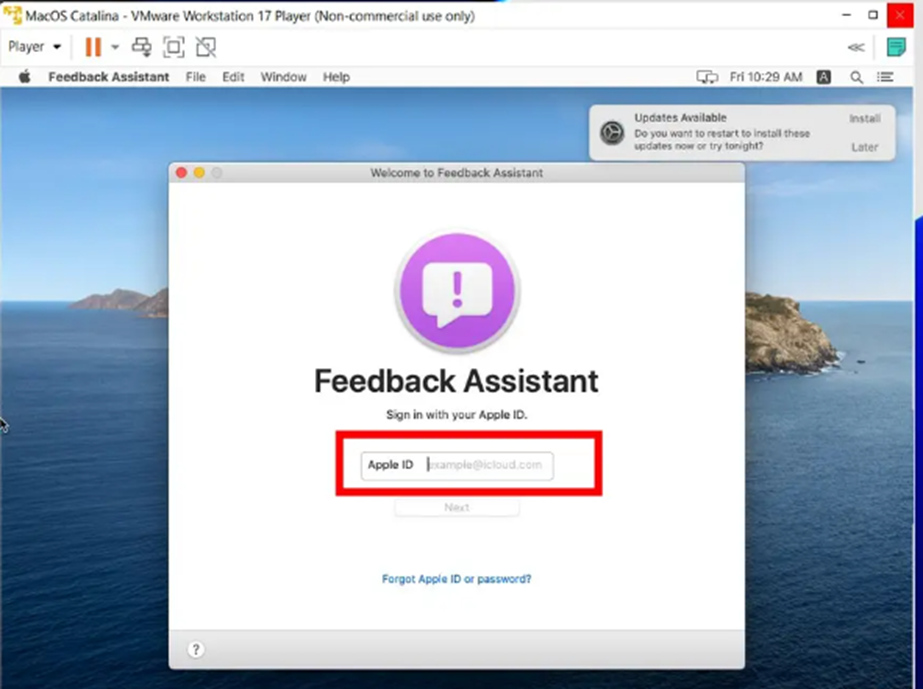
Step 33: After the virtual machine has booted up, accept the Feedback Assistant terms and conditions and login using your Apple ID to use all of the iCloud services.
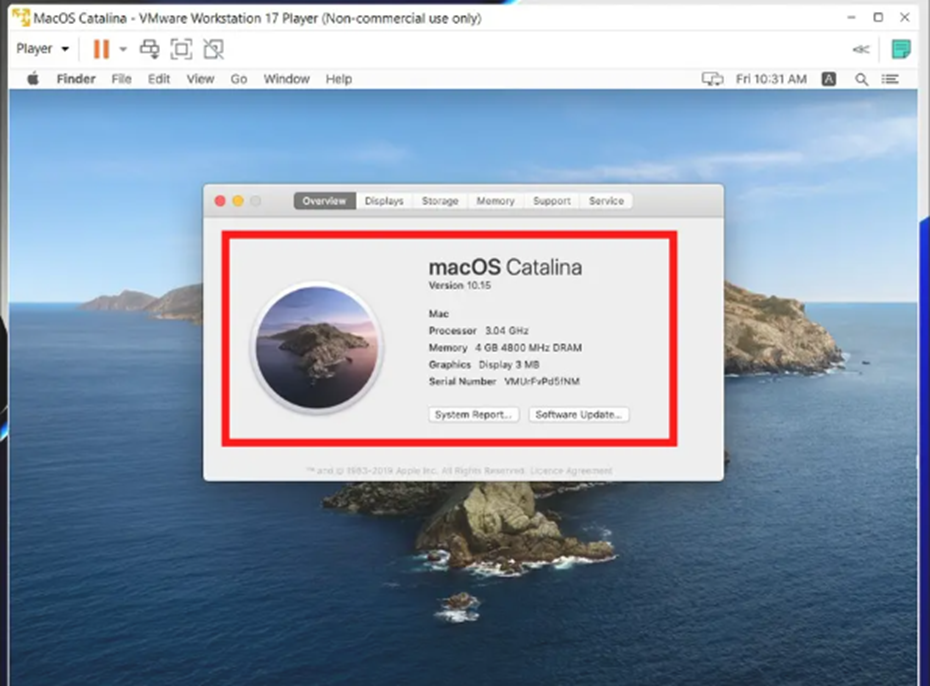
Step 34: Well done! With VMware, you have successfully installed macOS Catalina on Windows 11/10. For information about your “Virtual Mac,” select the “About this Mac” option.
Conclusion
With Windows 11, installing Mac OS is a surprisingly simple process that doesn’t require any technological expertise. You may quickly have the most recent version of macOS operating without any issues on your virtual computer by following a few easy instructions.
Installing Mac OS is an excellent choice for those who wish to venture outside of their present operating system environment, whether they want to try something new or leave the comforting boundaries of Windows.