Microsoft Word and Excel are the two most essential elements of the Microsoft Office suite. And, with more online capabilities than ever, the latest software versions are regarded as some of the best online collaboration tools available today.
But some people need help finding their favorite, daily use, and cross icon. But the main question is How to Insert a Tick or a Cross Symbol in Microsoft Word and Excel; this is among the constant problems for users of Microsoft Office.
There is no keyboard shortcut for these symbols. Therefore, we have to figure out solutions to create and get them. Fortunately, it’s an easy process you may accomplish in several ways.
You’ve come to the right place if you want to know how to insert a tick symbol (also known as a checkmark or check mark) into Microsoft Word and Microsoft Excel.
The methods outlined below apply to the following Microsoft Word and Excel.
- Word Microsoft 365
- Word for Microsoft 365 for Mac
- Microsoft Word 2021
- Microsoft Word 2021 for Mac
- Microsoft Word 2019
- Microsoft Word 2019 for Mac
- Microsoft Word 2016
- Microsoft Word 2016 for Mac
- Microsoft Word 2013
- Microsoft Word 2010
- Microsoft Word 2007
- Microsoft Word 2008
- Microsoft Word 2004, as well as relevant Microsoft Excel versions.
You’ll need a copy of Microsoft Office to complete these activities, and we prefer Microsoft 365 over all other Microsoft Office options. AutoSave, mobile editing, and threaded commenting in Excel have made team collaboration easier in Microsoft’s Office productivity products in recent years.
The examples below will also work on Office 2004 and later if you have a standalone version of Microsoft Office. On the other hand, the layout of the interface menus varies significantly between versions.
Solution 1: The Copy and Paste Technique
This copy-and-paste method is one of the simplest and fastest methods to add a checkmark or cross to your Word document or an Excel sheet. All you have to do is select one of the crosses or ticks below, copy it, and paste it where you need it.
Select the symbol type you want to use by highlighting it from the options below:
✓
✔
☑
✕
✖
✗
✘
You can then easily copy your selected symbol with Ctrl+C and paste it wherever needed using Ctrl+V.
Solution 2: Use The Symbol Menu To Insert a Tick Or a Cross

Using the Symbol menu is the second method of adding a checkmark or a cross to a Word or Excel document. It is on the ribbon at the top of the screen, under the Insert menu.
Select More Symbols by clicking on the symbol. In the Font pick box, change the font to Wingdings. Scrolling to the bottom, you’ll see two distinct ticks and crosses. Select your preferred symbol and press Insert.
Solution 3: Use the character code symbol.
Using the tick symbol’s character code is our list’s third and quickest method. We hope you still remember the traditional numerical keypad, not the keyboard.
And this is what you’ll need. There are four distinct tick marks that you can put with a set of codes.
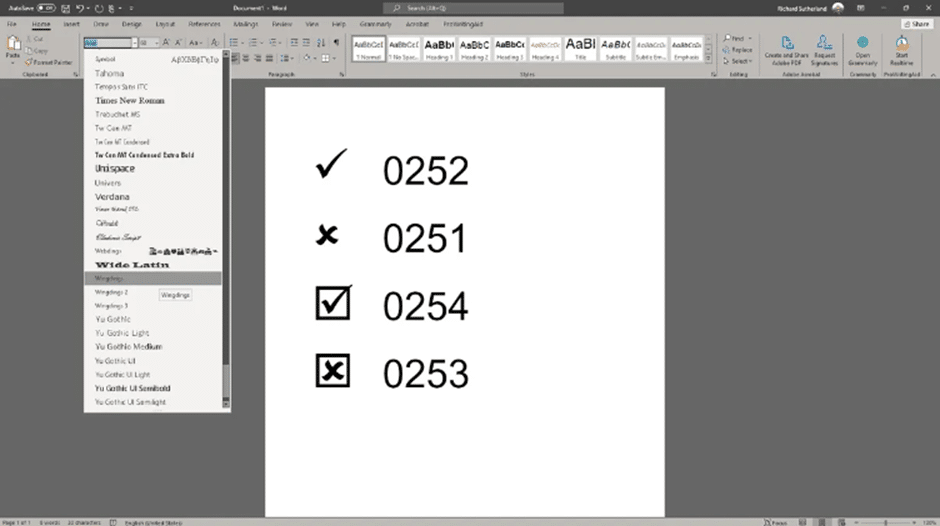
Step 1: Change to the “Wingdings” font.
Step 2: Press and hold Alt while entering any combination of the following numbers using the numerical keypad (not the horizontal line of numbers):
- For Ticks
ALT + 0252
ALT + 0254
- For Crosses
ALT + 0251
ALT + 0253
Remember to set the font to Wingdings before entering the character code. After that, you can change the font to how you want it to look.
The most effective methods for adding a checkmark to a typical Word document are as follows. Remember that these techniques might change according to your Microsoft Word version.
Solution 4: The Symbol Command Technique
If you don’t like the above option, you can get the same result using the Symbol Command. To utilize this function, you must first install Microsoft Word and Excel on your computer.
To do so, go to the main Excel menu and select ‘Insert,’ then ‘Symbol,’ then ‘Font,’ and finally ‘Wingdings.’ You’ll see that the tick mark is at the bottom of the list.
Another way to get to this is to go to the ‘Start’ option, available under the ‘Character Map’ section (inside System Tools). Select ‘Wingdings’ from the ‘Font’ menu once more.
After completing this task, use your mouse to hover over the correct symbol, which will magnify the symbol and allow you to select from a range of tick mark variations. Choose one, then copy and paste the icon wherever you need it inside the text.
Solution 5: Use The Built-in Keyboard Shortcut to Insert a Tick or a Cross.
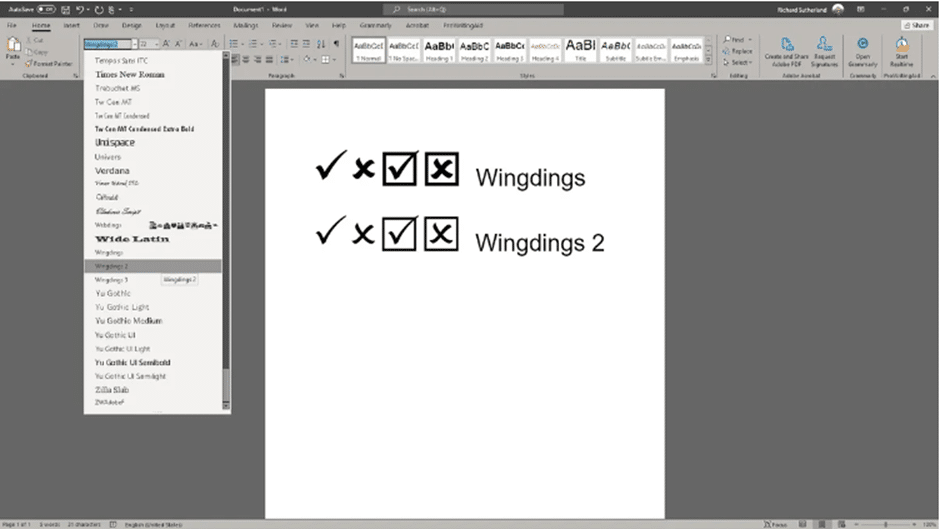
The fifth option combines built-in keyboard shortcuts with another font called Wingdings 2. In the document where you want the tick or cross to appear, change the font to Wingdings 2.
To make a tick, press Shift+P; to make a cross, press Shift+O. Press Shift+R or Shift+Q if you wish them to be in boxes.
Solution 6: Make use of the Windows emoji menu
This solution is only available for Windows 100 and 11 users.
To open the emoji/symbol menu, place the cursor where you want it to be and press the Windows key and. (period/full stop). Once you begin typing “tick” or “check” (or “cross”), the menu will display the available visuals. To add it to your document, click the one you wish.
Solution 7: Make Your Own Keyboard Shortcuts for The Tick or Cross
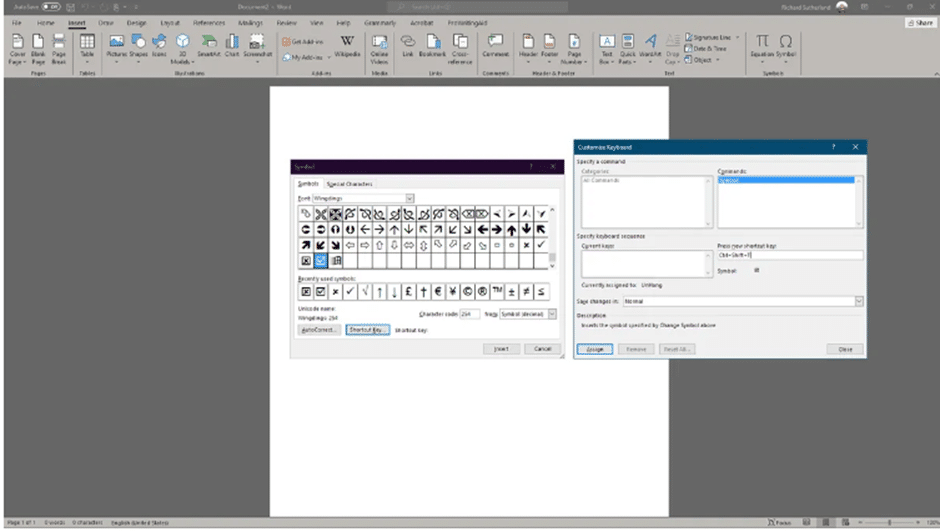
Finally, you can create your own keyboard shortcut for inserting ticks and crosses more quickly in the future. This can be done by picking the appropriate symbol in the Symbol menu and selecting a shortcut key.
To begin, enter the Insert menu, select the Symbol dropdown, and then More Symbols. Change the typeface to Wingdings or Wingdings 2, and look for the symbol you want.
Enter your key combination (e.g., Ctrl+Shift+T) by pressing the Shortcut Key. Select Assign. When you press that key combination again, the symbol will be added to your document without changing the font, going to the Symbol menu, or entering a character code.
Things to Keep in Mind
We have almost finished discussing every aspect of the Tick and Cross Symbol. But before we wrap up this article, let’s review a few essential points you should remember.
When you place a symbol into a cell, it works exactly like text. Pick, format, or highlight the symbol as needed. You can, for example, modify the font size and color and make it bold or italic.
Conditional formatting can also be applied based on the color or symbol type (using their character code).
For example, you can handle the tick sign with a special 252-character code, and it will only format the cells that include the tick symbol, ignoring the rest of the cells.
Excel tick checkboxes can be used instead of tick symbols to count the number of checked mark symbols and, ultimately, the number of times TRUE values occur in the selected columns.
Conclusion
Here are seven methods to add ticks and crosses to your Word and Excel documents in Microsoft. You can use a keyboard shortcut, the Symbol menu, or the character code.
With the help of this post, we hope you will feel easier about how to insert a tick or a cross symbol in Microsoft Word and Excel. And for such fantastic content, stay connected with us.