Multitasking is the need of the hour, in support of this, OSes have been molded to support many features which aid with multitasking. With features like split-screen and multiple monitor support, the workflow of users has improved and supports multitasking which improved the quality of work. Most of all the OSes have special features that support multitasking and Windows is one such commercial OS that extensively supports the feature.
Windows being one of the major computer OS used by millions for professional life features supporting multitasking need to be built-in. In support of the Microsoft had built in some easy to use features like snap layout within the OS. Well, in older versions of Windows the snap layouts feature was indirectly existing as users were able to use two applications side-by-side but the applications had to be manually resized. But with the latest OSes like Windows 10, the snapping can be done using keyboard shortcuts. So, with such features in the OS users are eager to know the snap layouts feature in the upcoming OS-Windows 11, and this article will focus on enabling the snap layouts in Windows 11.
Well, snapping layouts is a cool feature built into Windows 10, that lets users use two or more applications side-by-side. This feature is pretty useful for people who use multiple applications at the same time. With the snap layouts feature enabled, users can use the applications simultaneously without having to navigate to the application in use every time. So, this neat feature has been welcomed by most Windows users and is being used efficiently. The snap layouts feature works well on a large screen as multiple applications can be used simultaneously with great efficiency on a large screen compared to a small screen. Well, as previously said, Windows 11 brings in a new and improved way of using snap layouts that can be used efficiently without using keyboard shortcuts.
With Windows 11 on the edge, intrigued users are endlessly looking for features and other aspects to effectively understand the OS, to support this, Microsoft has released the preview builds of Windows 11 which anyone with a Microsoft account, Windows 10, and a compatible computer can run. Tech enthusiasts and Windows fans have been devouring the Windows 11 build versions to find what’s new. With this being done, the internet is filled with new content concerning Windows 11. This article is one of them where we will exclusively look into enabling the snap layouts feature in the OS. so, now, let’s dive into learning how to enable the snap layouts on Windows 11.
Recommended Post:- How to Dual Boot Windows 11 & Windows 7 – Complete Guide
Enable Snap layouts on Windows 11 Step-By-Step Guide
Well, there is nothing special that we have to do to enable the feature but just get into the settings and enable the option. Once enabled we can use it with ease.

- So, to enable the snap layouts feature, open the Settings application by searching for settings in the search menu.
- Now, in the settings application, navigate to the System tab.
- Here, select the multitasking option.
- Now, toggle on the button near the show snap layouts when I hover over Window’s maximize button.
- Once done, exit the settings application.
- Well, you have turned on the snap layouts option on your Windows 11 computer, now, you need to learn to use it.
Using the feature once enabled is pretty easy. So, here is how you can do that with ease.
- Open up any application that supports multitasking like Microsoft office applications or other third-party applications. You now can open another one or two applications to use the snap layout option.
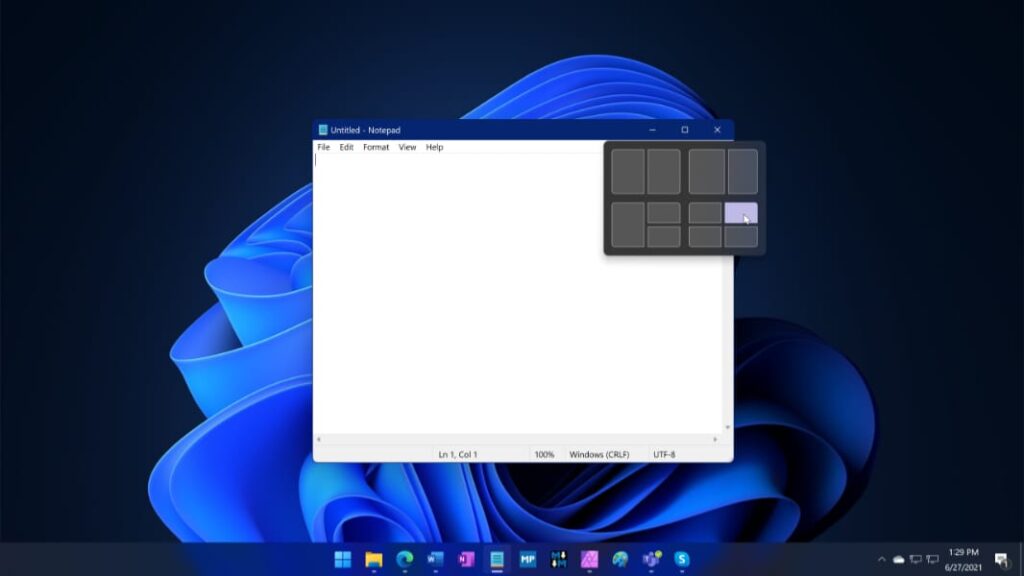
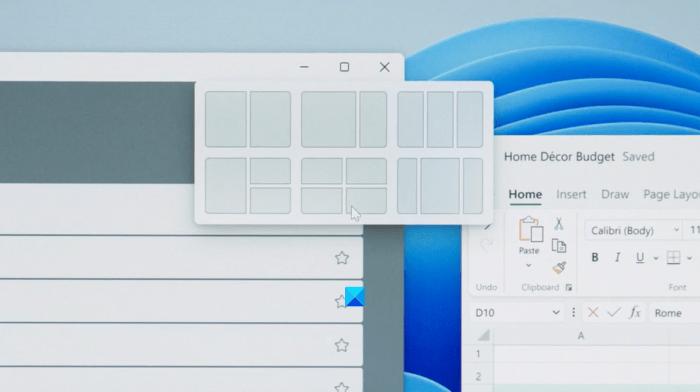
- Now, in the application, hover over the maximize button on the top right corner of the screen near the close button.
- When you do, you will notice a panel displaying all the snapping options, from which you can select the layout you want and snap the application to the portion of the screen. You can choose from the various snapping options from the panel to suit your work.
- Once you have snapped the selected application, you can snap other applications in the remaining slot by selecting the application.
See, this is pretty simple, right? With this, you can snap all the applications simultaneously and work effectively, this setup will pretty much benefit you with everyday functioning on your computer.
Well, For people who are comfortable with using a keyboard and prefer using shortcuts instead of the mouse can try the method mentioned below. Yes, the snap layouts feature has a shortcut that can be used easily.
The shortcut for using the feature is holding down the Windows key on the keyboard and pressing the right or left arrow on the keyboard while using an application, this will minimize the application in proportions fitting exactly half the screen. You can also use four layouts by using the up and down arrow keys on the keyboard. To accustom to this method, you have to do it for some time and with some practice, you will be able to instantly use the snap layouts feature without using the layouts window from the minimize button.
These are pretty much everything you can do to enable and use the snap layout option on your Windows 11 computer. Try out the different snapping options and work efficiently with the one that suits you. As mentioned above, a large screen is more suitable for using snap layouts so people with a large screen try the feature and multitask better.
Hope the information provide above was helpful and informative, work like a pro with the snap layouts feature on Windows 11.