What is a drive partition anyway? If you are using Windows 10, a partition is basically a space division that is there on a physical storage drive. It has a specific file system and settings that the user will find useful. The drive partition will be presented to the user in the form of a separate drive. Each drive has a lot of partitions and it can be hard to sort all of them at all times. Windows 10 has a bunch of tools that can help make things a lot easier for you. You can make use of these tools to get rid of all the things that you don’t need so you will have more space for yourself. You can also use the new storage to create a different kind of partition.
There are various methods that you can employ to delete a drive partition on Windows 10. We will discuss a few of these in this article and you can select the one that you think would be the best for you. Whether you use the Command Prompt, PowerShell, or Disk Management, you will get the results that you are looking for. Keep an open mind and get ready to learn some amazing information that would be really useful for you.
Recommended Post:- Fixed: Inaccessible Greyed-out settings on Windows 10
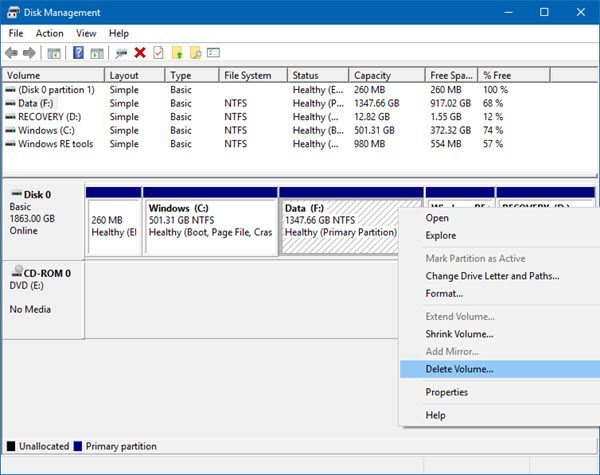
Steps to be followed to delete a drive partition using Disk Management
Please go through these steps so that you can learn how to delete a drive partition using Disk Management:
- You will have to first go to the Start menu and then look for Disk Management.
- When you are done doing this, you can select the drive that contains the partition you are interested in removing.
- In the drive, you will have to be careful in right-clicking only the partition that you want to get rid of. After doing that, you have to select the Delete Volume option.
- When the data has been erased, you will have to confirm it by clicking Yes.
- All of the contents of the partition in the drive will no longer be available to you, meaning you can use the extra space that you have gotten to make a different partition or perform formatting on the drive with another scheme that you think would be better.
Steps to be followed to delete a drive partition using PowerShell
There are at least two kinds of methods that are available here that you can make use of to remove the partition that you want to. You can either make use of the drive letter or the partition number that has various commands. Take a look at the steps that are given here and pick the method that you think will suit your taste the best:
- If you want to delete the partition that you want using an assigned drive letter, you will have to first go to the Start menu and then search for Powershell. When you are done doing that, you will have to then look for Powershell and right-click the result that you get at the top.
- When you are done doing this, you will have to choose Run as the administrator option.
- You will have to take a look at all the partitions that are available to you.
- You will then have to delete the partition and all of its contents using the required command. You will have to specify the letter of the partition that you are interested in getting rid of.
- When you are done with all of this, type the letter Y and then press Enter; this is you confirming the deletion that you have done.
- The partition will no longer be there when you are done.
- If you want to delete the partition without any of the assigned drive letters, go to Powershell and get all the drives that are available to you. You should then check all of the partitions that are available to you as well.
- Specify the appropriate drive number so that the deletion can take place accordingly. You should then press Y on your keyboard to confirm the deletion.
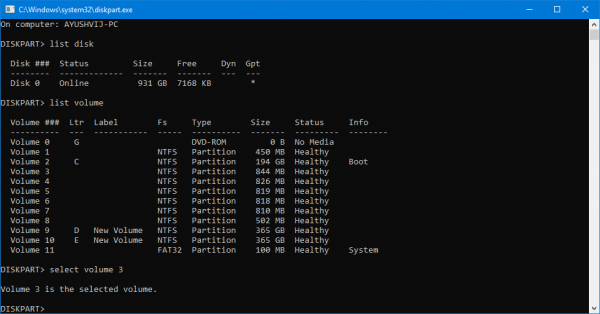
Steps to be followed to delete a drive partition using Command Prompt
You can make use of the Command Prompt to complete the deletions that you want to. There are two kinds of commands that you will have to try out: volume command and partition command.
- You will have to first go to the Command Prompt by clicking Start. The first thing that you will have to do is start diskpart and then hit Enter.
- You will then have to get all of the volumes that are available and hit Enter.
- You can then select the volume that you need to get rid of.
- You will have to specify the volume that you want to delete so that it can be performed accordingly.
- When you are done doing all of this, you will no longer have to worry about having the data that you were interested in.
- If you want to go for the partition command method, you can do so by opening the Command Prompt again and then right-clicking the result that is at the top. You will then have to select the Run option.
- Like before, you will have to start diskpart and then get a list of all the drives that are available.
- You should then select the drive that you want to delete and proceed with the deletion process.
- The partition will be deleted when you are done with this step.
We hope that the article helped you figure out how to get rid of the drive partitions that you are not interested in on Windows 10. Please try to implement the different methods that are given here and find the one that is most comfortable for you. When you are done with this, you can then use the method that you found most comfortable from now on whenever you need it. You can share the information that you got from this article with anyone who you think needs it. Please reach out to us in the comments section with whatever thoughts you may have about the article.


