Some Windows 10 customers have reported a bizarre problem that prevents them from logging onto their machines normally. A window displays in which they are prompted to enter their Startup Password.
Entering your computer password works as before, so there’s no problem there, however doing this every time you log in instead of your PIN can be annoying.
So far, this looks closely tied to a virus that permits SAM (registry file) encryption. As a result, utilizing regular password-altering tools such as NT PWD Reset will not resolve this issue. This problem can be quite tough to resolve and will always necessitate sophisticated troubleshooting.
However, we have created an article on this mistake, and if you carefully follow the instructions, you should be able to start your computer in no time.
Recommended Post:- How to Remove Files from Dropbox without Deleting them
How to Resolve Password Issues on Windows
The simplest solution to resolve this error notice is to remove the virus as soon as you log in. After that, you’ll need to update the settings on your Windows 10 system to prevent this from happening again.
Aside from the more difficult solutions, here are a few basic ones to try:
- Attempt to restart your computer. This tried-and-true strategy has been proven to be the most prevalent solution for any password-related issue. Take quick action if your computer fails to restart.
- Drain the battery fully if you’re using a Windows laptop. When it runs out of power, recharge it and turn it back on. The mistake should no longer exist.
- Remove your laptop’s CMOS (complementary metal-oxide semiconductor) battery and then drain the main battery.
Solution 1: Retrieve Your Registry Backup from Your Computer and Boot From It
Because this error locks your registry utilizing a Windows function that was abandoned and few people are aware of. As a result, you won’t be able to alter the password with other programs. Fortunately, this process should be simple enough because your machine has a recent registry copy someplace in its system files.
You should be aware that you will need to acquire access to and browse the contents on your hard disc without booting into the operating system. This can essentially be accomplished in two ways: either remove the hard drive and attach it to a working computer or follow our instructions on the same computer. We chose to give this technique because removing the hard disc from a laptop can void the warranty and is sometimes impossible.
To complete the steps in this solution, you will need to utilize or create a recovery media for the operating system you are using. This is often the DVD from which you installed your operating system. However, Windows 10 users can create one manually if necessary, and they can even utilize a USB device.
- Step 1: Download the Microsoft Media Creation Tool program from the Microsoft website. Accept the terms and conditions by opening the just downloaded file.
- Step 2: From the opening screen, select the Create installation media (USB flash drive, DVD, or ISO file) for another PC option.
- Step 3: The bootable drive’s language, architecture, and other variables will be determined by your computer’s settings, however, you should uncheck the Use the recommended options for this PC to select the appropriate settings for the PC with the password (if you are creating this on a different PC, and you probably are).
- Step 4: When requested to pick between USB or DVD, click Next and then on the USB drive or DVD option, depending on which device you wish to use to store this image.
- Step 5: Next, select the USB or DVD drive from the list that displays the storage media linked to your computer.
- Step 6: Click Next and the Media Creation Tool will begin downloading the files required to make the installation device.
Once you have this recovery DVD for Windows 10, follow the instructions below to access to Command Prompt without having to boot into your operating system first: - Step 7: Start your computer and insert your installation drive. The next steps differ depending on the operating system, so follow them accordingly:
Windows XP, VISTA, 7
Windows Setup should launch and prompt you to enter your desired language, time, and date settings. Enter them and, at the bottom of the window, click the Repair your computer option. Keep the initial radio button selected when presented with Use recovery tools or Restore your machine and click on the Next button. When prompted to select a recovery tool, select Command Prompt.
Windows 8, 8.1, 10
- Step 1: Choose the keyboard layout box that will appear, so select the one you want to use. When you get the Choose an option page, go to Troubleshoot >> Advanced Options >> Command Prompt.
- Step 2: When Command Prompt appears, type the “Notepad” command and press Enter:
- Step 3: Notepad should now be open, so select File
- Step 4: Click on the Save.
- Wait for the Windows Explorer window to open after selecting Open from the top right menu. To display all files, make sure you select the All Files option under Files of type.
- Step 5: Open the _restore… folder, where the three dots represent a variety of characters and numbers. The folder will contain multiple other folders, so organize them by Date Modified so you can see when these backups were created. Make sure you select a date when the virus has not yet appeared.
- Step 6: Look in that folder for the files listed below. These are the files that will be backed up, and they are part of the registry. While looking for them, remember to rename them.
Because you can see everything linked to your computer, this workaround will be ideal for what we are going to perform. Just be careful not to double-click on any file, as this may force Notepad to attempt to open it.
Navigate to This PC/My Computer >> Your Main Hard Drive and choose the System Volume Information folder. - Step 7: Select these files and copy them to the Windowssystem32config folder in the drive containing your Windows OS installation, making sure to overwrite any existing data. You have now successfully backed up your registry to the date you specified.
Check to see whether you are still provided with the password prompt after restarting your computer. If you are, try repeating the step but using an older registry version.
Solution 2: Turn off the Startup password.
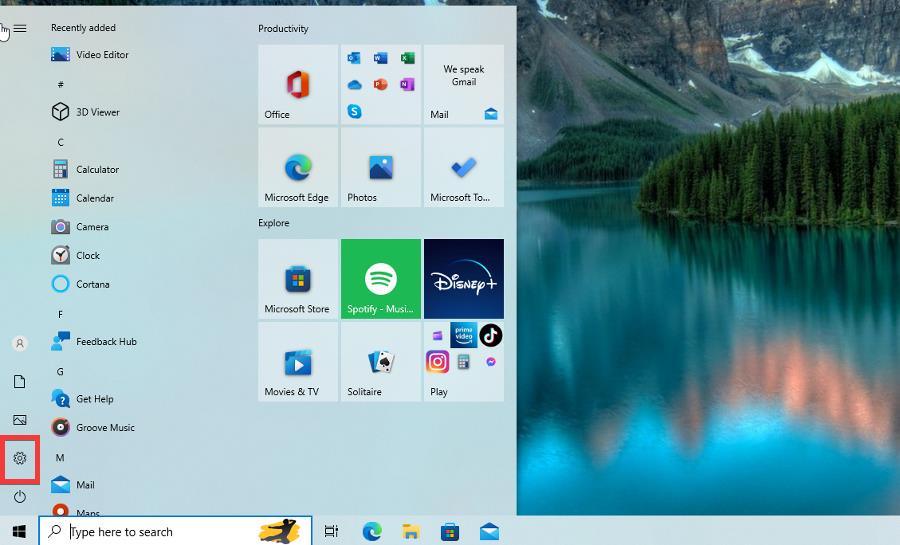
- Step 1: To open the Start menu, click the Windows icon
- Step 2: Then click on the Settings icon.
- Step 3: Select Accounts from the Settings menu.
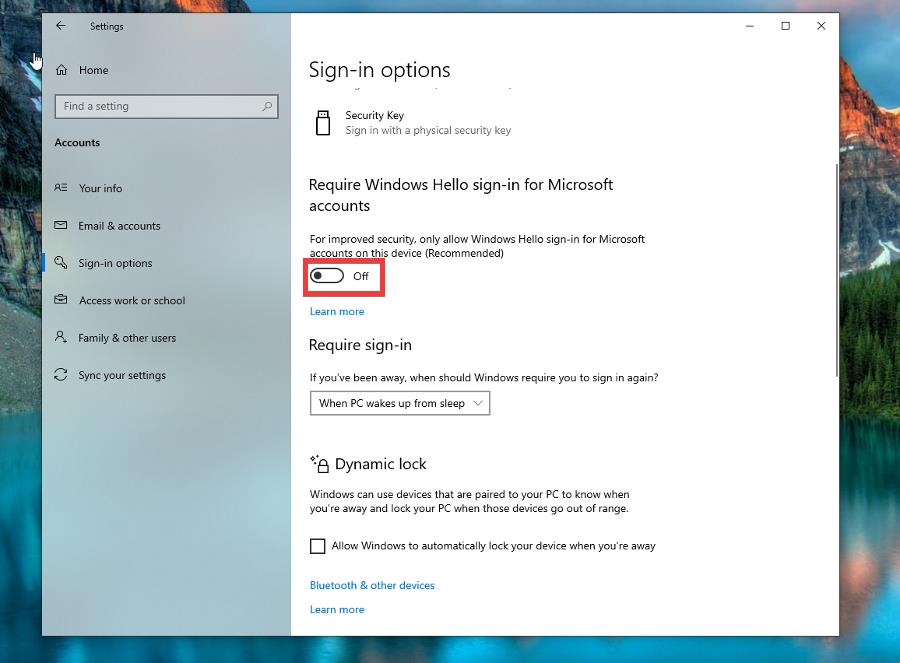
- Step 4: On the left, click the Sign-in Options tab.
- Step 5: Toggle the switch under Require Windows Hello sign-in for Microsoft accounts to the off position.
- Step 6: Now, in the lower left-hand corner, right-click the Windows icon and select Run.
- Step 7: Enter the following into the Run command and press Enter on your keyboard: “control userpasswords2”
- Step 8: Remove the check mark from the box next to To use this computer, users must enter a username and password.
- Step 9: If it’s already unchecked, insert a checkmark and then uncheck it again.
- Step 10: At the bottom, press the Apply button.
- Step 11: In the new window that displays, enter your login credentials.
- Step 12: To finish and close the window, click OK.
- Step 13: Restart your computer to see if the issue has been resolved.
Solution 3: Changing Registry Files
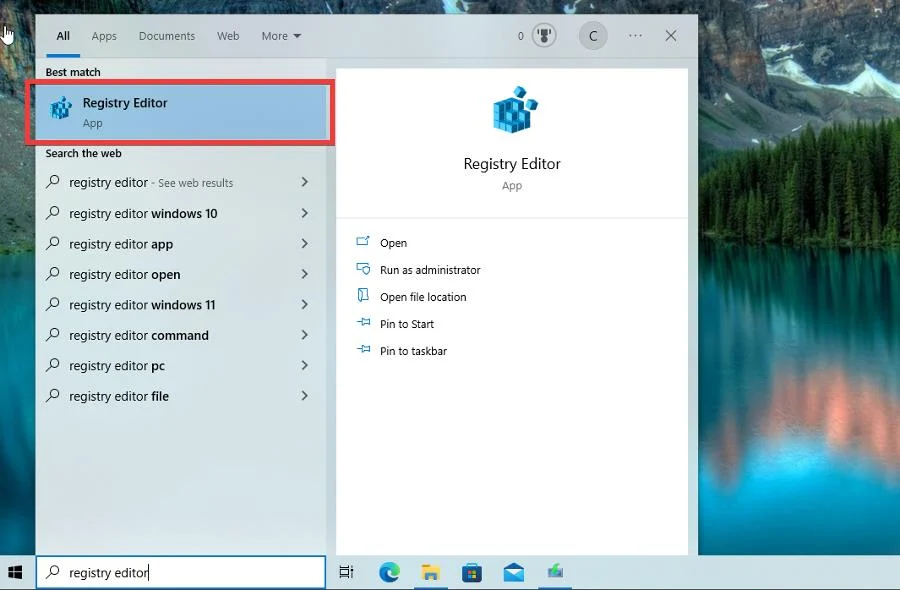
- Step 1: Search for the Registry Editor in the Windows Start menu.
- Step 2: If you want to make changes, a User Account Control window may appear. Choose Yes.
- Step 3: HKEY LOCAL MACHINE should be expanded. and then choose SOFTWARE
- Step 4: Choose the Microsoft option.
- Step 5: After that, navigate to Windows NT and CurrentVersion.
- Step 6: Scroll down until you reach PasswordLess. Then click Device.
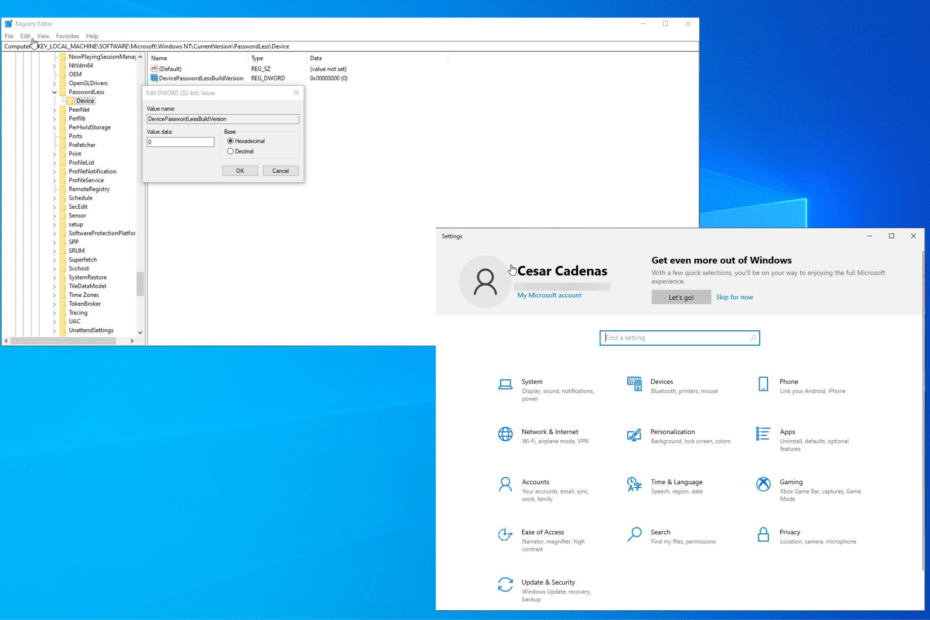
- Step 7: In the context menu that opens, right-click DevicePasswordLessBuiltVersion and select Modify.
- Step 8: Change the Value of the Data to 0.
- Step 9: To finish, press the OK button. Although you could remove the registry, we do not encourage it.
- Step 10: Now, like in the previous solution, open the Run command.
- Step 11: Remove the check mark from the box next to To use this computer, the user needs to enter a username and password.
- Step 12: Select the Apply option. Before you can activate the changes, you must enter your user password again.
This technique is useful if you want to automate all of your computer’s user accounts at once. The prior solution only applies to one account.
Solution 4: Use an antivirus Software
Another option is to employ an antivirus to protect all of your files, ensuring that no data is accessed or leaked by any internet risks.
Conclusion
Some PC problems are difficult to resolve, particularly when it comes to corrupted repositories or missing Windows files. If you’re having problems repairing a mistake, your system may be partially broken.
We propose installing Restore, a utility that will scan your machine and determine the source of the problem. This will undoubtedly resolve the problem.


