Imagine you are working and suddenly your operating system comes up with a sudden shutdown. It would be annoying for you as you have already lost your files and have no recovery to it. All your efforts have gone to waste. This situation is often faced by users when the operating system is not working properly. Yet it’s annoying and all you need is a fix for this issue.
Moreover, the users have also come up with the feedback that Windows 10 Automatic Repair makes operating systems impossible. This is indeed a strange problem which is needed to be fixed. We need to have an automatic repair of the Windows 10 operating system so that we don’t have to face such problems and manually repair the operating system. To learn more about Add a Sound Equalizer For Windows 10, visit our ISO River page for detailed information.
Let’s learn the overview of Windows 10 and come up with the potential way to automatic repair your PC:
Overview of Windows 10
Windows 10 is considerably the latest version released by Microsoft. The Windows 10 was launched in 2015. This version of Windows 10 faced many problems such as shutting down the operating system, unsuccessful installation of applications, and so. Microsoft made some advanced operating systems with several features introduced such as an effective start menu, Microsoft Web Edge Browser, Windows Assistant, and more.

This operating system is best for making presentations as it has smooth functioning over the workflow. Windows 10 is designed attractively with well-organized configurations.
Features of Windows 10
- Microsoft Windows has introduced an effective and attractive start menu which includes the tiles and blocks of icons. The user can also customize the start menu with changing colors and title size and the position of the icons. On the left side, there are most-recently visited applications and in the right panel, all the major applications are settled for the easy operations. These tiles are a bit similar to Windows 8, but Windows 10 tiles still offer an amazing vision.
- First time in history, Microsoft has introduced Windows Assistants to the user. The name is called to be Cortana. This Windows Assistant interacts with you and the user can order Cortana for any information on the Internet or open a specific application which is existing in PC.
Steps to Fix Automatic Repair in Windows 10
The user might have come up with the error messages including bootrec.exe/fixboot access denied, or Windows 10 automatic repair failed, or bootrect.exe/fixboot access is denied Windows 10. This might have happened because of the incorrect procedure implemented in the operating system. Let’s study the correct procedure to fix Automatic Repair in Windows 10.
Windows Command Prompt
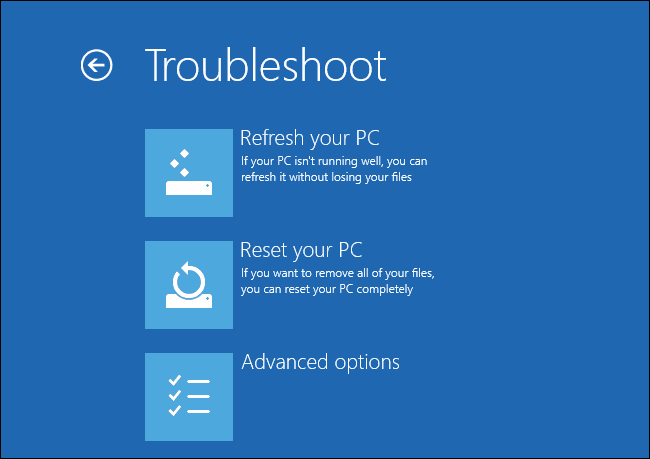
- To repair your Windows 10 operating system, Click Troubleshoot. Then proceed to Advanced Options and enter Command Prompt.
- The black screen will appear on the desktop. This is Command Prompt. So all you need to type the command and after every Command Press Enter to continue. Following are the commands:
- bootrec.exe/rebuildcd
- bootrec.exe/fixmbr
- bootrec.exe/fixboot
- Restart your Windows 10 operating.
This may solve your problem and fix the issue of Automatic Repair in Windows 10.
Run a Disk Check
In case you have failed with the first procedure this is the second hack which will take you close to success. Following are the steps to fix to Windows 10 Automatic Repair
The user has to run CHKDSK commands. Before running these commands make sure you are aware of the hard drive partition names, for example, if you have C Drive, you will command chkdsk/r c: and press enter.
Now restart the Windows 10 Operating system.
Boot Safe Mode
This is the third command prompt that will surely work and let you fix Automatic Repair in Windows 10. Follow the steps:
- Open Boot Options menu from the Boot > Click on Troubleshoot
- Enter Advanced Settings and then Startup Settings
- Click on Restart > Click Enable Safe Mode with the major networking list of options.
- Now, proceed with downloading the driver in safe mode saving it in your Flash Drive.
- Go to Command Prompt after pressing Windows key + X. Enter the command DISM/Online/Cleanup-Image/RestoreHealth.
Now restart the Windows 10 operating system.
We hope that you are satisfied with the information we have delivered to you. It is really important to realize that you are aware of Windows 10 Automatic Repair and further type the command prompt referring to the Internet. Learn the procedure of Windows 10 Automatic Repair on your operating system. If you have any queries regarding solving the errors of the Automatic Repair of Windows 10 you can drop down your concern in the comment section and we will get back with the solution in minimum time.


