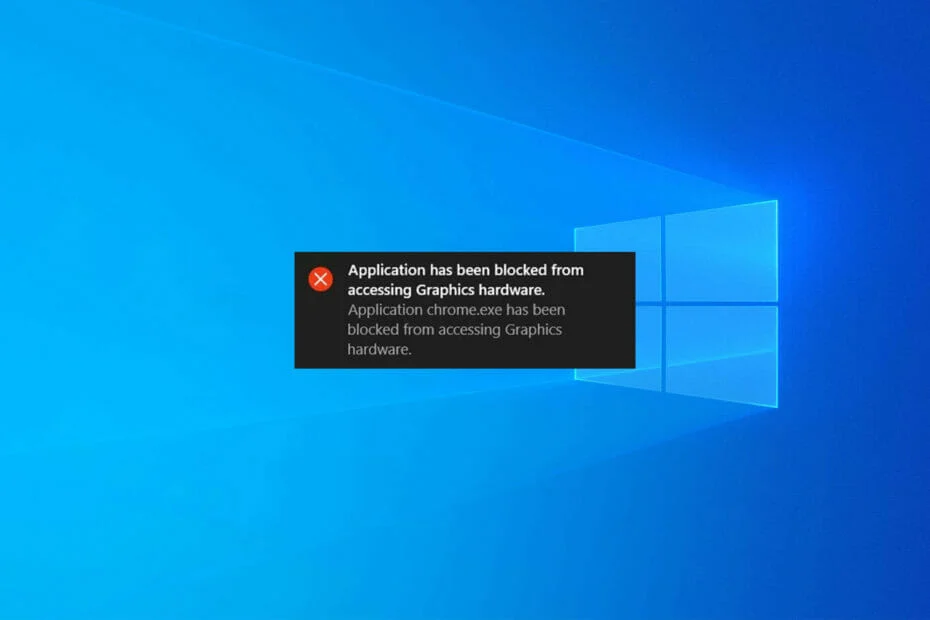
You’re playing your favorite game on Windows when you get the error “Application has been restricted from accessing graphics hardware.”
This problem appears to be most prevalent while attempting to run video games. This problem affects even games that can be downloaded from the Windows Store, such as Minecraft.
Fortnite, League of Legends, and Overwatch are examples of popular games that employ third-party installers but see this problem.
Other programs may also cause this problem; nevertheless, the same remedies can be used in all instances, regardless of which application is producing it.
Recommended Post:- Fixed: Reference by Pointer BSoD Error [Bugcheck 0x00000018]
Why does this Error occur
While the actual origin of the mistake is unknown at this time, it is thought that drivers are to blame.
Following a major operating system upgrade, your graphics drivers may become incompatible with your version of Windows 10. This is especially true if you manually update drivers rather than using a driver updater such as Driver Easy.
As a result, your GPU (Graphics Processing Unit) becomes stuck and fails to reply to the graphics request sent by your system.
If your GPU does not reply within a particular amount of time, Windows 10 will cease attempting to run your application and provide the error ‘The application has been stopped from accessing graphics hardware.’
Before Repairing
- Before implementing any of the fixes suggested below, there are a few things to keep in mind.
- It is recommended that you create a System Restore point before attempting any repairs.
Simple Solutions to fix the application has been Blocked from Accessing Graphics Hardware
Some of the fixes listed below require administrative privileges on your user account:
Solution 1: Use Administrator Rights to Run Your Apps
One of the most effective approaches to remedy this issue is to run the problematic software as an administrator. When you do this, the software gains access to a variety of functions, including graphics hardware.
To run an app as administrator, right-click it and select Run as administrator. Otherwise, experiment with launching Windows software as an administrator.
Solution 2: Customize the Affected App’s Graphics Performance Preferences
If the problem is limited to a single game or program, the graphics performance preference settings may be useful. These options are intended to improve app performance or extend the battery life of your PC.
So, here’s how you may tweak the graphics performance settings for the troublesome app:
- Step 1: Select Graphics settings from the Win Start Menu
- Step 2: Go to PC Settings
- Step 3: Click on System
- Step 4: Now, click on the Display.
- Step 5: Then, under the Choose an app to set preference option, search for the app by pressing the Browse button.
- Step 6: Choose the app and then click the Add button.
- Step 7: To complete the process, follow the on-screen directions.
Solution 3: Set the App’s Compatibility Mode Settings
This error is likely to appear if the app’s compatibility mode settings are incorrect. You could either configure the compatibility settings or run the compatibility troubleshooter in this scenario. They are as follows:
So, first, let’s look at how to configure the compatibility mode settings:
- Step 1: Enter the target program’s name into the Windows search bar.
- Step 2: Select the Open target folder from the context menu when you right-click on the programme.
- Step 3: Then, right-click on the executable (.exe) file of the app and select Properties.
- Step 4: Go to the Compatibility tab.
- Step 5: Check the box next to Run this programme in compatibility mode.
- Next, select a relevant option from the drop-down menu below this option. When you’re finished, click Apply and then OK.
- If the problem persists, try running the compatibility troubleshooter. Here’s how it’s done:
- Step 6: As in the previous steps, navigate to the Compatibility tab.
- Step 7: Select the Run compatibility troubleshooter option.
- Step 8: In the following window, select Troubleshoot programme.
- Step 9: Check the items that apply to the problem you’re having. When you’re finished, click Next.
- Step 10: To complete the process, follow the on-screen directions.
Solution 4: Display Drivers should be updated or reinstalled
This problem is more likely to occur if your device has incompatible or corrupted display drivers. As a result, you could solve the problem by upgrading or reinstalling these drivers.
Let’s look at how to update the display drivers:
- Step 1: Select Device Manager from the options by pressing Win + X.
- Step 2: To expand the Display adapters option, double-click it.
- Step 3: Right-click the display adapter on your PC and select Update driver.
In the next box, select Search automatically for updated driver software. Finally, to finish the process, follow the on-screen directions.
If the problem persists, reinstall the Display adapters by doing the following steps:
- Step 1: As in the previous stages, open the Device Manager and the Display Adapters.
- Step 2: Uninstall the Display adapter by right-clicking it.
- Step 3: Finally, pick Scan for hardware changes from the Action menu.
When the scan is finished, restart your computer to save the changes.
Solution 5: Use the Windows Hardware and Devices Troubleshooter to troubleshoot your computer
Windows has several troubleshooting tools to assist you in resolving system-related difficulties. In this instance, the Hardware and Devices troubleshooter may be useful.
As a result, here’s how to run the Hardware and Devices troubleshooter:
- Step 1: Navigate to the Windows Start Menu
- Step 2: Go to PC Settings
- Step 3: Choose Update & Security and, on the left-hand side pane
- Step 4: Click on the Troubleshoot.
- Step 5: Scroll down to the Hardware and Devices option on the right-hand side pane
- Step 6: Then click Run the troubleshooter.
- Step 7: To finish the process, follow the on-screen directions.
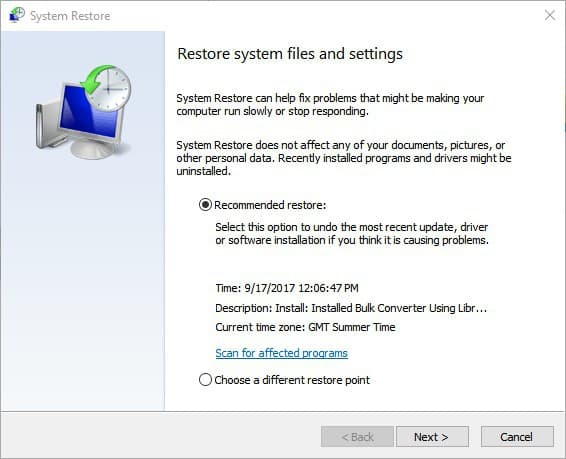
Solution 6: Make use of a System Restore Point
If this problem has only recently appeared, a System Restore point may be useful. In this situation, System Restore will restore your computer to its previous state and resolve any issues.
So, if you’ve made a restore point on your computer, here’s how you may utilize it to solve this problem:
- Step 1: Type In the Windows search bar, type Restore Point, and choose the best match.
- Step 2: Select the System Protection tab.
- Step 3: Select System Restore and then Next.
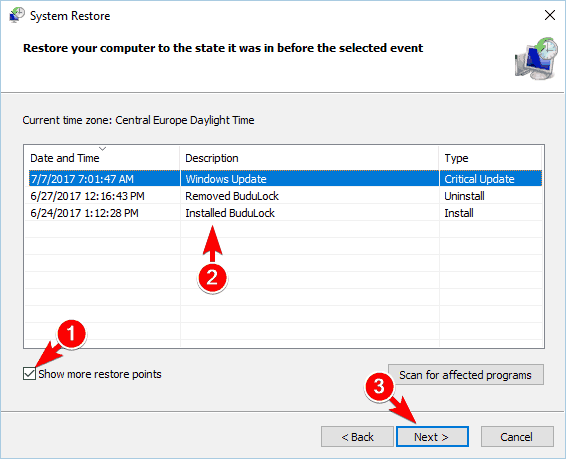
- Step 4: Show additional restore points are selected.
- Step 5: Choose your selected restore point and press the Next button.
- Step 6: Wait for the process to finish and then click on the Finish button.
Solution 7: Configure Registry Editor Settings
One of the best approaches to solve this problem is to configure a few settings in the Registry Editor. However, take care not to change or delete the incorrect keys in the process. To avoid problems, begin by backing up the Registry.
To fix this problem, we’ll configure the TDR (Timeout Detection and Recovery) key. The TDR feature detects graphics card response issues and addresses them by resetting the card. If a graphics card does not respond within a certain time frame, the device will automatically reset the graphics card.
Let’s now utilize the Registry Editor to change the TDR (Timeout Detection and Recovery) value:
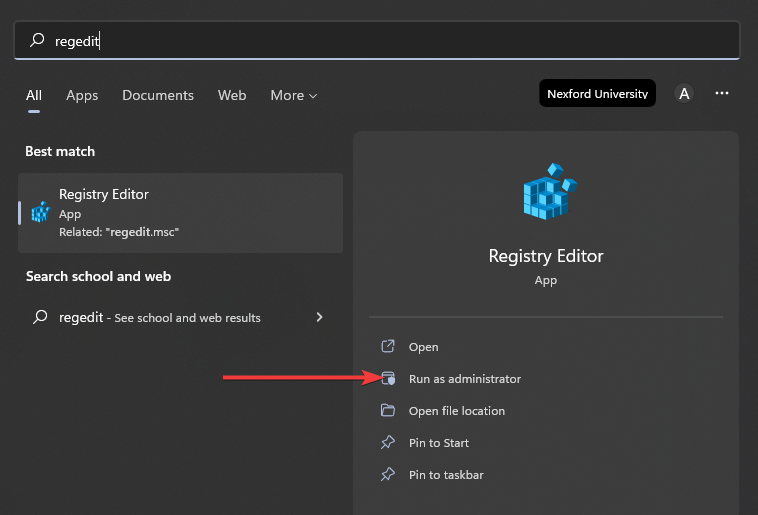
- Step 1: To open the Run command dialogue box, press Win + R.
- Step 2: To open the Registry Editor, type Regedit and hit Enter.
- Step 3: HKEY LOCAL MACHINE
- Step 4: Go to SYSTEM
- Step 5: Go to ControlSet001
- Step 6: Go to Control
- Step 7: Now, GraphicsDrivers is the path to take.
- Step 8: Select New > DWORD (32-bit) Value from the right-hand side pane by right-clicking anywhere on the right-hand side pane.
- Step 9: Type TdrDelay as the new value and press Enter. Then, double-click the TdrDelay variable and set its Value to 8.
- Step 10: Restart your computer to apply these modifications. If the problem is with the graphics card, the TDR feature should resolve it by resetting the hardware.
Solution 8: Updating Your Windows Device
If all else fails, you may need to update your computer. Once the device is updated, you should be able to address this issue as well as any other system concerns.
Here’s how to update a Windows device:
- Step 1: Select Windows Update from the Win Start Menu
- Step 2: Go to PC Settings
- Step 3: Click on the Update and Security menu.
- Step 4: Then, to finish the process, click the Check for updates button
- Step 5: Lastly, follow the on-screen instructions.
Conclusion
It’s quite annoying when you get the “Application has been prohibited from accessing graphics hardware” message at random. However, resolving the problem is simple—just implement any of the remedies we’ve suggested.


