Windows error 0x80070057 is a well-known annoyance among both users and system administrators. Since at least Windows XP, we’ve been plagued by this system problem. As a result, it isn’t a particularly difficult problem to correct, and we can teach you exactly how to do so.
We assume you’re reading this because you recently updated the latest Windows 10 operating system on your computer and want to resolve error 0x80070057.
We have some excellent news for you: if you carefully follow the steps mentioned below in the order they are given, you will be up and running with Windows 10 in no time.
Recommended Post:- How to Show Network Icon on the Taskbar in Windows 10 & 7
What is Windows Update error 0x80070057?
The 0x80070057 Windows 10 update error code indicates an issue with system storage, most commonly the storage disc. As a result, your first step should be to look for problems with it. Here are a few possible explanations for the error:
- Problems with the file system: If you have an incompatible file system, it will cause problems downloading and installing OS updates.
- Defective system files: When system files are corrupt, the PC’s performance suffers and BSOD issues occur.
- Third-party apps preventing updates: Occasionally, a third-party app, generally security software, may be preventing updates and triggering error 0x80070057 in Windows update.
How to Fix the Windows Update error 0x80070057?
Before we begin making more sophisticated adjustments, here are a few simple ones to try:
- Restart the computer.
- Disable any antivirus or security software that is installed on the computer. Some people stated that removing Cybereason Ransomware solved their problem.
If none of these work, proceed to the next solutions indicated.
Note: To resolve the 0x80070057 error code, you must have administrator privileges on Windows 10 to access the Group Policy Editor, which is not available in the Home version. You will also need administrator privileges to run the appropriate command lines in the Command Prompt window.
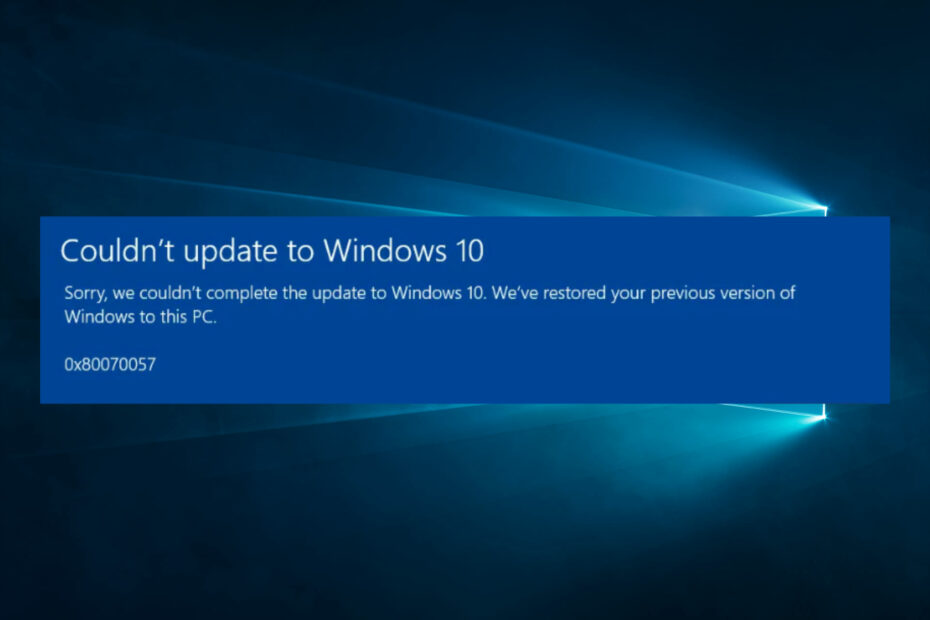
The most aggravating aspect of error code 0x80070057 is that you rarely know what caused it. If it occurred during a Windows Update, you most likely ran out of storage space. Yet it’s only an informed assumption.
We’ll walk you through all possible solutions, beginning with the most popular and simple ones. If you received a specific problem message, check the list below to see if we addressed it.
Solution 1: Make More Drive Space
Because update files can be rather large, error 0x80070057 frequently appears alongside Windows Update. Furthermore, when Windows updates the entire system, it stores the previous version in a folder called Windows. old, which might take up many gigabytes of disc space; more than you may have available.
This is usually the case when Windows Update fails. Yet, this is not the only instance of this issue.
- Step 1: Use Win + E to open the File Explorer and navigate to This PC to see how much space is left on your system disc.
- Step 2: If the space appears to be limited, right-click the device and select Properties
- Step 3: Go to Disk Cleaning
- Step 4: Click on Clear up system files.
- Step 5: Examine anything that can be removed, particularly the Recycle Bin and Windows Update Cleanup, then click OK and confirm with Remove Files.
- Step 6: If you want to keep Windows Update files for recovery, skip the System Files step and begin with Disk Cleaning.
Still, encountering the error? Clear out extra Windows storage space, or try the alternatives below.
Solution 2: Sync the Date and Time on Windows
When your Windows clock is out of sync, it might result in a variety of problems, including the error code 0x80070057. While this isn’t a common cause, it’s usually simple to solve.
To begin, verify the time and date by clicking the time in the far right corner of the Windows Taskbar. We may skip this step if it appears correct, but if it doesn’t match the actual time and date, here’s how to repair it:
- Windows 11 Users: To open the Settings program, press Win + I, then navigate to Time & language > Date & time.
- Windows 10 Users: Right-click the Taskbar and choose Change date/time.
We recommend that the following options be enabled:
- Automatically set the time
- Automatically adjust for daylight savings time
- Automatically set the time zone
Now that those are in place, click Sync to confirm. If your Windows time is constantly out of sync, there could be a more serious problem.
Solution 3: Do a Windows Update check
If the error number 0x80070057 appeared independently of Windows Update, it could be due to a missing update. To see if you have any pending updates, press Win + I and then do the following:
With Windows 11, go to the Settings app and pick Windows Update, then click Check for updates.
In Windows 10, you can: Go to Update & Security and select Check for updates.
Install any pending updates before attempting again.
Solution 4: Execute Chkdsk
Chkdsk is the quickest approach to locating and repairing corrupted files. This Windows utility checks your whole hard disc and can detect faulty hardware.
To run Chkdsk, launch the File Explorer by pressing Win + E, then navigate to This PC, right-click the system drive, and select Properties.
Go to the Tools menu, then select Check, then Scan drive. The scanning will take place in the background. If any problems are discovered, you have the option of dealing with them. We propose that you repair them and restart your system.
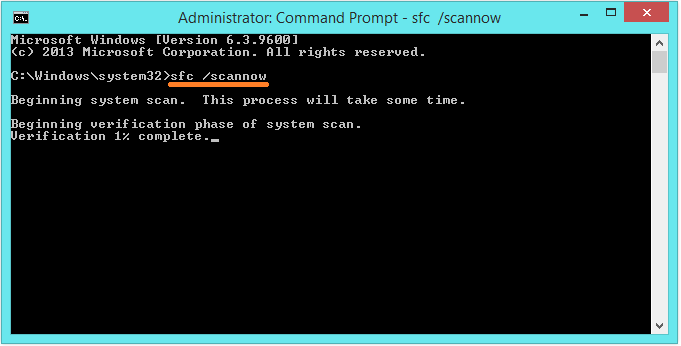
Solution 5: Run the System File Checker as a fifth option
We can use Windows’ built-in System File Checker utility to scan the system for potentially corrupted files. This utility will identify and perhaps repair any unforeseen corruptions, restoring the system to a functional state.
- Right-click the Start button and select Command Prompt (Admin) or Windows PowerShell to launch an elevated Command Prompt (Admin). Execute the following command: sfc /scannow
- This command may take some time to execute. Close the Command Prompt window only when the verification is complete. When you finish, you’ll get one of the following messages:
Windows Resource Protection did not find any integrity violations: Your system did not contain any corrupted files; you should attempt another solution for this problem. - Windows Resource Protection could not perform the requested operation. You must reboot your machine into Safe Mode before running the command.
- Windows Resource Protection found and successfully repaired them:
The CBS.Log%WinDir%LogsCBSCBS.log has more information. See the instructions below for further information on what the System File Checker corrected. - Windows Resource Protection found corrupt files but was unable to fix some of them:
The CBS.Log%WinDir%LogsCBSCBS.log has more information. You must repair the corrupted files manually. Follow the steps below to locate the corrupted file and manually replace it with a known good copy of the file. - If you receive one of the latter two notifications, you should investigate the System File Check log. This is critical if you received the final message.
- To begin, start an elevated Command Prompt by right-clicking the Start button and selecting Command Prompt (Admin), Windows PowerShell (Admin), or Windows Terminal from the option that appears (Admin). Execute the following command: findstr /c:”[SR]” %windir%\Logs\CBS\CBS.log >”%userprofile%\Desktop\sfcdetails.txt”
- This will save the contents of the log to a plain notepad file on your desktop. I have yet to encounter any problems because my Windows installation is quite new.
- Nevertheless, if you had corrupted files that the SFC procedure couldn’t automatically update, you’ll see entries like this (from the Microsoft Help document on the System File Checker):
2007-01-12 12:10:42, Info CSI 00000008 [SR] Cannot repair member file [l:34{17}]”Accessibility.dll” of Accessibility, Version = 6.0.6000.16386, pA = PROCESSOR_ARCHITECTURE_MSIL (8), Culture neutral, VersionScope neutral, PublicKeyToken = {l:8 b:b03f5f7f11d50a3a}, Type neutral, TypeName neutral, PublicKey neutral in the store, file is missing - Using the Command Prompt, we can now replace the corrupted file with a known good copy. To begin, start an elevated Command Prompt by right-clicking the Start button and selecting Command Prompt (Admin), Windows PowerShell (Admin), or Windows Terminal from the option that appears (Admin).
- We must now take administrative control of the corrupted file. Please keep in mind that in each of the stated cases, you should change the path and filename with the information from the sfcdetails.txt file prepared in the previous section.
The following command should be used:
- takeown /f <em>pathandfilename</em>
- To provide administrators with complete access to the corrupted file system, use the following command:
- icacls <em>pathandfilename</em>/grant administrators:F
- Lastly, use the following command to replace the corrupted system file with a known good copy.
- copy <em>sourcefile destinationfile</em>
For example, if you copied a known good system file from a system running the same operating system (and the same version, build, and so on) onto a USB, the command may look like this:
copy f:\usbstick\jscript.dll c:\windows\system32\jscript.dll
Solution 6: Execute the DISM Command
If the above-mentioned manual replacement is too onerous, or if there are too many files to replace, we can utilize the DISM command.
DISM stands for Deployment Image & Serving Management, and we can use this command to download and restore the file health of the system. Enter the following command from an elevated Command Prompt or Windows PowerShell prompt:
DISM /Online /Cleanup-Image /RestoreHealth
This command may take some time to complete depending on the state of your system and the extent of corruption present. This process has been observed to stall at 20%.
If this occurs, simply wait a few moments and it should resume on its own. Once completed, check to see whether any files have been replaced. If they have, restart your computer and then run the sfc /scannow command again. This time, it should replace the corrupted file.
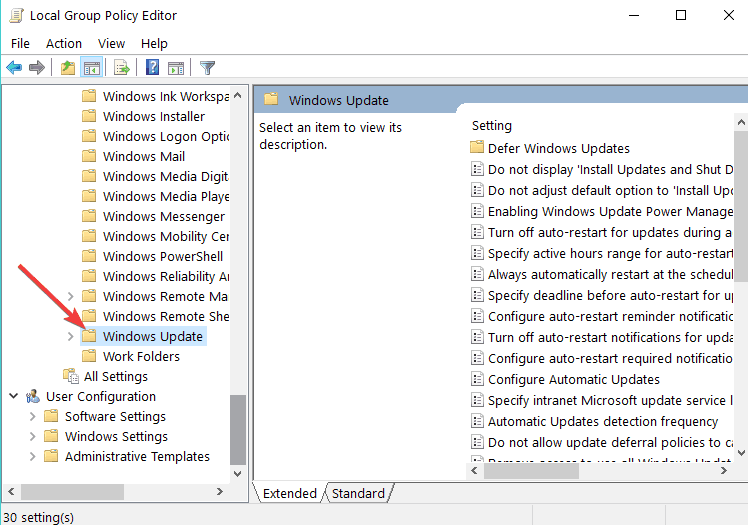
Solution 7: Repair Group Policy Interference
This hasn’t been the case for everyone, but when Windows 10 was released, many people (understandably) took offense at Microsoft’s archaic Windows Update system.
Windows 10 Home users were generally constrained by this mechanism, however, Windows 10 Pro users may change their Group Policy settings to disable the update system.
But, meddling with this policy may be exactly what is causing the Windows Update process to fail.
- Step 1: Hit Win + R to bring up the Run dialogue box.
- Step 2: Enter the command gpedit.msc.
- Step 3: Now take this path. Computer Configuration
- Step 4: Go to Administrative Templates.
- Step 5: Choose Windows Components.
- Step 6: Go to Windows Update.
- Step 7: Next, select Configure Automatic Updates.
- Step 8: Click on Not Configured.
- Step 9: Restart your system, and the update should now be complete.
Solution 8: Reset the Windows Update Repository
On occasion, we can try to resolve the issue by resetting the Windows Update repository.
It will direct you to the Microsoft Support document that covers the complete process so that you can try this remedy using their information.
Solution 9: Windows Update Troubleshooter
We’re not sure how successfully the Windows Update Troubleshooter handles this error because group policies and other system settings can have an impact.
But, if you are still unable to complete an update, it may be worth downloading and trying again.
Download the Windows Update Troubleshooter from this link. Run the troubleshooter after it has been downloaded.
Choose Windows Update, then Advanced, and finally Run as administrator. This will launch the troubleshooter as an Administrator, allowing it to detect and resolve a broader range of issues. Next, click the button.
The troubleshooter will automatically scan your system for Windows Update difficulties. If any problems are discovered, the troubleshooter will attempt to resolve them automatically unless you unchecked the automatic fix box.
Solution 10: Do a Windows System Restore, Reset, or Format on your hard drive.
This is your last resort because you will lose any modifications made since the last system restore point, or you will have to reinstall your system after a reset or formatting of your drive. Nonetheless, it will resolve any Windows or software-related issues. This article will walk you through all of your options for restoring Windows to factory settings, from the least invasive to the most invasive. Make backups before you destroy your machine.
Solution 11: Purchase a New Drive
If all else fails, the problem could be hardware-related. The final option here is to replace your system drive with a new SSD.
Where else can you find this error?
Today, error code 0x80070057 is mostly associated with the Windows 10 update, but it has the potential to spread to other platforms, apps, and behaviors. Let us investigate more.
With error code 0x80070057, the Windows Update client failed to detect. (In some circumstances, a more detailed warning is displayed: There were some issues installing updates, but we’ll try again later. If you continue to encounter this and want to search the web or contact support for more information, the following may be useful: (0x80070057).
- 0x80070057 related to Windows 10 installation
- Error 0x80070057 the parameter is incorrect
- error 0x80070057 on Xbox
- Windows 10 activation error 0x80070057 (If this problem prohibits you from using your license key, you may have to reinstall Windows.)
- Error 0x80070057 Google Earth
- 0x80070057 in Windows 7
- We couldn’t format the selected partition error 0x80070057
Conclusion
Is your computer displaying a Blue Screen of Death with the error code 0x80070057? This issue, which might show as a white pop-up window or the Blue Screen of Death, is well-known among Windows users and system administrators.
The causes of this error could be numerous, but the most vexing aspect for users is that the messages associated with error 0x80070057 can fluctuate. In short, the notice may say something like “Unspecified Parameters Encountered,” “Unknown Error,” or “Required services are not operating.”
The message that appears with the problem code, on the other hand, will tell you a lot about it. As a result, all of the strategies discussed in the preceding article can be used to address the root cause of the problem.


