The Windows OS is quite a capable OS with many functional features that lets you use the computer to work efficiently and also provide troubleshooting and repair features. Windows 10 is one of the most advanced and highly featured computer OS of this generation. the OS is being continuously updated to improve the standards as well as reduce the bugs in the operating system. Millions of people trust Windows OS and use the OS to perform day-to-day activities. The OSes efficient enough to support high-end games and powerful 3D software. You can get hands-on a Windows OS pretty easily by downloading the latest Windows OS from Microsoft.
As mentioned above, the OS is pretty neat with the features and functions well to provide the users with cool and really beneficial utility. Any software or OS will certainly have its flaws and the Windows OS certainly has some, so Microsoft has built-in some cool repair tools and troubleshooting tools to recover and repair problems and flaws instantly. Windows have some of the coolest and functional troubleshooters which solve most of the problem, if you still find the problem to be unsolved, you can learn more from the Microsoft website as they provide you with the best Windows community service, where experts and professionals answer queries and resolve problems.
Now, let’s focus on our main theme i.e how to use the DISM command to repair Windows 10 Image, before we go further, you need to understand what Windows 10 image is and what DISM command is. When you are done with understanding these things you will better understand, what is about to follow.
Windows 10 image file is the exact copy of the Windows OS files, it’s kind of a backup file to restore your computer using it in times of crisis. This feature comes in handy and can be really beneficial for you. You can rescue your computer from being destroyed. You can make an image file by going to the control panel and navigating to the system and security option and from there you need to get into the backup and restore option, here you will find the option to create an image file of your OS. you can save the image file to your computer, CD or on a network location based on the resource available. It is normally recommended to backup or create an image file of the OS immediately after you have installed the OS on the computer as the computer only contains the OS and not much of the software is present in the storage.
Recommended Post:- All the Ways You Can Still Upgrade to Windows 10 for Free
DISC is the short form of Deployment Image Servicing and Management. This is a built-in feature of the Windows OS that allows you to repair the image file. This feature can be very beneficial when your OS seems corrupt and needs repair. You can run some simple commands and that will scan the image files for corruption and will try to fix the problems. This feature can be a lifesaver and works efficiently and repairs the corrupted files and makes your OS come back to the normal and proper form.
How to Use DISM Command Tool to Repair Windows 10 Image
The DISM tool is very powerful and runs a deep scan of the files to find out corrupted files.
You will learn how to run the command and repair Windows 10 image files to restore your computer to good health:
- Follow these simple steps and repair your corrupted Windows 10 image file.
- From the start menu, open up the command prompt, you need to select run as an administrator while opening up the command prompt, you can also search for cmd in the search bar to find the command prompt.
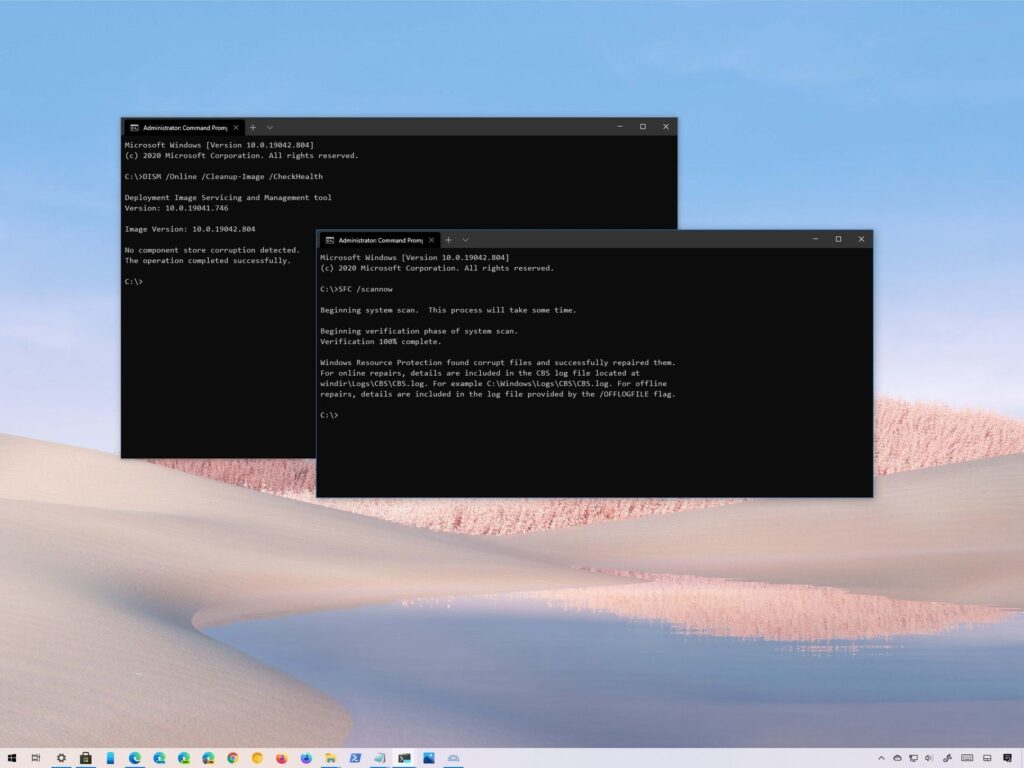
- Now once the command prompt is opened, you need to type in this code “DISM /Online /Cleanup-Image /ScanHealth” to start the scanning of image files.
- This will start the scanning and you need to wait for some time to let the DISM tool scan the system for corrupted files.
- Once the scanning is complete, you will find the percentage showing the scanning percentage.
- The prompt will also say whether there are files corrupted or all the files are intact.
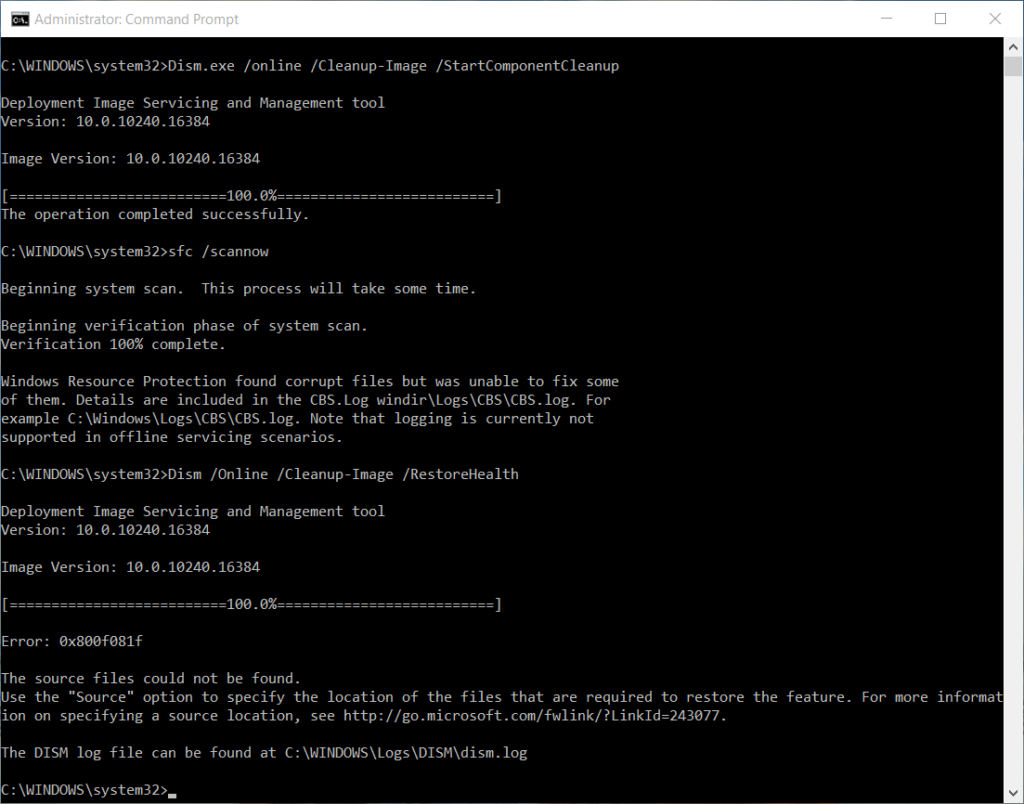
- If you find the files to be corrupted, you need to run another command which will repair the corrupted files and make your computer perform better.
- Input this code “DISM /Online /Cleanup-Image /RestoreHealth” in the prompt to restore the health of the image files.
- The restoration process might take some time, so you need to wait till the process completes to shut down the computer. You can perform any other action and let the process run in the background, this will only affect the speed of the process and will not affect the restoration or repair.
- Once the process is over you can access your computer and feel the change, either minor or major.
You can also try this method if the first one fails:
- You can download the Windows 10 ISO file from Microsoft and burn it to a storage location.
- Learn the file location, as you will need the path for the next operation, that you are going to perform.
- Now open up the command prompt as mentioned above.
- Run this command in the command prompt “DISM /Online /Cleanup-Image /RestoreHealth /Source:E:\Sources\install.wim”. This is an example source location, you need to change the location and this is where you need the path you have used to burn the ISO file.
- This will replace the corrupted file from the newly downloaded ISO file so that you can get better functionality with the OS.
Using the built-in DISC tool can be really easy and beneficial. You can easily repair the image files and restore your computers’ health. This tool will certainly be useful and can come in handy at times. Hope the information provided was useful and, We hope that you understand how to use the DISM command tool to recover the image files.