It is a very simple process if you are planning to upgrade your computer from Windows Vista to Windows 7, which requires a few steps to be followed. The first thing to take care of when you upgrade your computer from Windows Vista to Windows 7 is that before everything, you have to make sure that you have a service pack.
You can use the Windows 7’s Upgrade Advisor which helps you to understand the various software, gadgets, and tools that won’t be able to run on the computer after the upgrade to Windows 7 is being done. The Upgrade Advisor’s exam is usually pretty well done by the system of Windows Vista.
Steps of Upgrading Windows Vistas to Windows 7 without any Data Loss
Step 01:- Click Search Box to Enter Service Pack Listing
The first thing that one has to do is find out what version of Vistas is being run on the computer. So click the start button and open the Search box, and then press Enter. Then there appears the About Windows box which gives you the list of words such as Service Pack 1 or Service Pack 2 listed on the second line of the box.
Step 02:- Click to Windows Update
- If there is no listing of any service pack, then it can be grabbed through Windows Update for which you have to click the start menu choosing All Programs, and then you can click the Windows Update.
- All the updates that have been marked as important are to be kept on downloading after which Microsoft slips you a copy of Service Pack 1.
Step 03:- Click to Start Download Windows 7 Upgrade Advisor
- Now just click on the Download the Windows 7 Upgrade Advisor button for the download to start. This click fetches a slightly more complicated page of Windows 7 Upgrade Advisor in Microsoft’s traditional sleight of hand.
- Now you can click the download button which is on the second Windows 7 Upgrade Advisor page.
Then you will be asked whether you would like to run or save the file you have to choose the save button.
Step 04:- Install Windows 7 Upgrade Advisor Setup
When the download is completed, you have to just install the program by just clicking twice on the downloaded program’s name, Windows 7 Upgrade Advisor Setup. Then you can see one approval screen, click on that.
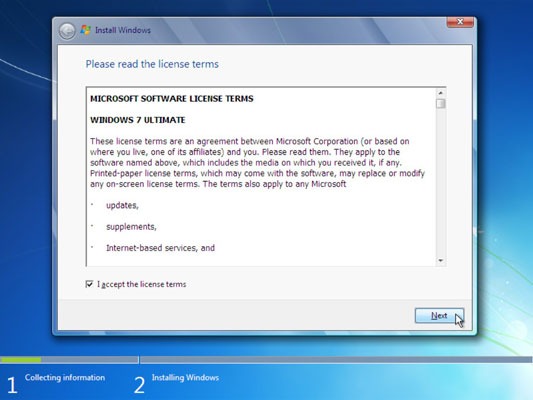
Step 05:- Accept Terms & Conditions
Click Accept on the License Terms which you can go through and then click the install button. After the program is installed you have to click the finish button. Accept the terms and conditions that pop up after going through them, click on the checkbox and then click next.
Step 06:- Launch the Program
The program is ready to launch. You can launch it by clicking the start button. You can also do that in the All Programs area if not on the Start menu’s first page. Then you will be asked if you want to allow the program to make certain changes to your computer according to the updated version, you can click on yes.
Step 07:- Turn on Plug-ins
Then there will be a Windows 7 Upgrade Advisor program which allows you to plug all the equipment that you want to use with Windows 7 into the computer’s several ports. Then you can turn on all that is plugged into your computer system after which you can click the Start Check button. The program displays its findings, After a bit of brow furrowing.
Step 08:- Update the Drivers
Now you can read the Windows Advisor’s results as these results explain to you which parts of the system need an update of the drivers or what must be replaced in the system.
These reports shown by the system can be printed and shown to the technical help at the store from where you plan to shop for the updated parts of the system. In this step, Windows 7 has been instructed to visit Microsoft’s Web site and download the latest updates such as patches, and assorted fixes and drivers for your computer system which will make installation of the update as smooth as possible. Make sure that your computer is connected to the internet for all these updates and downloads.
Step 9:- Click on Vista Permission Screen
- Windows 7 DVD can be inserted into your DVD drive and then it can be run as per the system’s requirements.
- You can then click on Install now once the installation program finally comes up for air and then the Windows 7 begins installing temporary files.
Step 10:- Activate the Product Key
The product key can be typed on the Type Your Windows Product Key dialog box, and click Next. You can now choose the recommendation settings and confirm other things like date, location and time and then run the window update. Now Choose the upgrade and go next after which you need to check the compatibility report and then click Next.
Upgrade Windows Vistas to Windows 7 without any Data Loss
You can download the upgrade Windows Vistas to Windows 7 without any data loss by accessing the link below. Also, make sure that you have enough back up before you proceed with the same. There are a lot of duplicate ISO images on the market and it is best to download the same from a trusted source.