Updates are fantastic, with every update the OS gets better and functions better. Updates bring in new features and improvements to the previous features and also does the job of bug fixing to enhance the quality of the OS and at last provide users with a perfect platform to work on.
Windows is one of the best operating systems out there, which is used to run computers and servers. There are nearly 17 major releases of Windows OSes and the most famous ones are Windows 7 and Windows 10 in which Windows 10 is the latest and considered to be the last major release of the OS. Windows 10. Ever since Windows 10 was released Microsoft has taken up the job of providing the OS with updates.
Windows 10 is provided with two major feature updates in a year and provides one bug fix updates each month, this system is pretty good as the OS is made better with the updates and all the new technologies are included in the OS without the need of reinstalling the OS as it was before. As of Windows 7, it is no longer supported by Microsoft as there have been two major Windows OS released after Windows 7 but the OS is still running on many computers and Microsoft
Recently users who tried to update the OS faced an issue with updating the OS, there was an error code 0x8024a10a associated with the error, which shuts down the updation process and halts it totally. This hindrance in updating the OS is causing worries to the users.
The error might have been caused due to some corrupt files in the updation engine of the OS or other minor errors in the computer. They can be fixed, so nothing to panic. Here you will get a full understanding of how to fix the updation error 0x8024a10a on your Windows 7 and Windows 10 OSes.
Recommended Post:- Fixed: The Activation context Generation Failed Error on Windows 10
Fix For The Update Error 0x8024a10a In Windows 7 and Windows 10
Here are some simple yet effective fixes for the updation error in Windows 7 and Windows 10. You can use them and fix the issues on your computer.
Method 1: Disable Your Antivirus Application
Any antivirus application can cause minor trouble on your computer, most antiviruses are build to accept Windows updates but sometimes they malfunction and cause errors in the update process. The error caused by antivirus can be fixed by disabling the antivirus for a short period of time and enable the protection once you have updated your computer.
- To disable the antivirus, you need to open the antivirus and go to the settings, here you will find the live protection turned on, you have to turn it off and set the time limit for the feature to be turned off. Every antivirus wil have the live protection feature in a different place in their interface, so look for the live protection and disable it.
- Once you are done with updating your computer, you can turn on the live protection feature on the antivirus, so you get uninterrupted protection from viruses and other malicious programs.
If this doesn’t work try the next method.
Method 2: Clean Boot Your Computer
Clean Booting the computer will give the computer a fresh start with less hassle to handle when it starts up and the OS files which need priority will get their priority and that will get errors fixed.
Follow these steps to clean boot your computer.
- Open the Run command by pressing the Windows key and the R key on the keyboard.
- In the command bar, enter MSConfig and hit Ok. the system configuration tool will open up.
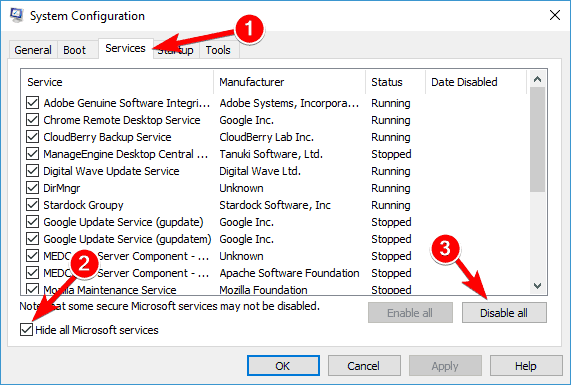
- Now in the system configuration, go to the services tab and toggle on the tick mark near the option hide Microsoft services.
- Now, once you have hidden the Microsoft services, just disable all the services by clicking on disable all.
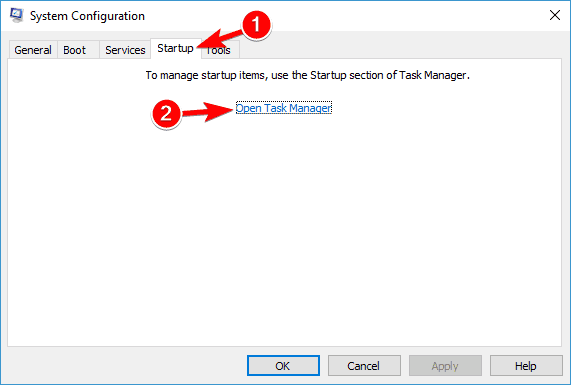
- Now open the task manager by pressing on the control key + the shift key and the escape key, all at the same time.
- In the task manager, disable all the startup applications.
- Now, restart your computer. And try updating your OS.
- This should work as all the system files were given priority at the start so they get enough hardware resources to keep them running smoothly.
Method 3: Use the SFC/Scannow Command To Fix The Issue
The SFC/ scannow is pretty good command in WIndows oS which you can use to rectify corrupt files. If there is anything wrong with the files of the update mechanism in Windows, the SFC/ scannow command will probably rectify that file and make things better.
- To run the scan, open the command prompt by searching for the command prompt in the search bar.
- Now, in the command terminal, enter SFC/Scannow and hit enter.
- The scan will run for some time and fix the corrupt files on the computer.
- After the scan is complete, restart the computer ( this is not necessary, but you can restart the computer to give it a fresh start).
- Try updating the OS.
The methods mentioned above are simple and common methods for fixing issues with the OS, they can come in handy in any situation, so make notes and use them to effectively fix errors on the computer.
Hope the information provided above was helpful and informative, you can fix the issue with the Windows updater and update your computer without facing issues.