Windows 10 is a very advanced OS that comprises many powerful system features to run your computer efficiently and provide you with the best quality operation features. You can find many upgraded features like the user interface, stability, troubleshooting functions, and much more. To make improvements Microsoft had removed some of the older built-in software to put in the new ones causing the removal of some basic functions. The improved software is much better than their predecessor software but misses out on some very crucial features. Most Windows users who had migrated to the new Windows 10 OS find it difficult to work with these features missing and are in the search for alternative ways to compensate for these features.
Microsoft is continuously working hard to improve their OS and are enhancing the functioning of the OS by providing crucial updates and bug fixes. Some of the missing features could be re-furbished in the OS in the updates and some may not be included.
There are some ways in which you can bridge these feature gaps and utilize the OS to function efficiently.

One such function, that previously existed in the older version of the Windows OS that had been scrapped away is the image preview option in the context menu. This is a very useful feature and can be used to save a lot of time while searching for a particular image or picture on the computer. Images are named in a very different and unrecognizable pattern making it difficult for you to search them manually using the search function, in such cases the preview function can be used to view the preview of the image without having to open the image file in the photo viewer software. With this feature being scraped away from the context menu, you have to adopt a different method for previewing the picture without opening it on the software.
You can use some of the third-party software to preview the images and other files directly, without opening the file in the software. You need to install the software manually and have to use it to preview the files on the computer, this sometimes can be difficult as you cannot find the perfect software for the purpose, you instead can use the built-in preview function from Windows Explorer.
Recommended Post:- How to Easily Reinstall Windows 10 Without the Bloatware
How to fix the Image Preview Option Missing From Context Menu in Windows 10
Here, you will learn some of the methods to preview your image files on Windows 10 computer, and also learn to enable the preview option in the context menu for easy previewing.
Method 1
- Follow along to enable the preview option in the context menu:
- Open up the registry editor, by typing Regedit in the search bar.
- Now from the search results, open up the registry editor and allow the tool to make changes to your device.
- Once the editor opens up, you need to navigate to the place where you can change some values to make the preview options appear in the context menu.
- Navigate to this path “HKEY_CLASSES_ROOT\SystemFileAssociations\image\shell\Image Preview\Command”.
- Once you have navigated to this path, find the REG_SZ in the right window pane.
- Open it by double-clicking on it.
- Once you have opened it, now enter this value in the Value data field “%SystemRoot%\System32\rundll32.exe “%ProgramFiles%\Windows Photo Viewer\PhotoViewer.dll”, ImageView_Fullscreen %1”
- Once you are done with it click on the Ok button and exit the registry editor.
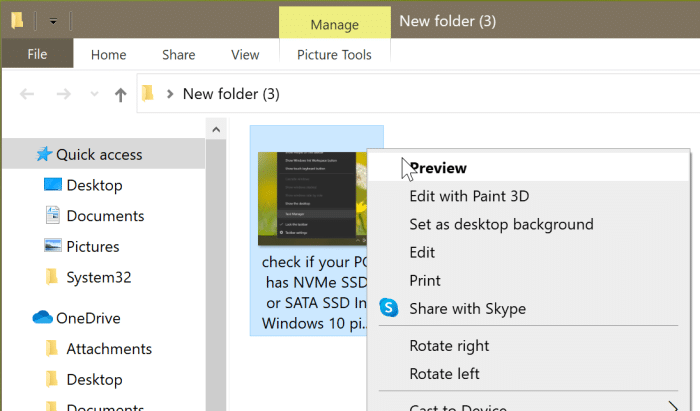
- Now go to This PC and right-click on an image file to find the preview option enabled.
- You can use the option to preview the image without opening it.
Make sure that you follow the instructions correctly as to not mess around with other options in the registry editor. It is a very powerful tool to configure and manage the OS functions and any mistakes and errors while editing can cause trouble for other functions.
Even though this method is efficient, sometimes this method dosent work and you need to use other methods to access the preview mode.
Method 2
In case of the above-mentioned method dosent work well, try this one:
- Open your Windows Explorer/ This PC.
- From the menu bar at the top, go to the View option and enable the Preview Pane, this will let you view your images in a separate pane in Windows Explorer. You can preview many other files with this mode turned on.
Method 3
You can also use this simple trick to preview your image files. This method does not work with all kinds of image files but will serve the purpose. It is a very simple trick and you can use this without having to go on a roller coaster ride of settings up things using complex settings.
- Open up Windows Explorer, from the menu bar at the top, choose the view option.
- Under the view option, you can increase or decrease the size of the icon of the files and folders.
- You need to choose the large icons or extra-large icons option from the menu to increase the size of the icons. When the size of the icons increases, you can preview the images directly through the icons.
Hope the information provided in the article was useful and you were able to enable the preview option in the context menu by using the registry editor tool. If you find the method difficult and want something simple, you can toggle on the preview option in Windows Explorer or increase the size of the icons, which will help you previewing images. The procedures are quite simple but need precise alterations as you are dealing with a powerful tool built-into the Windows OS.