The touchpad is a great way for you to be able to operate your cursor without the assistance of a mouse. There are many people who feel comfortable using a mouse. They get a mouse with a wire and attach it to their laptop so that they are able to operate the way that they want to. However, not everyone may be comfortable using a mouse. They may think that it is hard to constantly switch from the mouse to keyboard and back. If they use a touchpad, they will never have to lift their hands from the keyboard and be able to complete all of their work with greater ease.
At the same time, there may be people who may feel that using the touchpad can be infuriating as they may accidentally brush their fingers on it or place their hands on it unintentionally, leading to the cursor moving places that they don’t want to. In order to avoid this from happening, the touchpad can be disabled.
Please read our guide below to learn how to disable your laptop’s touchpad on Windows 10.
Recommended Post:- Fixed: Windows Update Service Not Running on Windows 10/8/7
Steps that have to be followed in order to disable your laptop touchpad on Windows 10
If you are interested in disabling your laptop touchpad on Windows 10, please follow the steps that are given here:
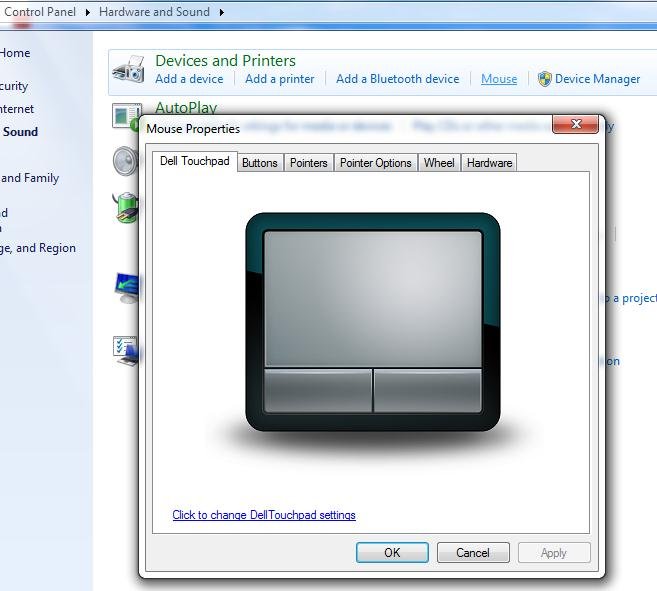
- The first thing that you can do is check if there is some sort of button present near the top of your touchpad. Using this button will allow you to disable and enable your touchpad however you want to.
- There are also certain function keys that you can press so that the touchpad can be enabled and disabled. There will usually be some sort of icon that is on the function key that will help you realise which one you have to press.
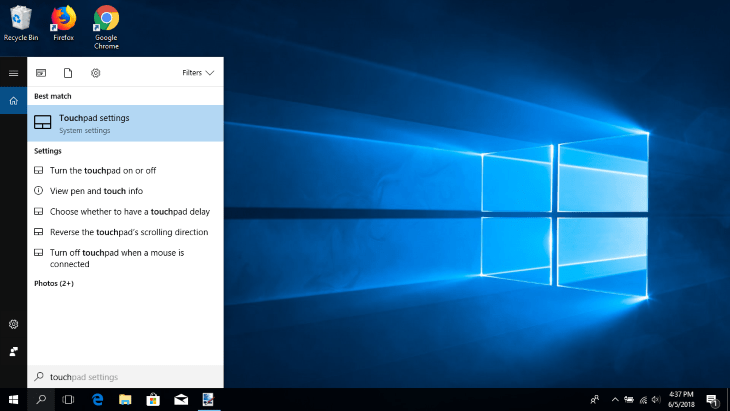
- If that method did not work, you can follow one of the methods given here. You can use your mouse and keyboard in order to disable it. First, press the Windows key, type the word touchpad, and then hit the Enter key.
- You can also press a combination of Win and I in order to open Settings. Once you do that, select Devices followed by Touchpad.
- There will be a window called Touchpad Settings where you can turn the toggle switch to Off for your touchpad.
- After your touchpad has been disabled, you can make use of an external mouse to do all the navigating that you need to do in Windows. You will also be able to use your keyboard to do all of the navigation that you want to do in Windows.
- You can also disable your touchpad with the aid of only your keyboard. You have to first hit the Windows key, type the word touchpad, and then press the Enter key.
- You can also do something else- press a combination of Win and I in order to open Settings. Then, make use of your Tab, arrow, and Enter keys in order to select Devices. Select Touchpad after this.
- You will then have to hit the Tab key and keep pressing it until the toggle switch for your Touchpad gets selected.
- The Spacebar can then be hit so that the toggle switch is changed to the Off position.
- Now that you have learned how to disable the touchpad, you may be interested in learning how to enable it as well. The following method can be employed.
- In this method, you will have to use both your keyboard as well as mouse. First, hit the Windows key. Then, type the word touchpad and hit the Enter key. You can also press a combination of Win and I so that Settings can be opened. Then, select Devices followed by Touchpad.
- When you see the windows for Touchpad settings, use the toggle switch and change to On.
- You can do the same thing by just using the keyboard without the mouse. Hit the Windows key, type the word touchpad, and then hit the Enter key. You can also just hit a combination of Win and I in order to get Settings opened. Then, make use of the Tab, arrow, and Enter keys so that Device gets chosen. After that, select Touchpad.
- Once the window for Touchpad settings appears in front of you, hit the Tab key and press it until the toggle switch for your touchpad gets selected.
- You will then have to make use of your Spacebar to get the toggle switch to change to On.
We hope that the article helped you understand what has to be done when you have to disable or enable your laptop touchpad on Windows 10. The touchpad is an extremely useful feature that has helped many people manage their cursor in an effective way. At the same time, it has also caused problems for many people who have found it to be bothersome. No matter what side of the aisle you are on, we hope that we can all agree that we can choose to do what we want.
If you want to enable your touchpad, please go ahead. If you think that disabling it is easier, please do that. Ensure that you find what is most comfortable for you and follow one of the methods that have been listed above to do what you need to for your touchpad. Please know that you can try another method if the one that you try at first does not seem to work. If you know of anyone that has problems with their touchpad and doesn’t know how to operate it, please share whatever information you know with them.
You will be happy knowing that you contributed to making someone else’s life a little easier. If you are interested in discussing the thoughts that you had after or while reading the article, please feel free to do so in the comments section below. We are welcome to hear whatever thoughts you may be interested in sharing.